Configure a Microsoft CA
To configure a Microsoft Certificate Authority (Microsoft CA), you must complete procedures on two different machines.
Microsoft CA—The Microsoft CA is located on a Domain Computer or Domain Controller. For additional details on Microsoft certificate authorities see: https://docs.microsoft.com/en-us/windows/win32/seccertenroll/about-certification-authorities.
Note: Identity as a Service supports only Microsoft Enterprise CA.
Microsoft CA Proxy Server—The interfacing component that communicates to the Microsoft CA. This component must be deployed on a domain-joined machine in the same domain as the Microsoft CA.
If you are publishing certificates to Active Directory, the subject dn of your generated certificates must correctly identify the associated user in Active Directory. If you are using AD Sync to sync users to Identity as a Service, the certificate subject DN is automatically set with the user's DN. See Configure a DN attribute for Microsoft CA for more information.
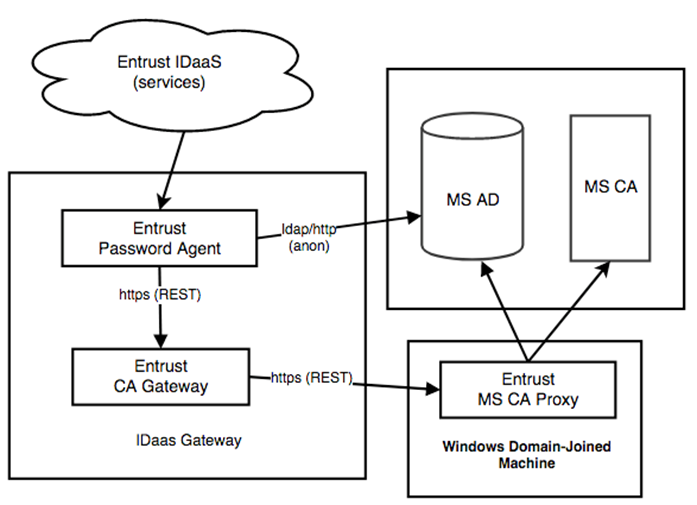
Overview
The use of a Microsoft CA with Identity as a Service involves the following components and interactions:
Prerequisites
Before you begin, you need a machine that will host the Microsoft Certification Authority Proxy with the following:
Windows Server 2016 (x64) and above
Java 11 version or later of Oracle Java, OpenJDK, or AdoptOpenJDK. To check the Java installation, run java -version
Install the Microsoft CA Proxy on the Microsoft CA Proxy Server.
The domain user account is used by the MSCA Proxy to access MSCA.
The CA configuration gives permissions to the domain user account to issue and manage certificates and request certificates.
All templates used by IDaaS allow the domain user to read and enroll certificates.
Permissions against authenticated users are reduced or restricted.
Permissions against all other users and roles are managed by the CA operator.
Create a domain user account
You need to create a domain user using Active Directory Users and Computers (ADUC) on the domain controller.
When you create the domain user, the user has a domain user membership. Add the cert publisher membership to this domain user. You can give the domain user any name. Set the password and expiry rules as required by your policy.
Create a domain user account.
Set the Certificate Authority permissionsSet the Certificate Authority permissions.
On the Microsoft CA machine, go to Start > Windows Administrative Tools > Certification Authority.
Right-click the Certification Authority and select Properties. The CA Properties dialog box appears.
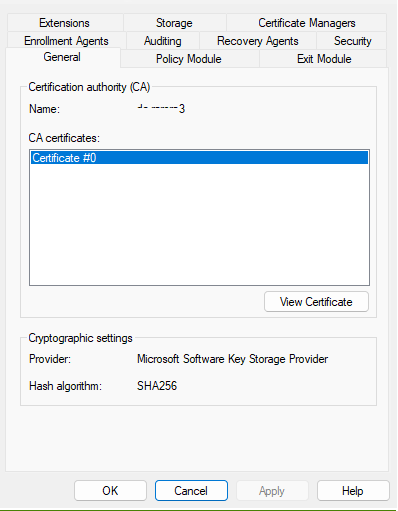
Click the Security tab.
In the Group or user names list, add the new domain user to the list.

Under Permissions for <domain_user>, in the Allow column, ensure that the following permissions are selected:
Read
Issue and Manage Certificates
Request Certificates
Click Apply to save the settings and close the window.
Review the permissions for other users and groups in the list to make sure they follow your corporate access policy.
Upgrade to Microsoft Proxy 2.7.10
Go to the directory where Microsoft CA Proxy 2.5.4 is installed (for example, c:\mscaproxy).
Run the following command as an administrator:
MSCAProxy stop
MSCAProxy uninstall
Rename the Microsoft CA Proxy 2.5.4 directory as follows:
move c:\mscaproxy c:\mscaproxy2.5.4
Note: If you get an error accessing the files, perform a reboot and run the command again to move the files.
Install the Microsoft CA Proxy 2.7.10
Complete the Microsoft CA Proxy 2.7.10 upgrade.
Install the Microsoft CA Proxy 2.7.10
Download the Microsoft CA Proxy server installation file from Identity as a Service:
Click ![]() > Resources > Gateways. The Gateways page appears.
> Resources > Gateways. The Gateways page appears.
Click ![]() Microsoft CA Proxy. The Microsoft CA Proxy Download URL dialog box appears.
Microsoft CA Proxy. The Microsoft CA Proxy Download URL dialog box appears.
In the Microsoft CA Proxy Download URL dialog box, click ![]() Microsoft CA Proxy to download the msca-proxy-install-2.7.10-158.zip file.
Microsoft CA Proxy to download the msca-proxy-install-2.7.10-158.zip file.
Copy the msca-proxy-install-2.7.10-158.zip file to your Microsoft CA Proxy server machine.
Unzip the contents of the compressed file in a local directory of the Windows machine (for example, c:\mscaproxy).
Run the following command as an administrator:
MSCAProxy install /p
Note: The /p option is required in order to be prompted to use a domain user account with the required permissions as mentioned below.
At the username and password prompt, use the domain user with the following permissions on the CA.
Note: When entering the domain user, the value should be of the form domain\username, for example, mydomain\<domain_user>.
Complete the Microsoft CA Proxy 2.7.10 upgrade
Do the following to maintain the existing ssl keys, certificates, and configuration:
xcopy c:\mscaproxy2.5.4\config\* c:\mscaproxy\config /I
xcopy c:\mscaproxy2.5.4\ssl\* c:\mscaproxy\ssl /I
xcopy c:\mscaproxy2.5.4\tmp\* c:\mscaproxy\tmp /I (or xcopy c:\mscaproxy\client\* c:\mscaproxy\client /I)
Update the keystore and truststore passwords. These will be re-encrypted using the latest MSCA Proxy version.
Go to <msca_install>/config and open key-store-password.scrt with a text editor.
Change encrypted=<encrypted-keystorepwd> to decrypted=<keystorepwd> where <decrypted-keystorepwd> is the decrypted password of the JKS keystore used with the Microsoft CA Proxy Server.
Save and close the file.
Go to <msca_install>/config and open trust-store-password.scrt with a text editor.
Change encrypted=<encrypted-truststorepwd> to decrypted=<decrypted-truststorepwd> where <decrypted-truststorepwd> is the decrypted password of the JKS truststore used with the Microsoft CA Proxy Server.
Save and close the file.
As an administrator, run the following command:
MSCAProxy start
Inspect logs to ensure a clean start has occurred.
There are many topics in this section. It is important that you complete the procedures in the following order:
Create a Microsoft CA Enrollment Agent
Create a Microsoft CA Key Recovery Agent
Configure Microsoft CA for PIV certificate templates
Create PIV CS PKCS12 store (PIV PFX)
Configure a Microsoft CA in IDaaS
Edit, test, and refresh a Microsoft CA
Configure a certificate subject DN attribute for Microsoft CA