Configure a Microsoft CA in IDaaS
Before you begin this procedure, ensure that you have completed all the previous steps in this section, Configure a Microsoft CA. This procedure outlines how to configure a Microsoft CA in Identity as a Service. You need to upload the certificate and key files that you created in earlier sections.
You must have an Enterprise Service Gateway 5.5 or later to use a Microsoft CA.
Configure a Microsoft CA
Click ![]() > Resources > Certificate Authorities. The Certificate Authorities page appears.
> Resources > Certificate Authorities. The Certificate Authorities page appears.
Click Issuing Certificate Authority and then select Microsoft CA from the drop-down list.
Configure the Connection Settings. This section contains the information needed to connect the CA with your Identity as a Service account.
Enter a Name for your certificate authority.
In the PKI Host field enter the fully qualified domain name of the computer hosting the PKI.
Enter the Certificate Authority Common Name.
Configure the CA Gateway Settings to connect the Microsoft CA to the Enterprise Service Gateway.
Select the Gateway from the drop-down list. Your Gateway must be 5.5 or later.
Enter the Microsoft CA Proxy Host. This is the server machine hosting the Microsoft CA Proxy.
Enter the Microsoft CA Proxy Port. The default port is 8443.
Click ![]() and navigate to the select the Microsoft CA Proxy Client PFX. This is the client mscaproxyclient.pfx file you created in step 3 of Configure Microsoft CA Proxy.
and navigate to the select the Microsoft CA Proxy Client PFX. This is the client mscaproxyclient.pfx file you created in step 3 of Configure Microsoft CA Proxy.
Enter the Microsoft CA Proxy Client PFX password.
Click ![]() and navigate to the select the Microsoft CA Proxy Server Certificate. This is the mscaproxyserver.cer file you created in step 4 of Configure Microsoft CA Proxy.
and navigate to the select the Microsoft CA Proxy Server Certificate. This is the mscaproxyserver.cer file you created in step 4 of Configure Microsoft CA Proxy.
Configure the PIV Content Signer Settings for the certificate authority. These settings define how the smart credential PIV applet information is signed by the CA.
The default PIV Content Signer Algorithm type is RSA RECOMMENDED NO SHA224. Do not change this setting unless you are sure of the setting you need, and why you need it.
Click ![]() and navigate to the .PFX file of an administrator capable of performing PIV signing operations. This is the piv.pfx file you created in Create PIV CS PKCS12 store (PIV PFX).
and navigate to the .PFX file of an administrator capable of performing PIV signing operations. This is the piv.pfx file you created in Create PIV CS PKCS12 store (PIV PFX).
Enter the PIV PFX Password.
Configure the LDAP Configuration settings, as follows:
In the LDAP Host field, enter the fully qualified host name of the computer hosting the LDAP directory. The LDAP configuration settings contain information required to access certificate-related information, including the certificate revocation list (CRL) through Certificate Distribution Points (CDPs) and Authority Information Access (AIA) endpoints. The CRLs are checked by Identity as a Service to confirm that the certificate being used has not been revoked. Identity as a Service uses the AIA endpoints to obtain necessary intermediate issuing CA certificates.
Note: Changes to the CRL (for example enabling or disabling HTTP or LDAP CRL distribution points) can cause the enrollment and key recovery agents to become invalid and smart credential encoding to fail until you issue a new CRL.
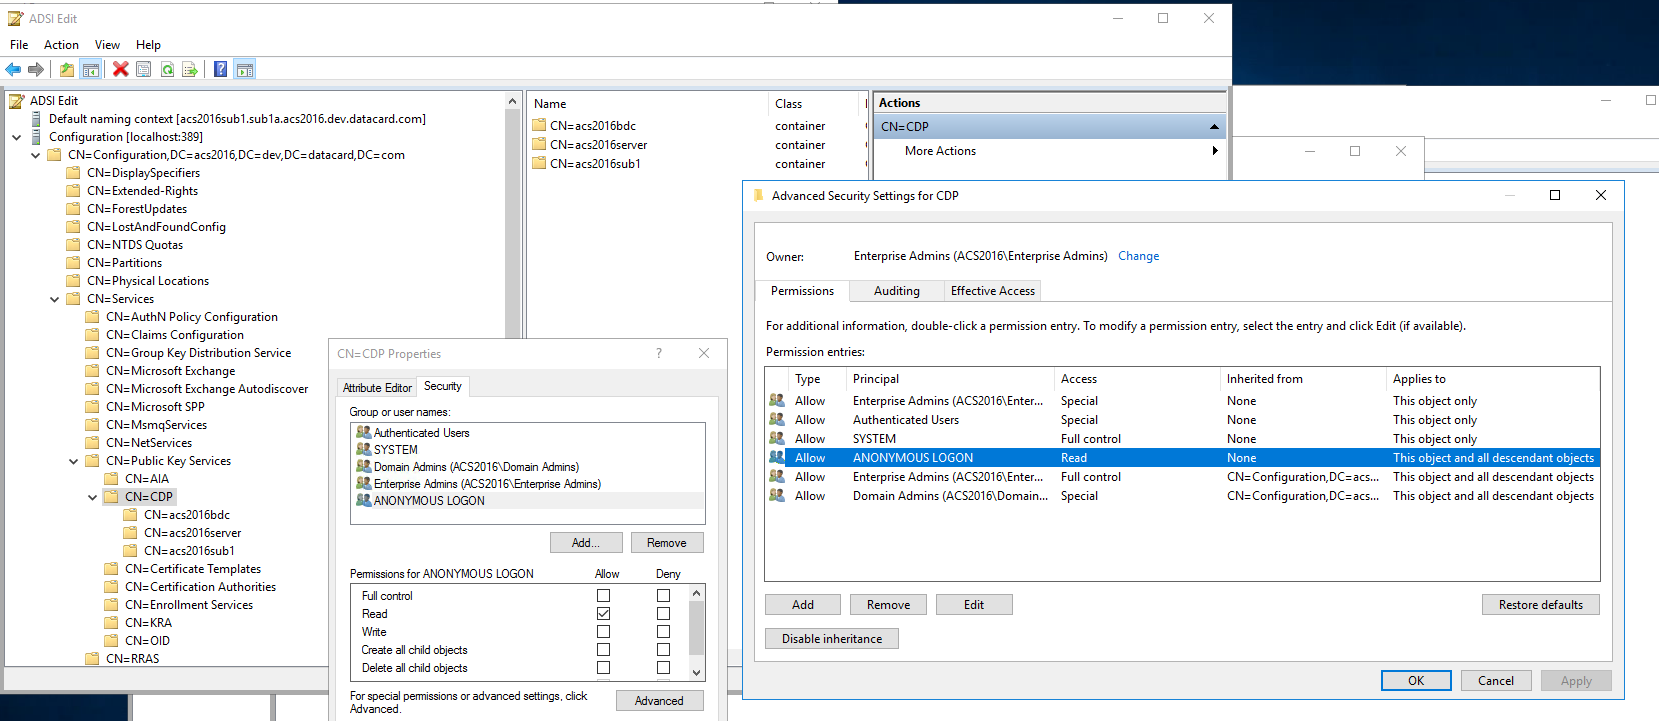
Note: ldap CRLs and AIA data are only supported in an anonymous manner over ldap (non-ssl). In addition to CRL information being present in user certificates, any intermediate CA certificate issuing these certificates must also have this CRL information present in order for the intermediate CA certificates to be validated. The following link provides more information if CRLs are not currently available in this manner: https://social.technet.microsoft.com/wiki/contents/articles/51431.adcs-change-your-default-ldap-based-cdp-and-allow-anonymous-access-to-the-new-cdp.aspx. These updates apply to the CDP and AIA modes. Additionally, read permissions on the CDP node and the AIA node should also be granted to descendant objects. See the following image for an example of how this is done for the CDP node. The same would apply for the AIA node.
In the LDAP Port field, enter the LDAP port number used to connect to the LDAP directory.
Configure the Other Settings as the default settings.
Select Immediately Publish CRL Upon Revocation if you want to publish a new CRL immediately after an operation. If this option is not selected, the CRL publishes every 24 hours.
The Revocation Cache Timeout (min) is the number of minutes Identity as a Service should cache the revocation information of a CA before refreshing the information. The default is 120 minutes.
Select Skip Revocation If CA Not Available to allow Identity as a Service to delete or disable a smart credential if revocation fails. If deselected, the delete or disable operation fails if certificate revocation fails. See Manage Certificate Authorities for more information on revocation.
Select Use as a Trusted CA for Device Verification to use this CA as a trusted CA for device verification.
Click ![]() and navigate to select the Microsoft Enrollment Agent PFX The enrollment agent is required in order to use MS CA certificate templates that publish certificates to Active Directory. This is the enroll.pfx file you created in Create a Microsoft CA Enrollment Agent.
and navigate to select the Microsoft Enrollment Agent PFX The enrollment agent is required in order to use MS CA certificate templates that publish certificates to Active Directory. This is the enroll.pfx file you created in Create a Microsoft CA Enrollment Agent.
Enter the Microsoft Enrollment Agent PFX password.
Click Add to upload a Microsoft Key Recovery Agent. The Microsoft Key Recovery Agent dialog box appears.
Click ![]() and navigate to select the Microsoft Recovery Key Agent. This is the This is the recovery.pfx file you created in Create a Microsoft CA Key Recovery Agent.
and navigate to select the Microsoft Recovery Key Agent. This is the This is the recovery.pfx file you created in Create a Microsoft CA Key Recovery Agent.
Configure the Digital ID Configuration as follows:
Enter the Searchbase of the digital ID configuration. The searchbase is the root domain naming context of your Active Directory.
Click Add. The Add Digital ID Configuration dialog box appears.
From the Configuration Template drop-down list, select the type of configuration template associated with the searchbase listed in your CA.
Note: You may require more than one template depending on how you are using the smart credential.
For smart credential push authentication, you require the following configuration templates. You must add each one individually.
PIV Card (identifies the card)
PIV Cardholder (identifies the user)
PIV Cardholder 1 KP
Click Add. The configuration appears in a list of Digital ID configurations.
Repeat steps b to d to add the remaining configuration templates.
Click Save. The CA appears on the Certificate Authorities page.
Attention: Changes made to the Microsoft CA are propagated to the Enterprise Service Gateway. This might take a few minutes to initialize.