Protecting AWS API Gateway
Please note that this guide applies specifically to the AWS REST API Gateway. If you're using the AWS HTTP API Gateway, you can use the built-in authorizer.
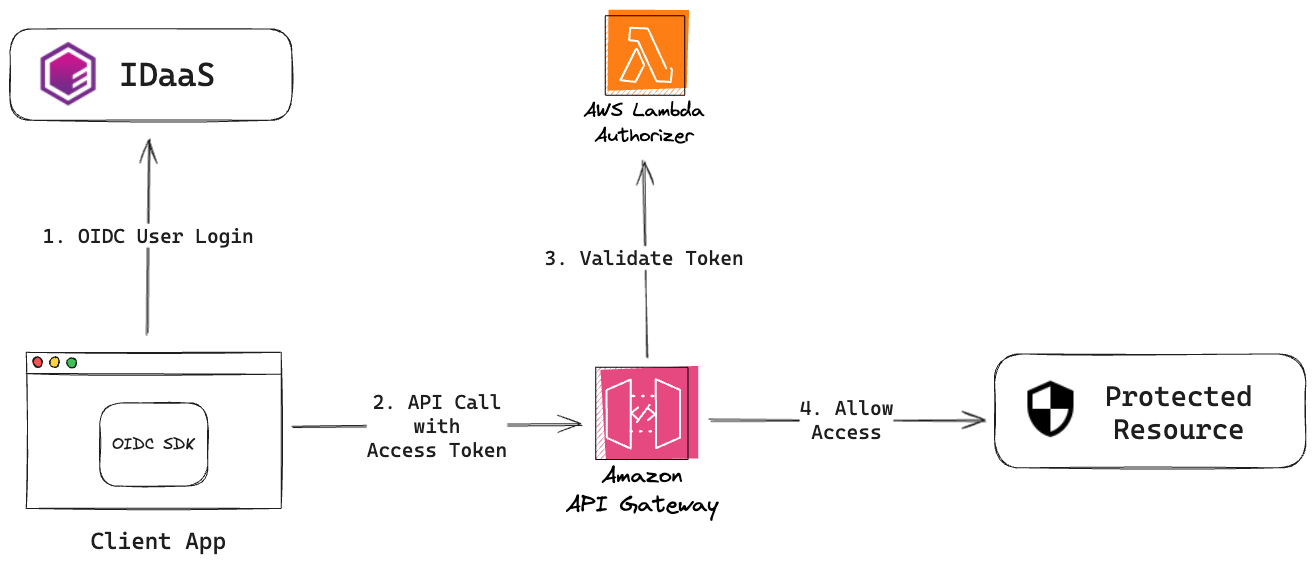
Secure your AWS API Gateway endpoints using a custom Lambda authorizer that accepts OIDC access tokens. To do this, you configure your API with API Gateway, create and configure your AWS Lambda functions (including the custom authorizer) to secure your API endpoints, and implement the authorization flow so that your users can retrieve the access tokens needed to gain access to your API from IDaaS.
To learn more, visit AWS Lambda Overview once you log into your AWS API Gateway.
The API Gateway extends the capabilities of Lambda by adding a service layer in front of your Lambda functions to extend security, manage input and output message transformations, and provide capabilities like throttling and auditing. A serverless approach simplifies your operational demands since concerns like scaling out and fault tolerance are now the responsibility of the compute service that is executing your code.
The custom authorizer will:
- Confirm that the access token has been passed via the authorization header of the request to access the API in the form
Bearer <token>. - Verify the RS256 signature of the Access Token using a public key obtained via a JWKS endpoint.
- Ensure the access token has the required Issuer
issand audienceaudclaims and is not expired.
Quick Start
This assumes that you are familiar with AWS Lambda and API Gateway configuration. If you are not, refer to the detailed guide below.
Steps to protect a resource using AWS REST API Gateway lambda authorizer with IDaaS OIDC:
- Create an OIDC application in IDaaS
- Create a new API/URL in IDaaS to define your protected resource/audience
- Upload this sample custom authorizer to a
new AWS Lambda, and configure the
ISSUER,JWKS_URI, andAUDIENCEenvironment variables:Parameter Value ISSUERThe issuer of the token. If IDaaS is the token issuer, use https://{yourIdaasDomain}/api/oidc.JWKS_URIThe URL of the JWKS endpoint. If IDaaS is the token issuer, use https://{yourIdaasDomain}/api/oidc/jwks.AUDIENCEThe URL of the domain of the endpoint you are trying to secure. E.g. https://{yourApiGateway}. This should be the same address as the API/URL defined in IDaaS (Step 2). - Configure your API Gateway to use the new Lambda as a
Tokenauthorizer using theAuthorizationheader as the source - Configure any endpoints in your API Gateway that need to be protected to use the custom authorizer
How API Gateway custom authorizers work
According to Amazon, an API Gateway custom authorizer is a "Lambda function you provide to control access to your API using bearer token authentication strategies, such as OAuth or SAML."
Whenever someone (or some program) attempts to call your API, API Gateway checks to see if there's a custom authorizer configured for the API.
If there is a custom authorizer for the API, API Gateway calls the custom authorizer and provides the authorization token extracted from the request header received.
You can use the custom authorizer to implement different types of authorization strategies, including JWT verification, to return IAM policies authorizing the request. If the policy returned is invalid or if the permissions are denied, the API call fails.
For a valid policy, API caches the returned policy, associating it with the incoming token and using it for the current and subsequent requests. You can configure the amount of time for which the policy is cached. The default value is 300 seconds and the maximum length of caching is 3600 seconds (you can also set the value to 0 to disable caching).
To read more, visit What is Amazon API Gateway? in the Amazon Developer's Guide.
Prerequisites
You need to sign up for an AWS account. This grants you access to the AWS features, including API Gateway and Lambda. All new members receive twelve months of free tier access to AWS.
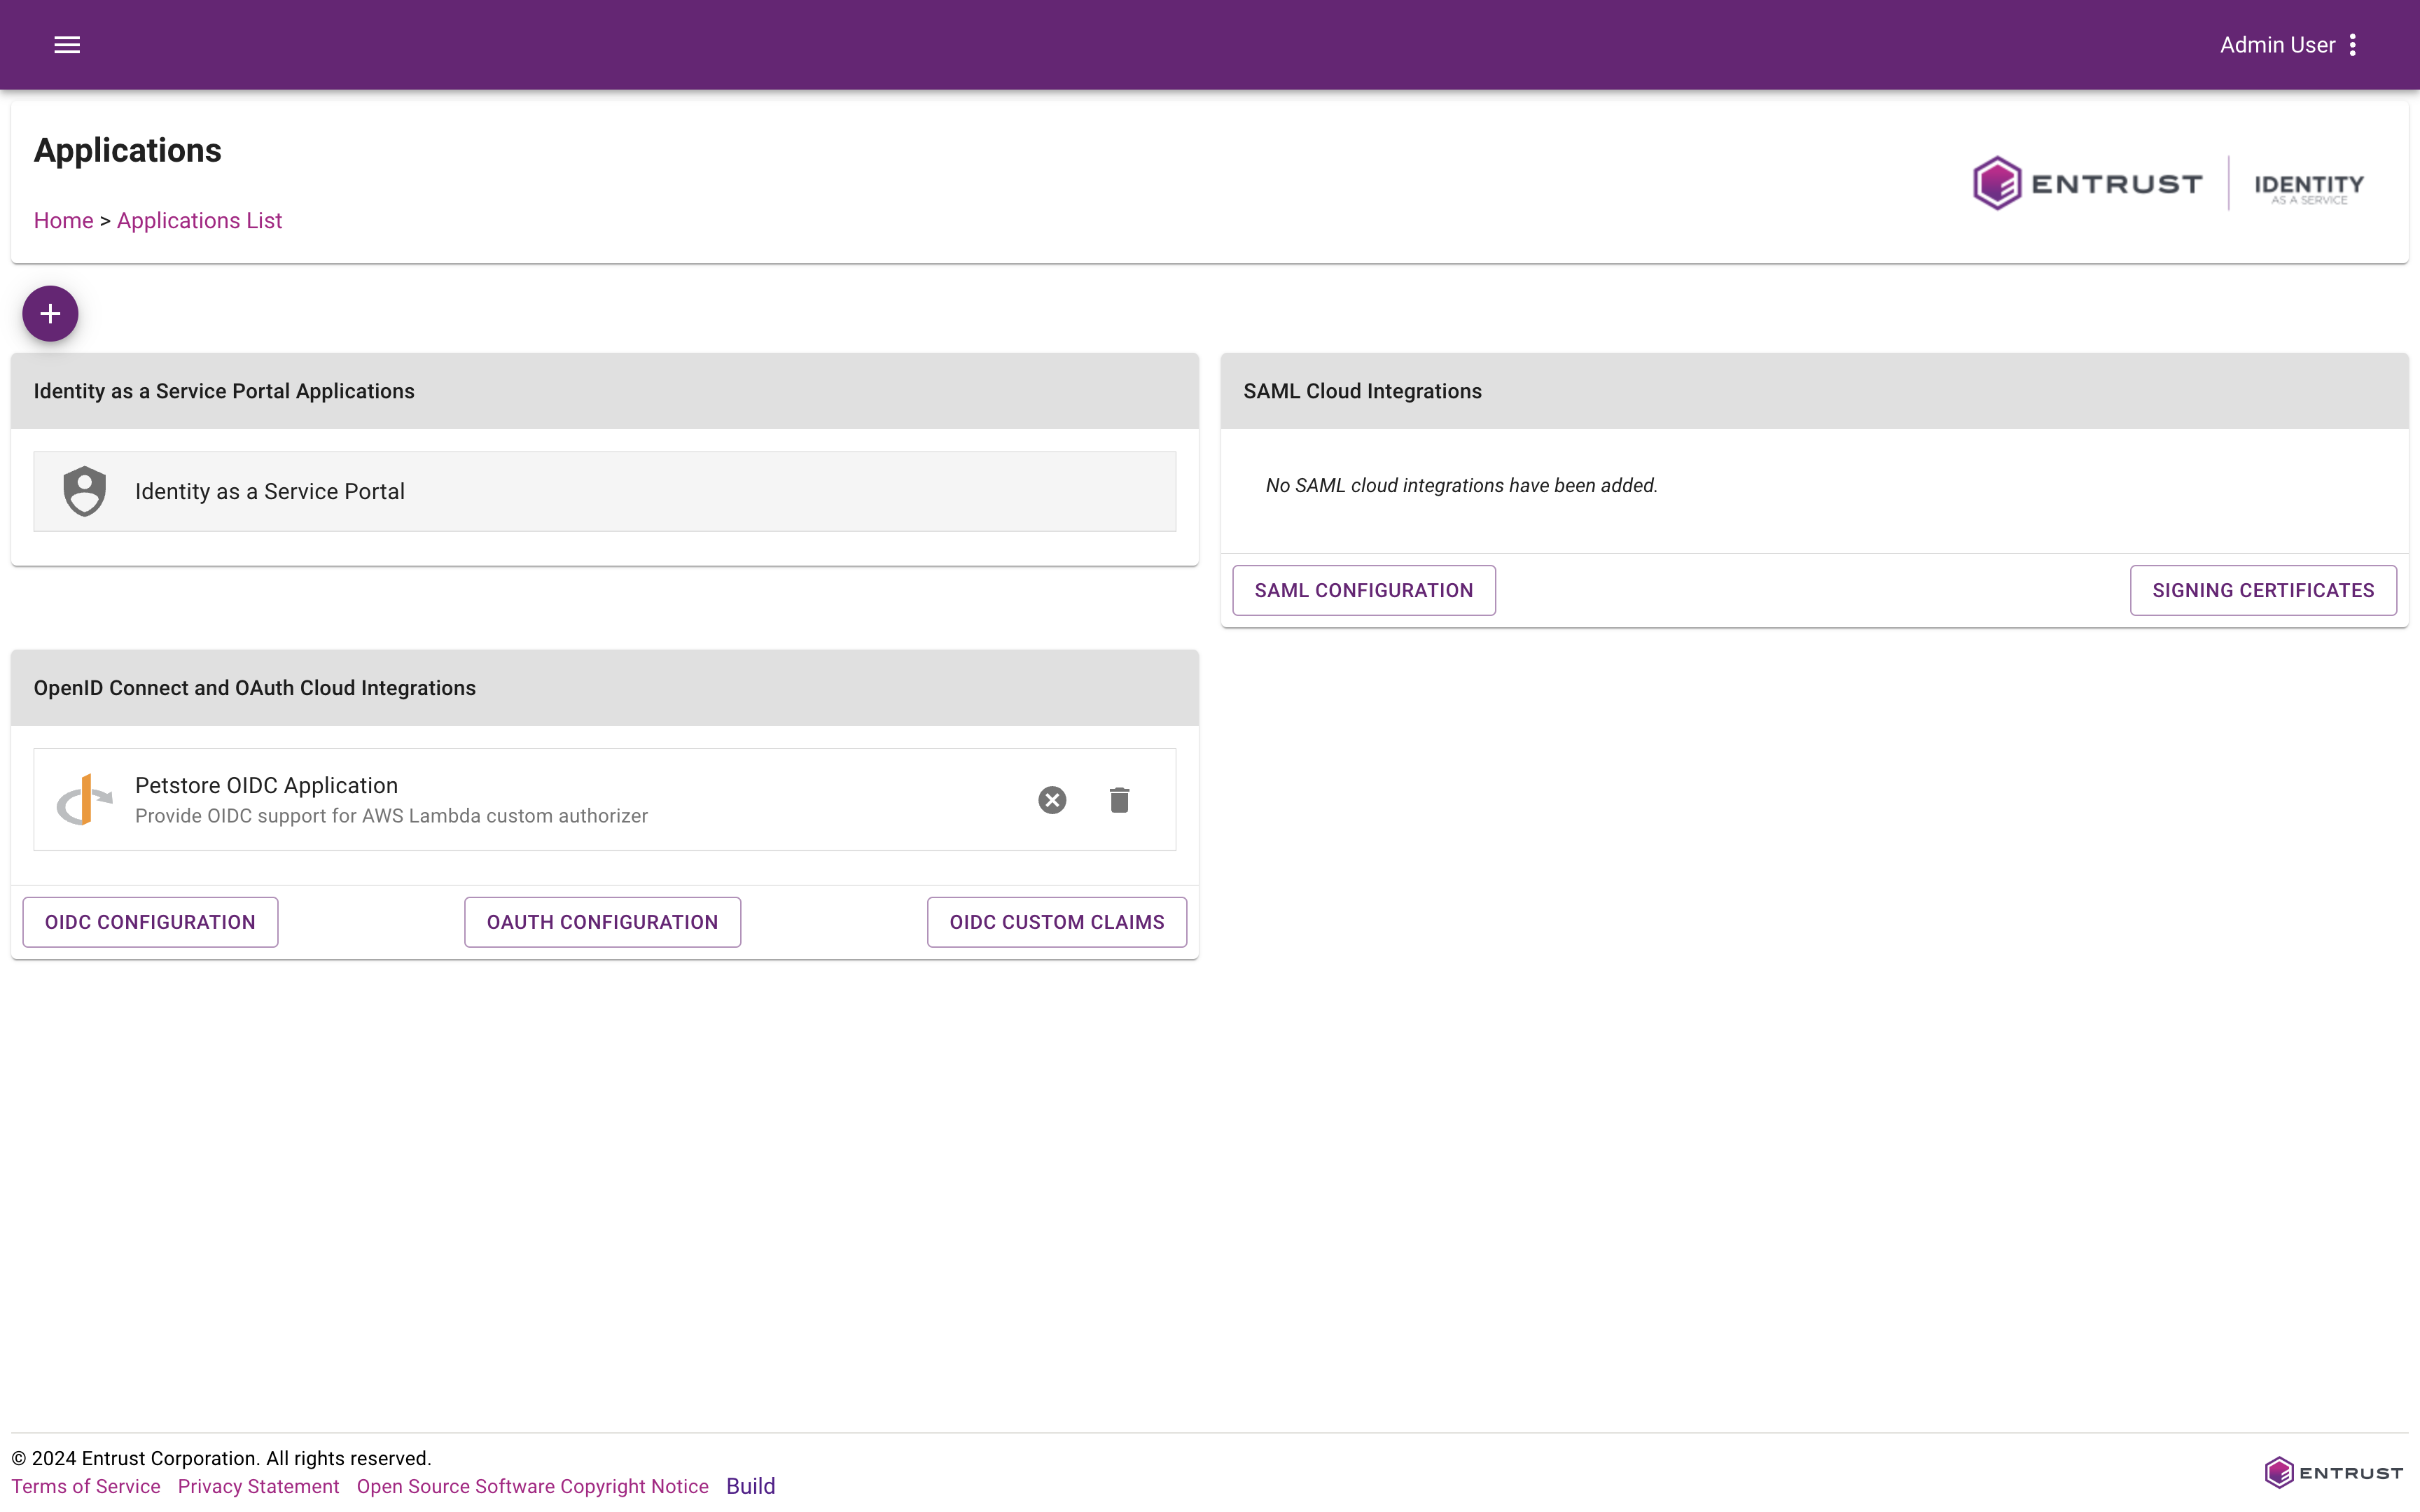
Create and Configure an IDaaS OIDC Application
Set up the OIDC Application
-
Go to IDaaS Dashboard > Applications > + (Add), and select Generic SPA Application.
-
For the General tab, configure the Application Name and Application Description. You'll see these in your list of OIDC applications. You can keep the authorization flow as the default.
-
For the Setup tab, enter values for the following fields, and select Submit:
Field Description Subject ID Attribute A unique identifier for your authenticating user. This is the subject header any issued ID or access token. We recommend adding a custom unique attribute to identify the user without exposing any sensitive user information. Login Redirect URI(s) The URI that the user will return to after completing OIDC login. This must be formatted like a URL https://your-application-address. infoAdditional configuration can be applied, but these are the required fields.
To see the details of your newly-created API, refer to it in the OpenID Connect and OAuth Cloud Integrations card.
Define the protected resource server
Configure the APIs to be consumed by the applications that successfully authorize. This must be done for any audiences that you want to have in your access token.
-
In the menu on the left, go to Security > Authorization
-
Under API/URL, select + to define a new protected resource that your access token will be valid for
-
Configure the following fields:
Field Description Enabled Whether this is an active resource server. Should be set to true.Name A friendly name for this resource when shown in the IDaaS API/URL list. Description A friendly description for this resource when shown in the IDaaS API/URL list. Value The resource that you are trying to protect. This will be the same as the AUDIENCEvalue that you are passing in from the client when authenticating.Supported OIDC/OAuth Applications The OIDC applications generating the access tokens to access this resource. Select the OIDC application that you have just configured. Refresh Token Whether to allow refresh token requests (the offline_accessscope). Recommended to enable.infoAdditional configuration can be applied, but these are the required fields.
Import and deploy the AWS API Gateway API
This portion of the tutorial has been adapted from the official AWS example. Please refer to this example for in-depth notes and discussion.
In this step, you will:
- Import an API into API Gateway
- Test an API import
- Deploy an API for use with any front-end applications
- Test an API deployment
Import and configure the Pets API
-
Log in to your AWS account, and using the Services drop-down located in the top navigation bar, go to the API Gateway Console.
-
If you've previously created an API, simply navigate to the API Gateway Console and click Create API. You'll be given the option to create the Example API on the Create new API form. If you've never created an API using API Gateway, click Get Started with API Gateway to proceed.
You'll see a pop-up message welcoming you to API Gateway. Click OK to proceed.
-
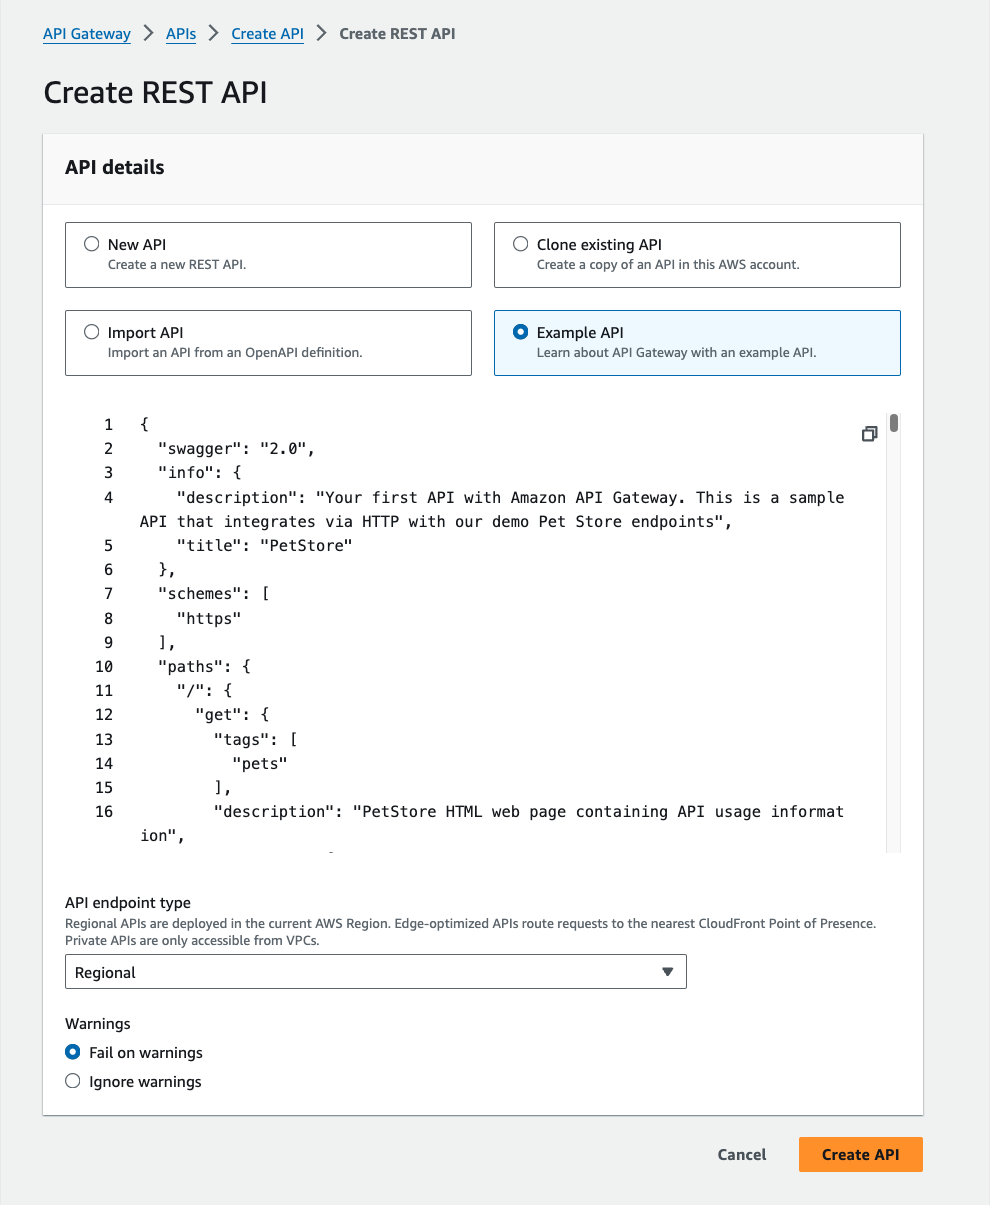
Select the Create API button in the top right. You will be prompted to select an API type. Select Build under REST API. See the difference between the REST API and HTTP API types here.
-
On the Create REST API form, select the Example API. We'll use this API for the rest of our tutorial, so begin the API creation process by clicking Create API.
When done, AWS displays a message indicating that your API created and populated with the provided data. Notice the API already has methods associated with it (namely,
GETandPOST). You can view the details of a method, modify its configuration, or test the method invocation by clicking the method name from the resource tree.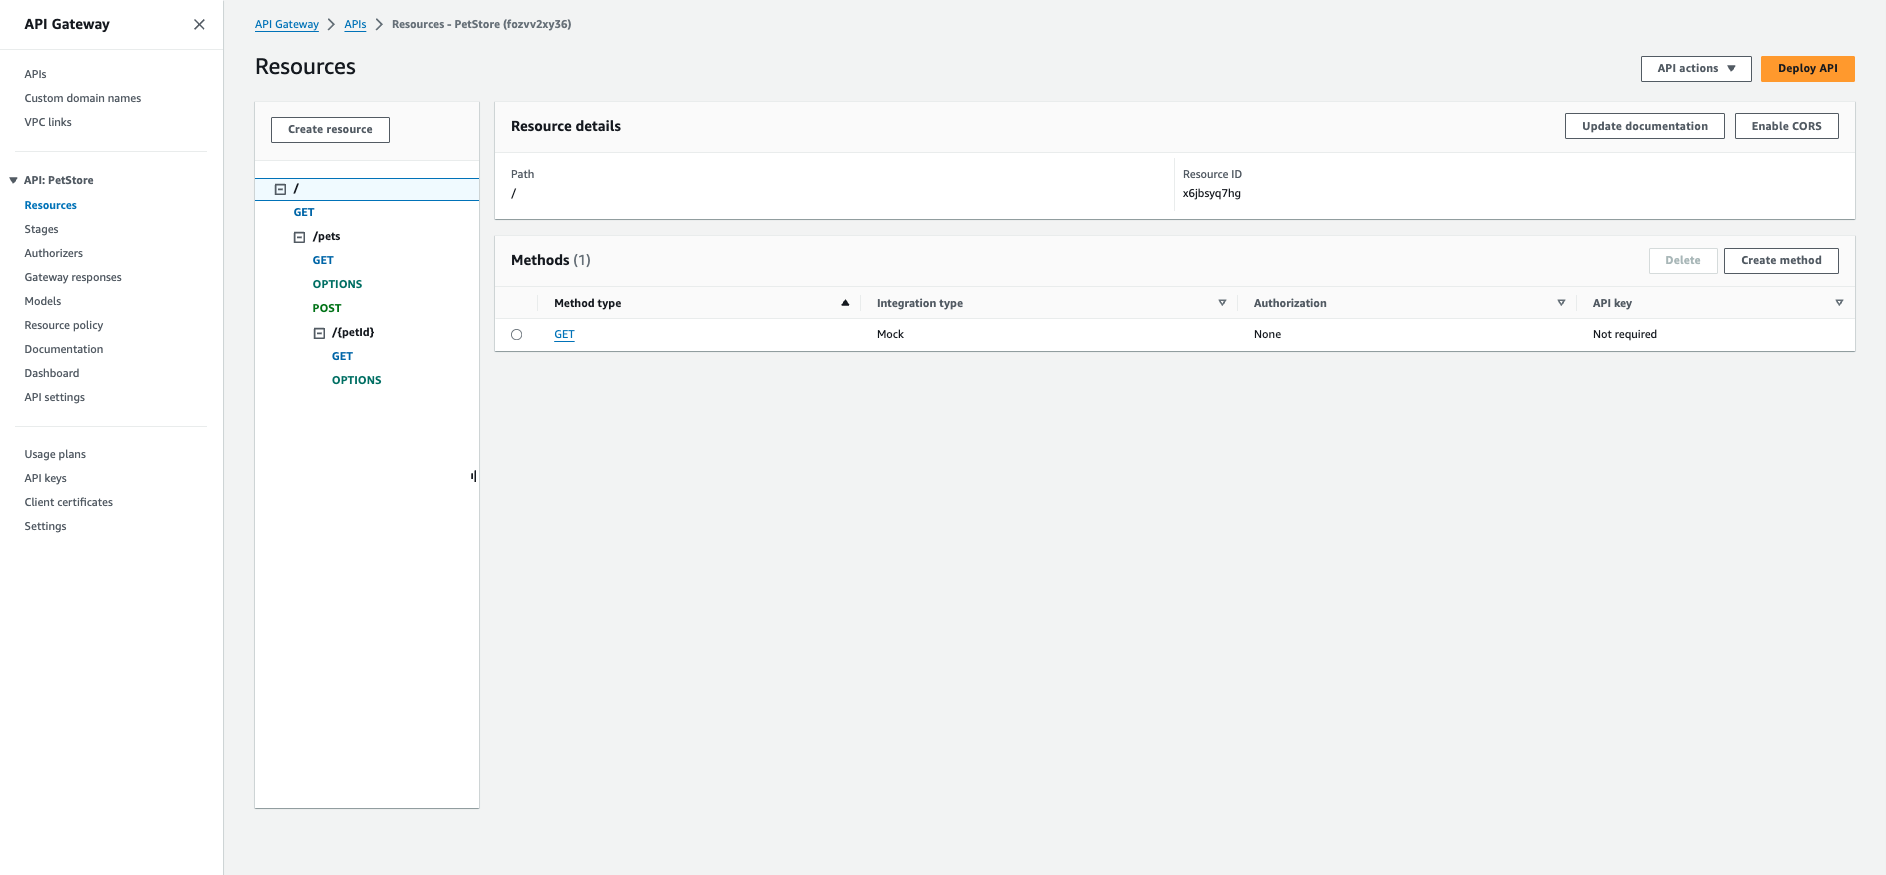
Test your API
To test your API, click POST under /pets. This brings up the Method Execution window that provides an overview
of the POST method's structure and behaviors:
- Method Request and Method Response: the API's interface with the front-end
- Integration Request and Integration Response: the API's interface with the back-end
- Test: send test requests to your API
We can use this area to test the API.
-
Click Test (shown on the Client sliver located in the middle of the page). You'll be redirected to the
/pets POSTtest form. Scroll to the bottom of the page, and provide the following snippet as the Request Body:{
"type": "dog",
"price": 249.99
}The request body indicates the attributes of the pet we want to add to the database, as well as the cost for the pet.
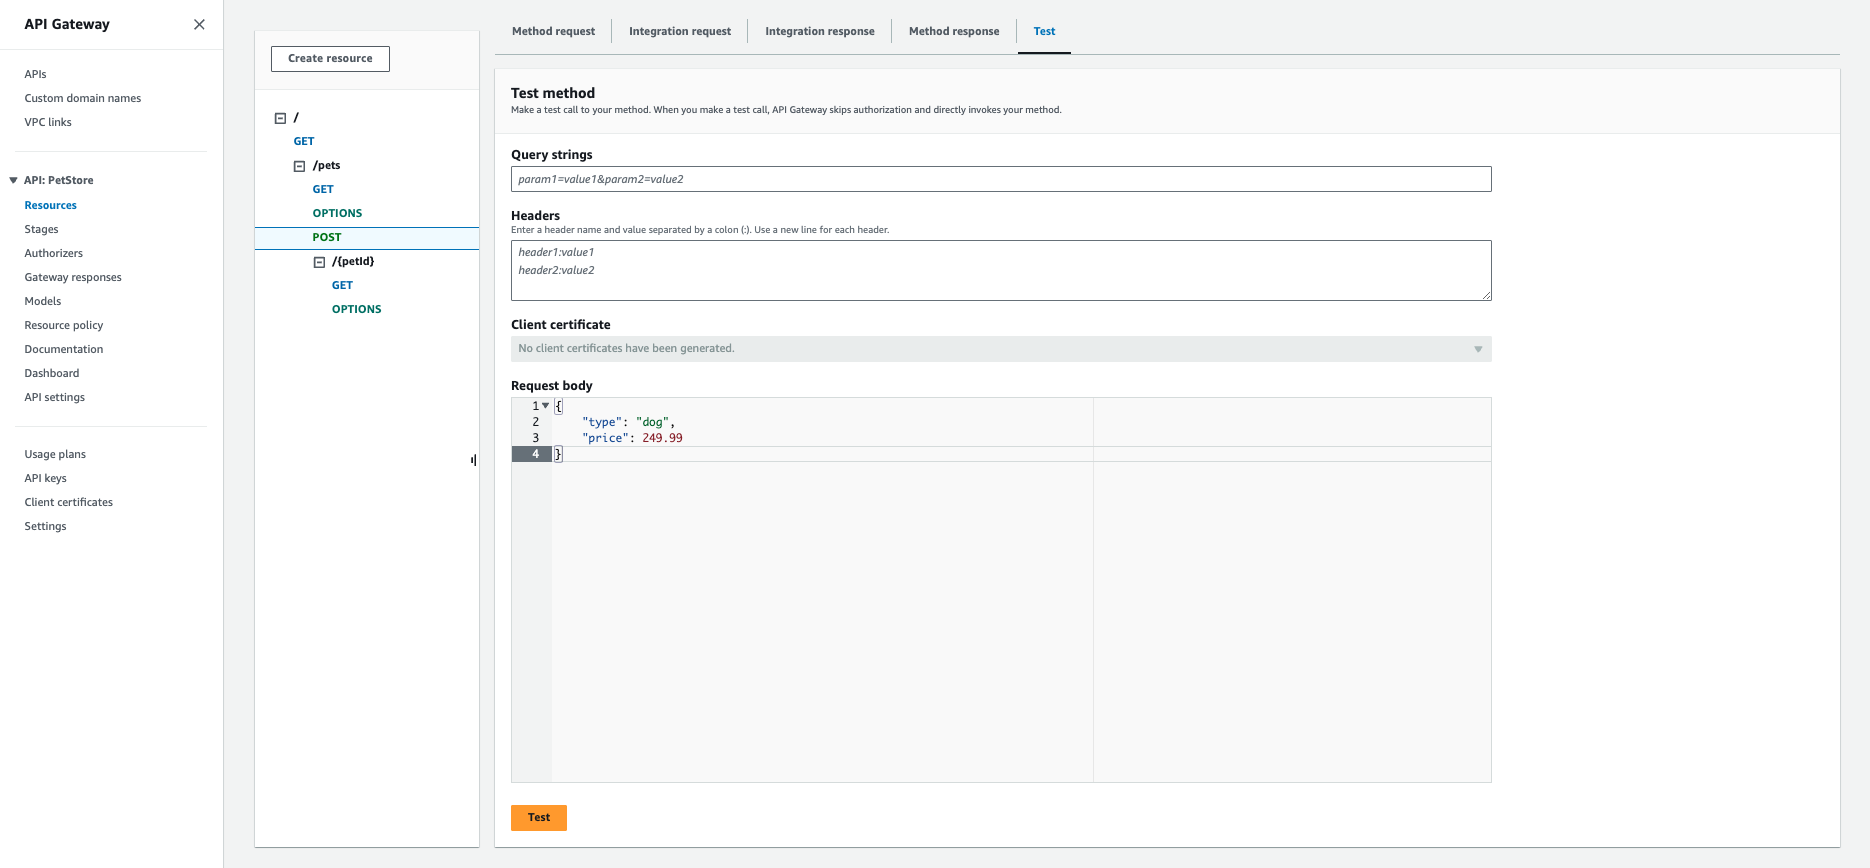
-
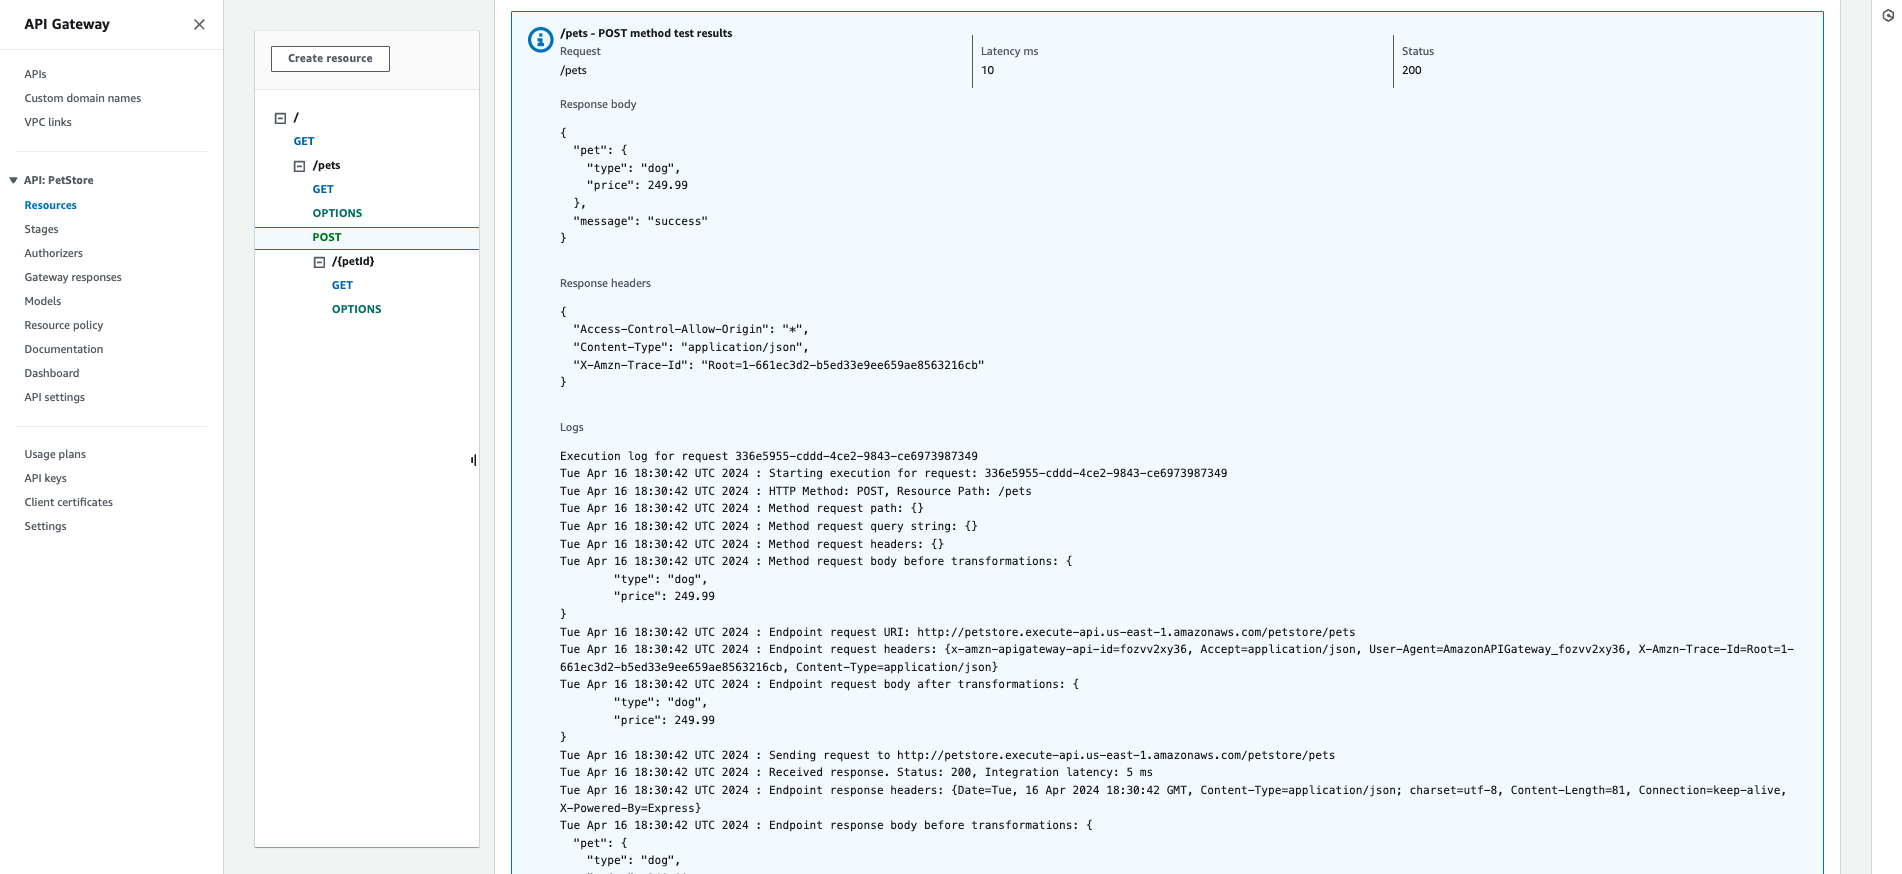
Click Test to proceed. You'll see the results of the test at the bottom of the page.
Deploy the API
The test we just completed was done using the API Gateway console. To use the API with a different application, you'll need to deploy the API to a stage.
- At the top right of the screen, select Deploy API.
- Provide the following values, and click Deploy:
Parameter Value Stage Choose [New Stage] Stage name Provide a name for your stage Deployment description Provide a description for your API deployment
Test the deployment
When the API has successfully deployed, you'll be redirected to the Stage Overview. You can, at this point, test the API to see if it deployed correctly.
-
In the middle of the window is your Invoke URL. This is the URL used to invoke the
GETendpoint of your API. Copy the link into a new tab to submit theGET /method request in a browser. This should result in the following success response: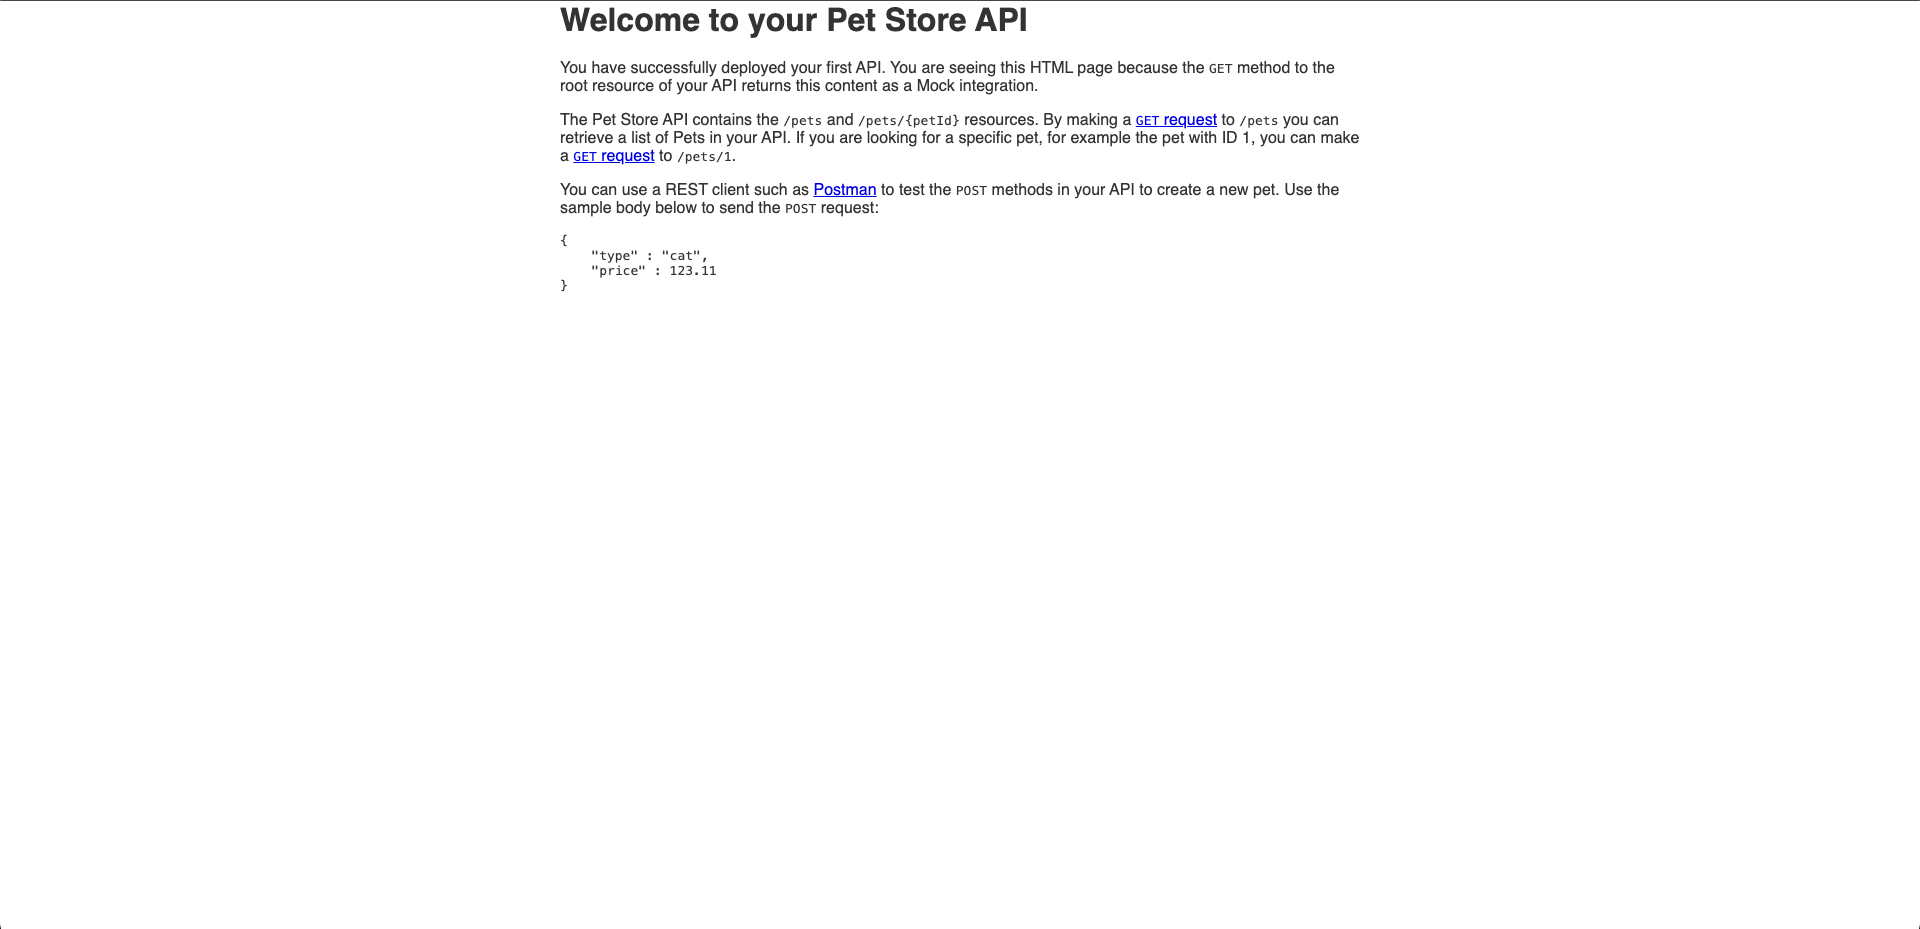
-
In the Stages page, expand the tree under the stage you created. Click GET under
/pets/{petId}.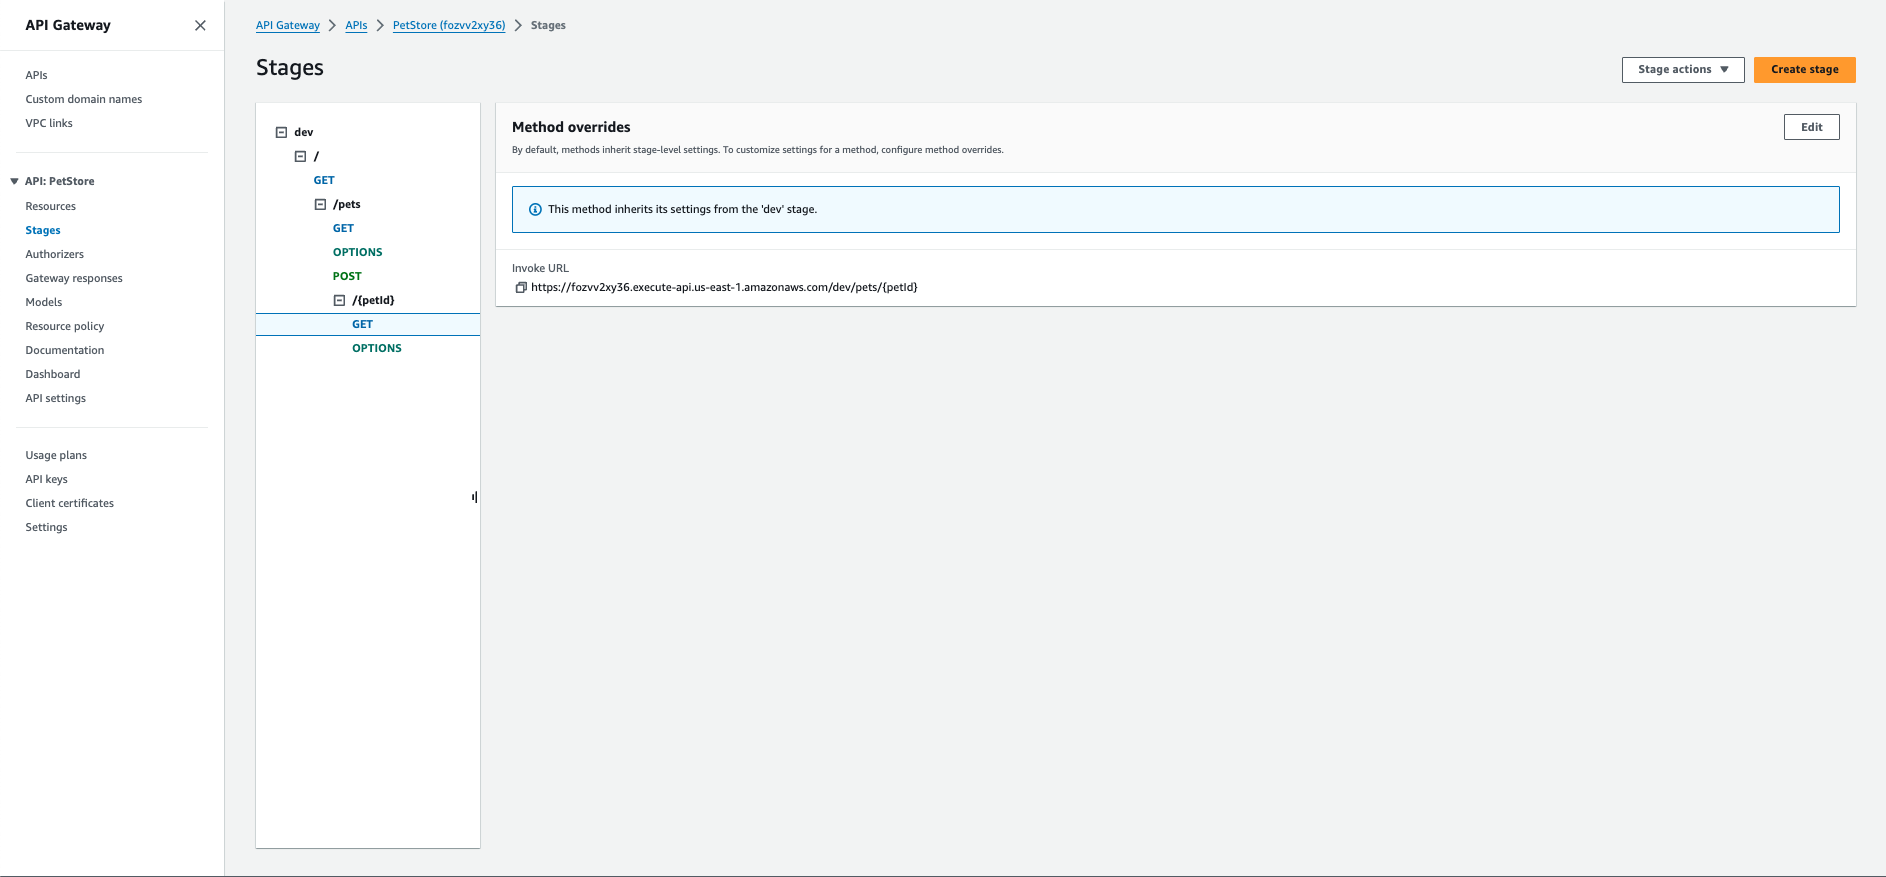
-
You'll see an Invoke URL displayed in the middle of the screen. The final portion,
{petID}, stands for a path variable. Replace this variable with1, and navigate to the new URL using your browser. You should receive an HTTP 200 response with the following JSON payload:{
"id": 1,
"type": "dog",
"price": 249.99
}
Create the custom authorizers
Now that we have a fully functional API that's managed by API Gateway, secure this API so only those with the appropriate authorization may access the back-end behind the API.
Use API Gateway's custom request authorizers to authorize your APIs using bearer token authorization strategies, such as OAuth 2.0 or SAML. For each incoming request, the following happens:
- API Gateway checks for a properly-configured custom authorizer.
- API Gateway calls the custom authorizer (which is a Lambda function) with the authorization token.
- If the authorization token is valid, the custom authorizer returns the appropriate AWS Identity and Access Management (IAM) policies.
- API Gateway uses the policies returned in step 3 to authorize the request.
Prepare the custom authorizer
You can download a sample custom authorizer that supports IDaaS OIDC tokens. Afterward, you'll need to customize the files so that the custom authorizer works for your environment.
-
Unzip the folder containing the sample files you downloaded above to the location of your choice, and navigate to the folder using the command line.
-
Within the sample folder, run
bun installto install the Node.js packages required for deployment; AWS requires that these files be included in the bundle you will upload to AWS during a later step. -
Configure your local environment with a
.envfile. You can copy the.sample-envfile (while simultaneously renaming it.env) usingcp .sample-env .env. Make the following changes:Parameter Value ISSUERThe issuer of the token. If IDaaS is the token issuer, use https://{yourIdaasDomain}/api/oidc.JWKS_URIThe URL of the JWKS endpoint. If IDaaS is the token issuer, use https://{yourIdaasDomain}/api/oidc/jwks.AUDIENCEThe URL of the domain of the endpoint you are trying to secure. E.g. https://{yourApiGateway}.As an example, the text of your .env file should look something like this when complete:
JWKS_URI=https://{yourIdaasDomain}/api/oidc/jwks
AUDIENCE=https://{yourApiGateway}
ISSUER=https://{yourIdaasDomain}/api/oidc
Test the custom authorizer locally
Obtain a valid JWT access token from IDaaS for the relevant audience. There are multiple ways you can get one and the method you choose depends on your application's type, trust level, or overall end-user experience.
Create a local event.json file containing the token. You can copy the sample file (run cp sample-event.json event.json).
Add your JWT token to authorizationToken. You can also replace methodArn with a method ARN of your API that you intend
to protect (optional for local tests).
To get the methodArn:
- Using the API Gateway Console, open the PetStore API.
- In the middle Resources panel, expand the resource tree. Underneath
/pets, select GET. - In the Method Execution box, you'll see the ARN.
- Run the test using
bun run test.
The test uses the lambda-local package to test the custom authorizer using your token. If the test was successful, you'll see output similar to the following:
info: START RequestId: 3df095ef-8876-c996-919f-cca592e01a62
info: End - Result:
info: {
        "principalId": "userId",
        "policyDocument": {
                "Version": "2012-10-17",
                "Statement": [
                        {
                                "Action": "execute-api:Invoke",
                                "Effect": "Allow",
                                "Resource": "arn:aws:execute-api:us-east-1:1234567890:apiId/stage/method/resourcePath"
                        }
                ]
        }
}
info: Lambda successfully executed in 316ms.
If the value of Effect is Allow, your authorizer would've allowed the call to API Gateway.
To learn more, visit Lambda-local at NPM.
Create the Lambda function and deploy the custom authorizer
Now that you've configured your custom authorizer for your environment and tested it to see it works, deploy it to AWS.
-
Create a bundle that you can upload to AWS by running
bun run bundle. This generates atoken-authorizer.zipbundle containing the source, configuration, and node modules required by AWS Lambda. -
Navigate to the Lambda console, and click Create function.
-
The default should be Author from scratch to create a blank function. Under Basic information, provide values for the following parameters:
Parameter Value Function Name A name for your Lambda function, such as jwtCustomAuthorizerRuntime Select Node.js 20.x -
Click Create Function to continue.
-
On the Code page of your function, select the Upload From dropdown menu and select .zip file.
-
Click Upload and select the
token-authorizer.zipbundle you created earlier. -
Then creat the following three Environment variables. Note that this information is identical to the contents of
.envfile:Parameter Value ISSUERThe issuer of the token. If IDaaS is the token issuer, use https://{yourIdaasDomain}/api/oidc.JWKS_URIThe URL of the JWKS endpoint. If IDaaS is the token issuer, use https://{yourIdaasDomain}/api/oidc/jwks.AUDIENCEThe URL of the domain of the endpoint you are trying to secure. E.g. https://{yourApiGateway}. -
To test the Lambda function you just created, click the Test tab.
-
Copy the contents of your
event.jsonfile into the Event JSON form. You can use the default "Hello World" event template. The methodArn must be set to a valid method ARN in your gateway. -
Click Save.
-
Run your test by selecting it and clicking Test. If the test was successful, you'll see: "Execution result: succeeded". Expanding the output window should show a message similar to the one you received after your successful local test.
Configure API Gateway custom authorizer
-
Return to API Gateway Console and open the PetStore API we created earlier.
-
Using the left-hand navigation, open Authorizers and select Create an Authorizer, then set the following parameters, and click Create authorizer.
Parameter Value Authorizer Name jwt-custom-authorizerType Select Lambda Lambda Function jwtRsaCustomAuthorizer Lambda Event Payload Select Token Token Source AuthorizationToken Validation ^Bearer [-0-9a-zA-z\.]*$TTL (seconds) 3600 -
After AWS creates the authorizer and the page refreshes, test your authorizer by clicking Test and providing the Access token (
Bearer ey...) you previously used. If the test was successful, you'll see a response similar to the following.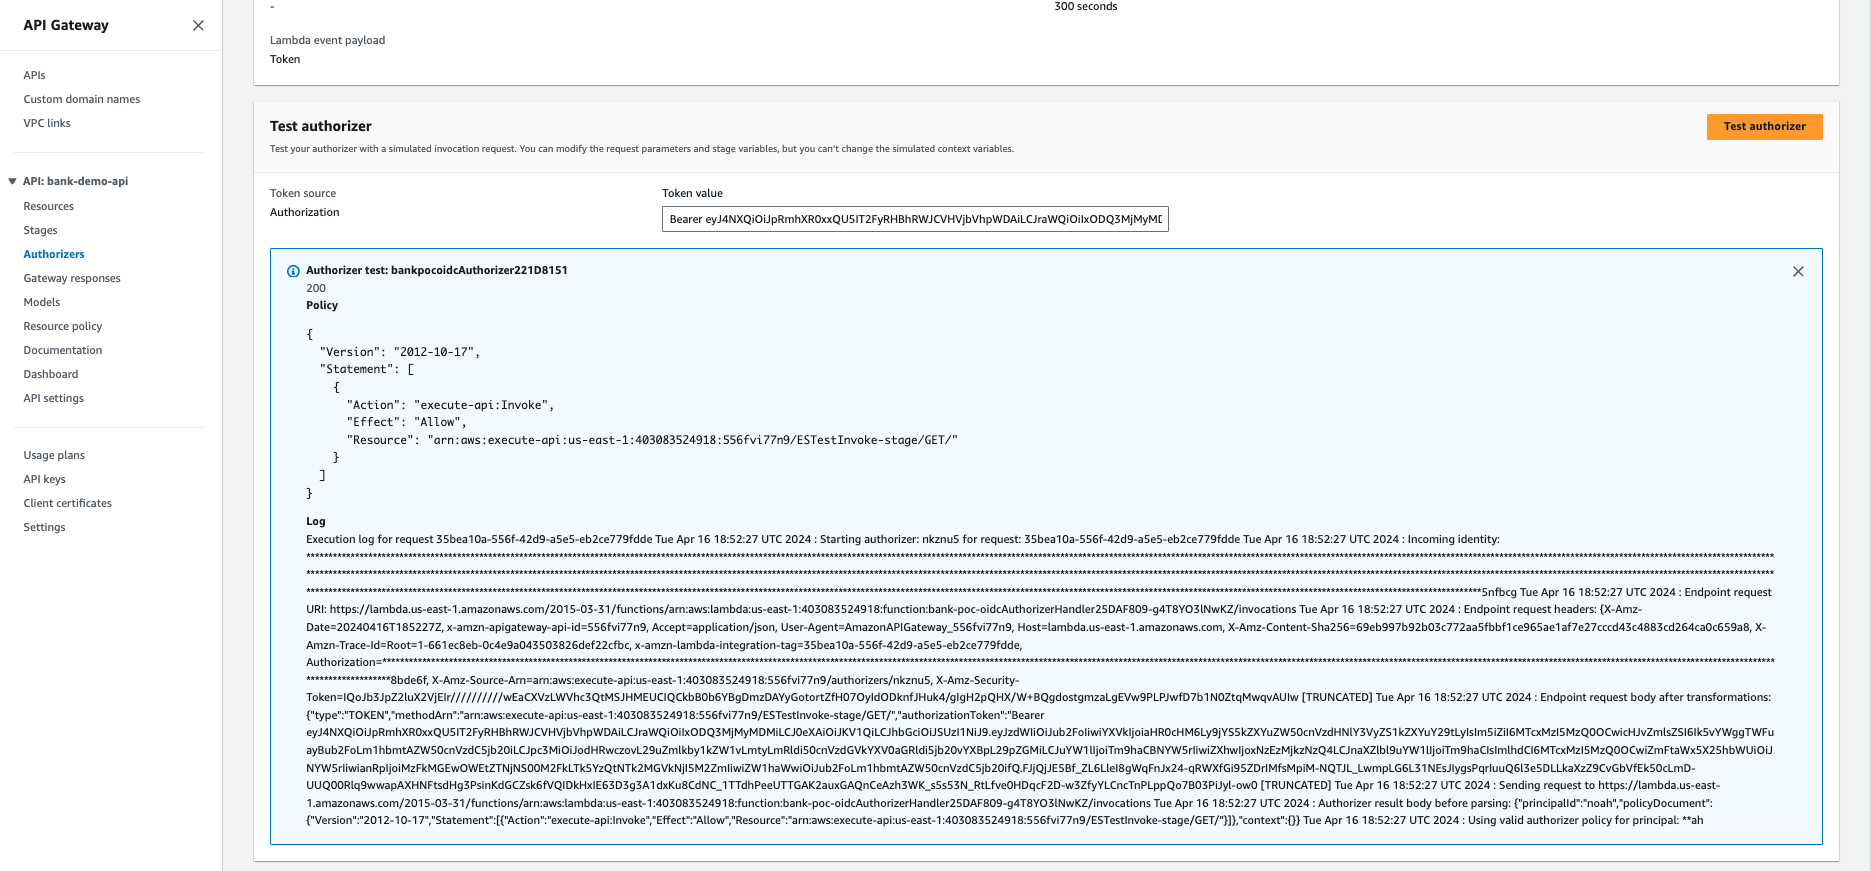
Secure the API using custom authorizers
To learn how to secure your API's endpoints, see the Amazon API Gateway developer guide article: Use API Gateway Lambda Authorizers.
Configure API Gateway resources to use the custom authorizer
-
Log in to AWS, and navigate to the API Gateway Console. Custom authorizers are set on a method by method basis; if you want to secure multiple methods using a single authorizer, you'll need to repeat the following instructions for each method.
-
Open the PetStore API we created in step 2 of this tutorial. Under the Resource tree in the center pane, select the GET method under the
/petsresource: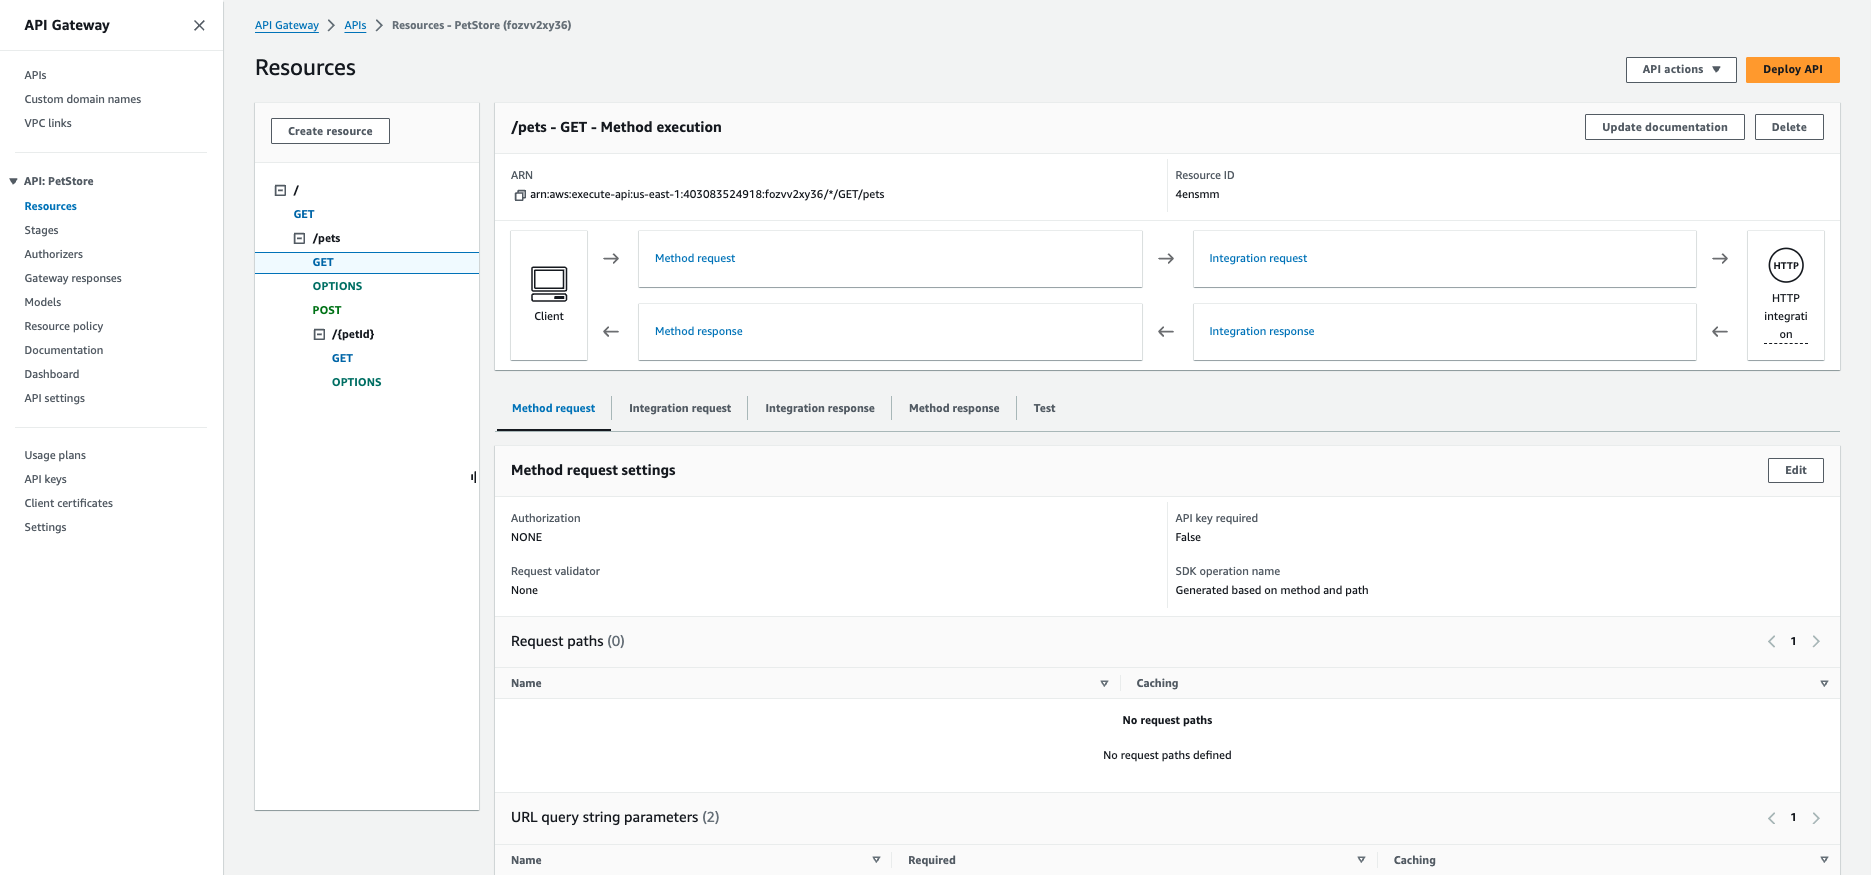
-
Select Method Request.
-
Click Edit on the right hand side and under Authorization choose the
jwt-custom-authorizercustom authorizer you created in step 3. -
Click save to save your choice of custom authorizer. Make sure the API Key Required field is set to
false.
Deploy the API
To make your changes public, deploy your API.
- At the top right of the screen, select Deploy API.
- Provide the following values, and click Deploy and choose the stage you created previously.
If successful, you'll be redirected to the Stage Overview. Note the Invoke URL provided under the Stage Details because you need this to test your deployment.
Test your deployment
To test your deployment, make a GET call to the Invoke URL you noted in the previous step. If this test fails,
check that you obtained the JWT access token correctly.
Next Steps
Scope Limited Access
After adding this custom authorizer to protect your AWS API Gateway endpoints, you might want to limit access to individual
endpoints based on the allowed scopes of the authorized party (e.g. read:resource). To do this, leverage the authorizationScopes
property of each gateway method to define the scopes required to invoke the method.