Integrate Citrix ADC
Citrix ADC (formerly Citrix Netscaler) is an application delivery and load balancing solution (see https://www.citrix.com/products/citrix-adc/). This integration provides instructions to integrate Citrix ADC with Identity as a Service. Once integrated, users can use single sign-on to log in to their Citrix ADC account using Identity as a Service
Note: This guide was tested using previous versions of Identity as a Service and Citrix ADC. Other versions of Citrix ADC may require integration and configuration steps that differ from those documented in this procedure. For newer versions of Citrix ADC, this integration guide may be used as an initial approach for integrating Citrix ADC. In the event of other issues, contact support@entrust.com for assistance.
To integrate Citrix ADC with Identity as a Service, you must do the following:
Step 1: Add Citrix ADC to Identity as a ServiceStep 1: Add Citrix ADC to Identity as a Service
Add Citrix ADC to Identity as a Service
Log into your Identity as a Service administrator account.
Click ![]() > Security > Applications. The Applications Lists page appears.
> Security > Applications. The Applications Lists page appears.
Click Add. The Select an Application Template page appears.
Do one of the following:
Select SAML Cloud Integrations from the search drop-down list and scroll to find the application you want to add to IDaaS.
- or -
In the Search bar, enter a search option to filter for the application you want to add to IDaaS.
Click Citrix. The Add Citrix page appears.
In the Application Name field enter Citrix ADC.
Enter an Application Description.
Optional. Add a custom application logo.
Click ![]() next to Application Logo. The Upload Logo dialog box appears.
next to Application Logo. The Upload Logo dialog box appears.
Click ![]() to select an image file to upload.
to select an image file to upload.
Browse to select your file and click Open. The Upload Logo dialog box reappears showing your selected image.
If required, resize your image.
Click OK.
Select the Authentication Flow that appears to users during login.
Click Next. The General page appears.
If available, use the Upload Metadata XML file option to auto-populate the following fields, if available in the file:
Default Assertion Consumer Service URL
Alternative Assertion Consumer URLs
Service Provider Entity ID (Issuer)
Single Logout Service URL
SAML Signing Certificate
SAML NameID Encoding Format
SAML Signature Algorithm
Click ![]() to the Upload Metadata XML and browse to the location of the metadata file you downloaded. The Metadata Configuration dialog box appears.
to the Upload Metadata XML and browse to the location of the metadata file you downloaded. The Metadata Configuration dialog box appears.
If required, click Merge with existing values to merge new values with existing values for Alternative Assertion Consumer Services URLs and SAML attribute names.
Click Save.
Enter the SAML Session Timeout to the time when the SAML Assertion times out. The maximum is 720 minutes.
Enter the Max Authentication Age (seconds) to set the maximum amount of time that can elapse before a user is required to reauthenticate during a new login attempt. This applies for both SP-initiated and IDP-initiated login. Set this field to -1 to disable this feature.
If you do not have a metadata file, use the information provided in the next steps to populate the fields.
Enter the Default Assertion Consumer Service URL for the application.
Example: https://<server.domain.com>/cgi/samlauth
Enter the Service Provider Entity ID (Issuer) that is used by Identity as a Service to identify your application.
Example: <server.domain.com>
Optional. Enter the SAML Username Parameter Name used to identity the user ID being requested for authentication. The user ID can then be passed as a parameter, for example, Username=jdoe.
From the SAML Name ID Attribute drop-down list, select the User ID.
Select the SAML Signing Certificate from the drop-down list.
From the SAML NameID Encoding Format from the drop-down list, select UNSPECIFIED.
From the SAML Response Signature Algorithm drop-down list, select SHA256.
Note: Citrix ADC cannot accept signed responses using a SHA512 signature algorithm.
Optional: Select Sign complete SAML response to ensure the message integrity of the SAML response sent to the application during authentication.
Optional: Select Respond Immediately for Unsuccessful Responses to return to the application immediately after a login failure, rather than allow user to try again with a different userID.
Deselect Enable Go Back Button if you do not want users to be able to go back to the Citrix ADP login page to log in.
Select Show Default Assertion Consumer URL Service in the My Profile. When selected, the Default Assertion Consumer URL appears in a user's My Profile page in addition to relay states and Alternative Assertion Consumer URLs.
Optional: Select Encrypt SAML Assertion. When selected the SAML Assertion is also encrypted. If you select this option, do the following:
From the Encryption Method for Key drop-down list, select either RSA Version 1.5 or RSA-OAEP. RSA Version 1.5 is the default.
From the Encryption Method for Data drop-down list, select the encryption method used to encrypt data. The options are:
AES-256 (default)
AES-128
AES-192
Triple DES
In the Encryption Certificate field, upload the encryption certificate file.
Note: The Subject Domain Name and Certificate Expiry Date values are populated with values from the certificate once the Encryption Certificate is uploaded.
Optional. Add Alternative Assertion Consumer Service URLs, as follows:
Click Add.
Enter a Name.
Enter a URL Value.
Select Show in My Profile to display the Alternative Consumer Service URL in a user's My profile page.
Optional. Add an Application Logo.
Click Add.
Repeat these steps to add more Alternative Assertion Consumer Service URLs.
Optional. Add a Relay State as follows:
Under Relay State, click Add. The Add Relay State dialog box appears.
Enter a Name for the relay state.
Enter the Value for the relay state. This setting specifies the application or URL that is a user is redirected to after successful authentication.
Select Show in My Profile to display the relay state on the user's My Profile page.
Note: After you add relay states, you can also enable or disable them on the Add/Edit application page. Click ![]() next to the relay state to disable it or click
next to the relay state to disable it or click  to re-enable it.
Relay states apply to the Default Assertion Consumer Service URLs and not the Alternative Assertion Consumers URLs.
Optional. Add a Relay State as follows:
Under Relay State, click Add. The Add Relay State dialog box appears.
Enter a Name for the relay state.
Enter the Value for the relay state. This setting specifies the application or URL that is a user is redirected to after successful authentication.
Select Show in My Profile to display the relay state on the user's My Profile page.
Notes: After you add relay states, you can also enable or disable them on the Add/Edit application page. Click ![]() next to the relay state to disable it or click to re-enable it.
next to the relay state to disable it or click to re-enable it.
Relay states apply to the Default Assertion Consumer Service URLs and not the Alternative Assertion Consumers URLs.
Optional. Add a Relay State custom logo.
- Click
 next to Relay State Logo. The Upload Logo dialog box appears.
 - Click
 to select an image file to upload.
 - Browse to select your file and click Open. The Upload Logo dialog box reappears showing your selected image.
- If required, resize your image.
- Click OK.
Click Add.
Repeat these steps to add more Relay States.
Click Submit.
Step 2: Add a resource ruleStep 2: Add a resource rule
Step 3: Download the metadata file from Identity as a Service Step 3: Download the metadata file from Identity as a Service
Download the Metadata file from Identity as a Service
In Identity as a Service, click ![]() > Security > Applications. The Applications List page appears.
> Security > Applications. The Applications List page appears.
Do one of the following:
Click ![]() next to the application you are integrating with Identity as a Service.
next to the application you are integrating with Identity as a Service.
–or–
Click ![]() next to the application you are integrating with Identity as a Service and select SAML IDP Metadata.
next to the application you are integrating with Identity as a Service and select SAML IDP Metadata.
The SAML Application Metadata dialog box appears.
Select the certificate to include in the SAML IDP Metadata file from the drop-down list.
If applicable, Select the domain to include in the SAML IDP Metadata file from the drop-down list.
Enter the Lifetime, in days, for the SAML IDP Metadata file. The value must be between 2 and 730.
Do one of the following, as required:
Copy the Public Endpoint to paste into your SAML application being used Identity Provider authentication.
Click Download.
Note: If you are using multiple domains, you must download each domain's metadata file separately because the values in the metadata file vary for each domain.
Step 4: Export the signing certificateStep 4: Export the signing certificate
Export a SAML signing certificate
Log in to your Identity as a Service administrator account.
Click ![]() > Security > Applications. The Applications List page appears.
> Security > Applications. The Applications List page appears.
Under SAML Cloud Integrations, click SAML Signing Certificates. The SAML Signing Certificates page appears.
Click ![]() next to the certificate to export the certificate you want to import into your SAML service provider application. The Export Certificate dialog box appears.
next to the certificate to export the certificate you want to import into your SAML service provider application. The Export Certificate dialog box appears.
If the certificate has been issued by a CA, do one of the following:
Click Certificate to export the self-signed certificate.
Click Root CA Certificate to export a certificate issued from a CA.
Click Certificate Chain to export the SAML signing certificate and its CA certificates.
Click Export.
Step 5: Import the SAML signing certificate into Citrix ADCStep 5: Import the SAML signing certificate into Citrix ADC
In the Citrix ADC Configuration menu, expand Traffic Management > SSL > Certificates > CA Certificates.
Note: Even though the SAML IDP signing certificate is not a CA certificate, for NetScaler version 11.1+, you must import it under CA Certificates.
On the CA Certificates page, click Install.
On the Install Certificates section, under Certificate-Key Pair Name, enter a descriptive name for the SAML IDP signing certificate, for example <domain>.us.trustedauth.com.
Under Certificate File Name click Browse and select the certificate file you downloaded in Step 4: Download the SAML signing certificate.
Leave the Key File Name field empty.
Click Install.
Step 6: Add a SAML authentication server to Citrix ADCStep 6: Add a SAML authentication server to Citrix ADC
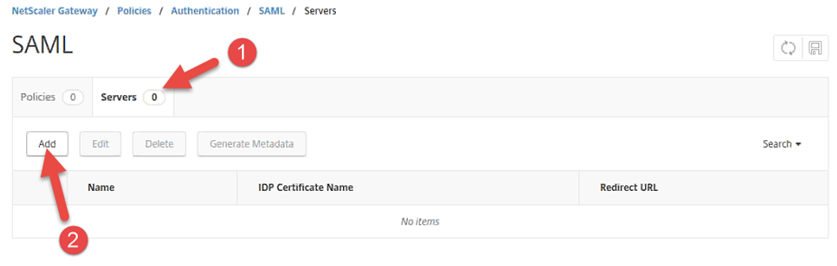
In the Citrix ADC Configuration menu, expand NetScaler Gateways > Policies > Authentication> SAML. The SAML server page appears.
On the SAML page, click the Servers tab.
On the Servers tab, click Add.
On the Create Authentication SAML Server page, enter the following information:
|
Field |
Description |
Value Example |
|
Name |
Descriptive name for the IDP |
Identity as a Service |
|
IDP Certificate Name |
The SAML signing certificate from the Identity as a Service IDP. |
The SAML signing certificate you downloaded in Step 4: Download the signing certificate. |
|
Redirect URL |
The location of the SAML servlet in Identity as a Service, extracted from the IDP metadata file. |
https://<domain>.us.trustedauth.com/api/saml/SAML2/SSO |
|
Single Logout URL |
The single logout URL. |
https://<domainFQDN>/cgi/saml/tmlogout |
|
User Field |
The user identifier from the IDP metadata file. It should be Name ID in most cases. |
Name ID |
|
Signing Certificate Name |
The SP SAML signing certificate. |
This should already exist in Identity as a Service. |
|
Issuer Name |
The entityID of the SAML SP. |
This value should match the Service Provider ID (Issuer) you entered in Step 1: Add Citrix NetScaler to Identity as a Service. |
|
Reject Unsigned Assertion |
ON = Reject the Identity as a Service Assertion if it is not signed. OFF = Accept the Identity as a Service assertion if is not signed. |
ON |
|
SAML Binding |
The binding method for SAML assertion. This must be POST. |
POST |
Click Create.
Step 7: Add a SAML authentication policyStep 7: Add a SAML authentication policy
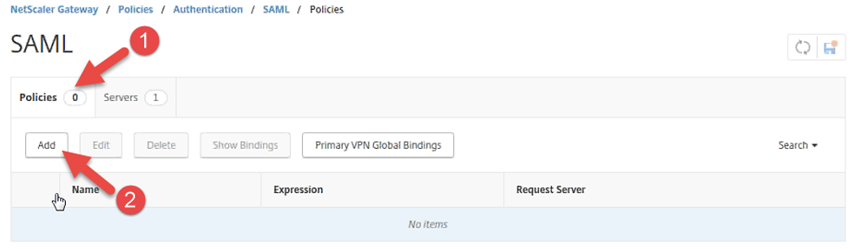
In Citrix ADC Configuration menu, expand NetScaler Gateways> Policies> Authentication> SAML. The SAML server page appears.
On the SAML page, click the Policies tab.
On the Policies tab, click Add.
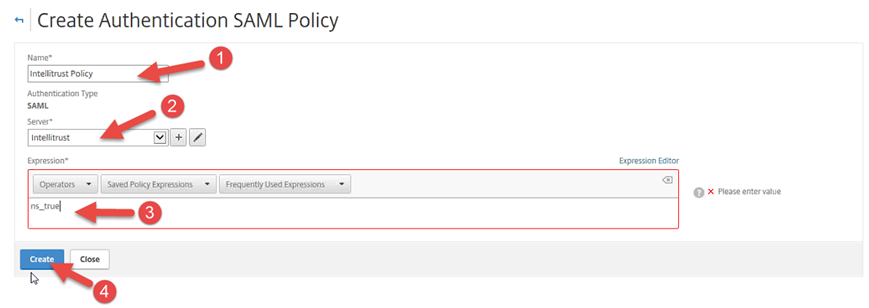
On the Create Authentication SAML Policy page, under Name enter a descriptive name for the SAML Policy, for example Identity as a Service Policy.
From the Server drop-down list, select the SAML Authentication Server that you created in Step 6: Add a SAML authentication server to Citrix NetScaler.
Under Expression, click the empty text box under the Operators button and enter ns_true.
Note: A setting of ns_true means that the policy is always active when assigned to a VIP. This is an example of a very basic policy settings. The policy may be further fine-tuned in accordance with the Ctirix product documentation and the Ctirix Customer Support team if required.
Click Create.
In the Citrix NetScaler Configuration menu, expand NetScaler Gateways > Virtual Servers. The NetScaler Gateway Virtual Servers page appears.
Under the Name column, click the name of the virtual server that requires the Identity as a Service Policy to be added.
On the VPN Virtual Server page, under Basic Authentication, click the + icon.
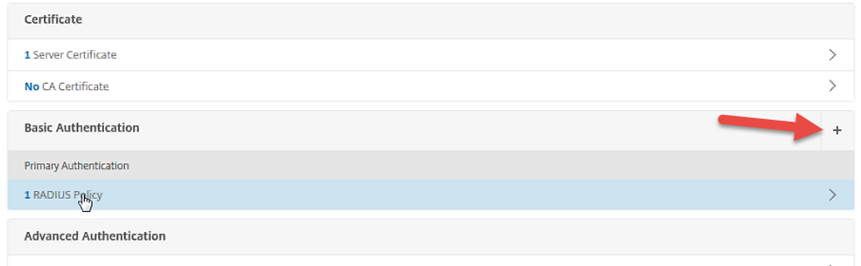
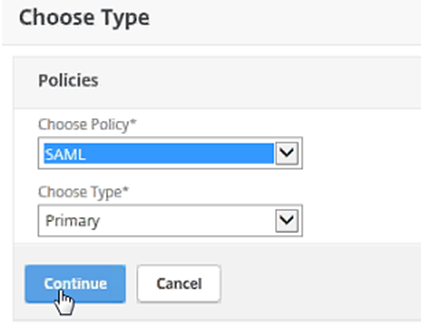
On the Choose Type pane, under Choose Policy select SAML.
Under Choose Type, select Primary.
Click Continue.
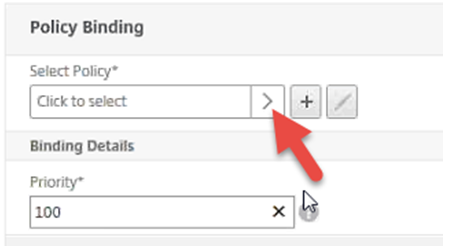
In the Policy Binding section under Select Policy, click the > button to access the SAML Policies page.
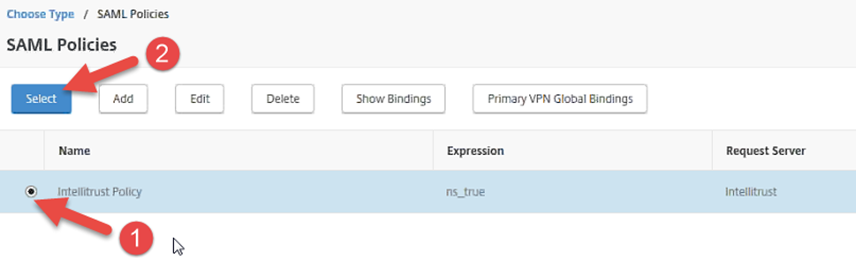
On the SAML Policies page, click the radio button to select the policy you created in Step 6: Add a SAML authentication server to Citrix NetScaler, for example Identity as a Service Policy, and then click Select.
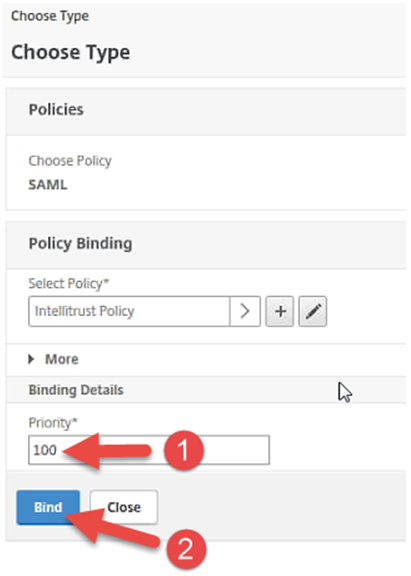
Under Binding Details, enter 100 for the Priority.
Click Bind.
Note: If additional Primary Authentication policies exist, they may need to be unbound if it is to be enforced that only the SAML IDP should be used for authentication.