Integrate Check Point Security Gateway
This technical integration guide describes how to integrate Check Point Security Manager Gateway and Identity as a Service. The aim of this integration is to provide strong, second-factor authentication for your Check Point Security Manager Gateway using Identity as a Service.
Before you begin, review the following:
Supported authentication methodsSupported authentication methods
| Authentication method | Notes | Supported protocols |
| Password |
Password authentication is a first-factor authentication with Identity as a Service's password feature. |
PAP, MS-CHAP v2 |
| RADIUS |
RADIUS authentication is a first-factor authentication with a RADIUS server. |
PAP, MS-CHAP v2 |
| Grid |
Two-step authentication only |
PAP, MS-CHAP v2 |
| Token |
Identity as a Service supports response-only tokens. One-step or two-step authentication (including token push authentication). Note: Challenge/response tokens are unsupported with MSCHAPv2. |
EAP-GTC or EAP MSCHAPv2 |
| Temporary Access Code |
Grid or token authentication must be configured. |
PAP, MS-CHAP v2 |
| OTP (One Time Password) by SMS or Token |
Two-step authentication only |
EAP-GTC |
| Knowledge-based authentication |
The RADIUS proxy only supports a single question and answer. For CHAP and MS-CHAP, the answer must be an exact match. Two-step authentication only |
PAP, MS-CHAP v2 |
|
Entrust Soft Token push authentication |
Mobile Soft Token push authentication (supports response-only tokens for second-factor authentication. | PAP, MS-CHAP v2 Classic token authentication can be used for fallback. |
PrerequisitesPrerequisites
Complete the following steps before integrating your authentication system with Identity as a Service:
Install and configure your first-factor authentication resource using the documentation provided by the vendor. The first-factor authentication resource can be a RADIUS server or an external authentication resource (a Local DB, LDAP-compliant directory or Windows domain controller through Kerberos).
Install and configure the RADIUS appliance using the documentation provided by the vendor. The device must be able to route traffic before integrating with Identity as a Service.
Install and configure Identity as a Service and an Identity as a Service Gateway (containing a RADIUS proxy agent). Take note of the shared secrets, IP addresses, and ports you use. You need this information to configure the RADIUS appliance and first-factor authentication resource.
If you want to configure your RADIUS appliance and first-factor authentication resource to recognize Identity as a Service user groups, you must define the Identity as a Service user groups first.
Integrate Check Point Security Gateway
Complete the following steps to integrate Check Point Security Gateway with IDaaS.
Step 1: Configure the Check Point Security Gateway
This section describes how to configure and integrate the Check Point Security Gateway with Identity as a Service. Check Point Security Gateway is used for Mobile Access (SSL VPN through a Web browser) and the IPSec VPN (Endpoint Security Client).
Step 1.1: Set the static IP address to access the Check Point Security GatewayStep 1.1: Set the static IP address to access the Check Point Security Gateway
Check Point Security Gateway systems ship with a default network configured IP address of 192.168.1.1 on the management interface. You can access the web-based configuration utility through the management port, and configure the unit directly. If the default IP address is unsuitable for your network, define an IP on an administrative workstation in the same IP network as the Checkpoint system. Once the utility finishes and the system reboots, these default IP addresses are replaced with the information that you entered in the First Time Configuration Wizard.
Use the following procedure to set the IP address for the computer or workstation to connect to the Check Point Security Gateway controller.
To set the static IP address to access the Check Point Security Gateway management port IP address
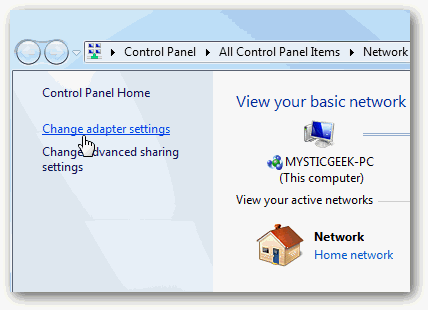
To change the computer’s IP address in Windows, type network and sharing in the Search box in the Start Menu and select Network and Sharing Center.
If you are using Windows 8.x it will be on the Start Screen.
If you are using Windows 7 or 10 it will be on the Start Menu.
In the Network and Sharing Center, click Change adapter settings.
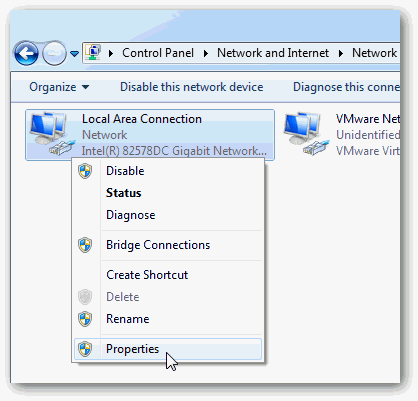
Right-click your Local Area Connection and select Properties to display the Local Area Connection Properties page.
In the Local Area Connection Properties page, select Internet Protocol Version 4 (TCP/IPv4) and then click Properties.
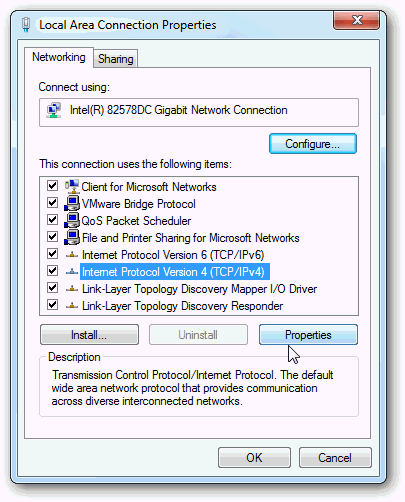
The Internet Protocol Version 4 (TCP/IPv4) Properties page appears.
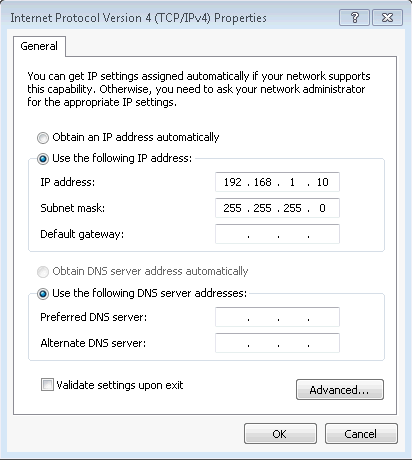
In the Internet Protocol Version 4 (TCP/IPv4) Properties page, do the following:
Select the Use the following IP address radio button.
Enter the correct IP address.
Enter the Subnet mask.
Enter the Identity as a Service gateway that corresponds with Check Point Security Gateway Management port network and subnet.
Click OK to close the Local Area Connections Properties page.
Open a command prompt and type ipconfig to see whether the network adapter settings have been successfully changed.
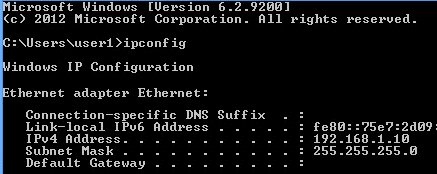
Note: Before you configure Check Point Security Gateway and manage the system, you need to connect the unit to a management workstation or network.
Step 1.2: Run the Check Point First Time Configuration WizardStep 1.2: Run the Check Point First Time Configuration Wizard
After you connect the management workstation to the management interface, open the configuration utility and begin configuring the system. When you start the utility from a Web browser, use the selected default IP address as the application URL.
To start the configuration utility in a web browser
From a workstation attached to the network on which you have configured the Management Interface, type the following URL syntax where <https://management_IP_address> is the address you configured for device management.
For example: https://192.168.1.1 (which is the default). The Check Point Security Gateway Configuration Utility opens.
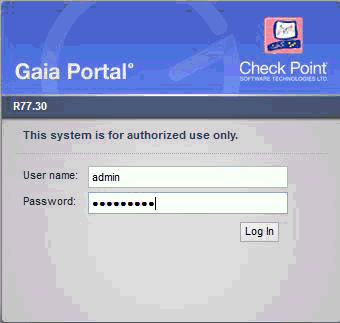
At the login prompt, enter the default user name admin and password admin.
The First Time Configuration Wizard page appears.
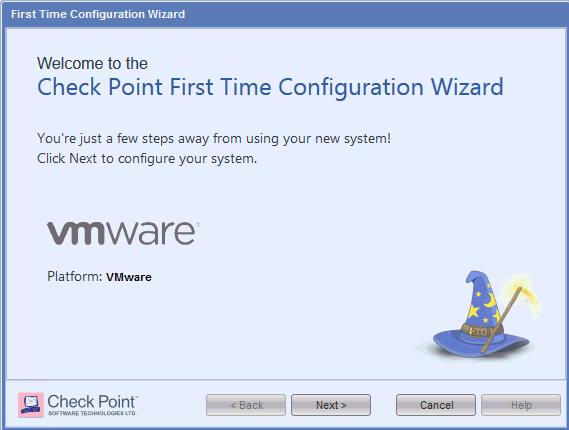
Click Next. The Deployment Options page appears.
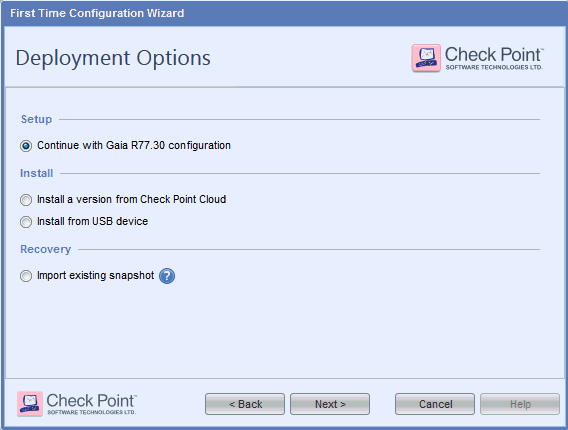
Select the option Continue with Gaia R77.30 configuration and then click Next. The Management Connection page appears.
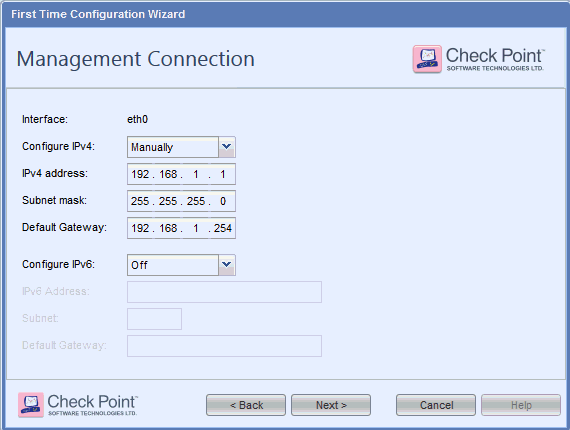
Optional: Change the Management IP Address, enter the Management IP address, Subnetmask, and Default Gateway.
Click Next. The Device Information page appears.

Enter the Host Name, Domain Name, and Primary DNS Server and then click Next. The Date and Time Settings page appears.

Set the Date, Time, and Time Zone and then click Next. The Installation Type page appears.
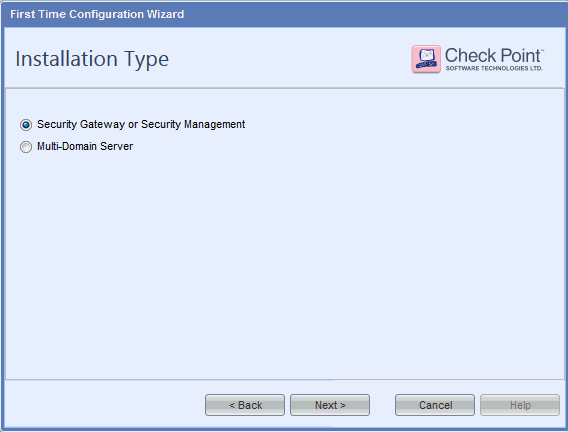
Select Security Gateway or Security Management and then click Next. The Products page appears.
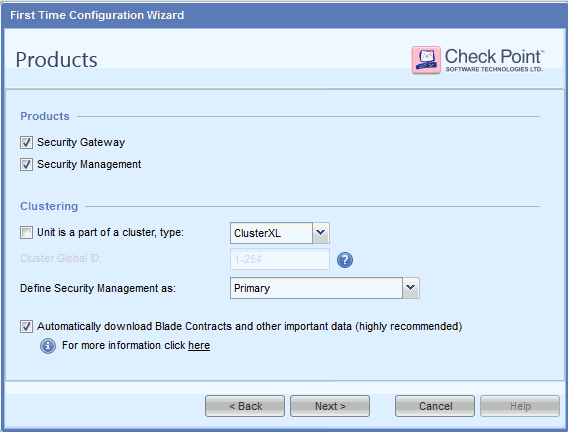
Review the options and then click Next. You are prompted to enter a username and password.
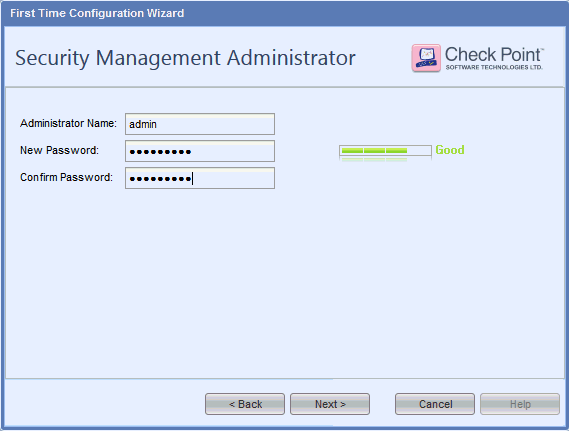
Enter the User Name and Password for the Security Management Administrator and then click Next. The Security Management GUI Clients page appears.
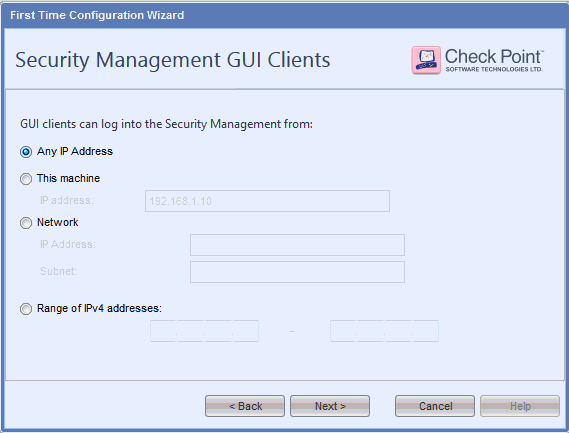
Select Any IP Address, if you want to access the Management IP address from any host and then click Next. The First Time Configuration Wizard Summary page appears.
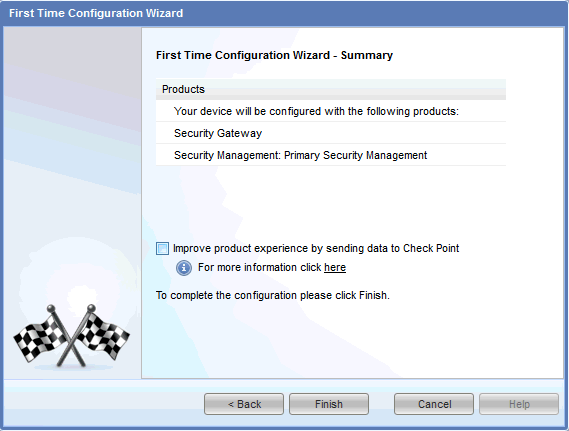
Click Finish. The configuration process confirmation page appears.
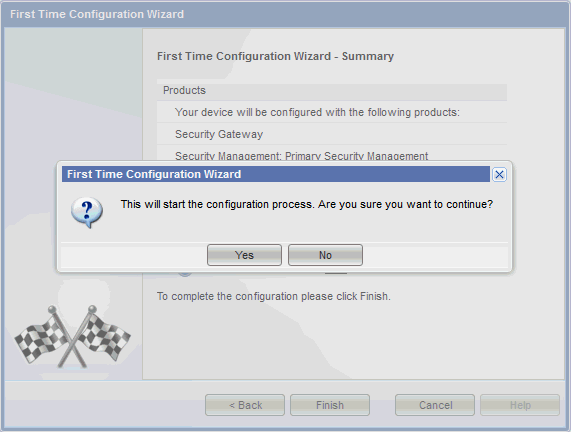
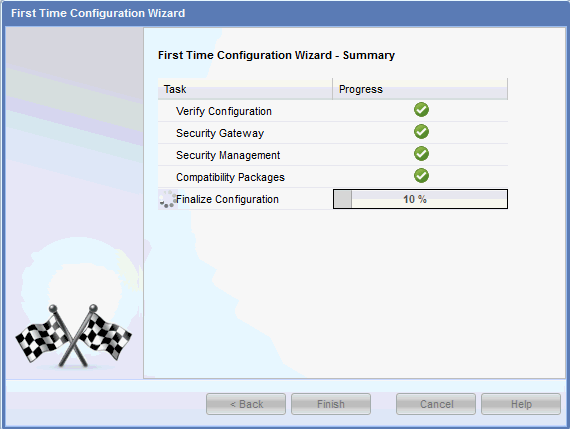
Click Yes. The Configuration Process progress page appears. It takes few minutes to complete First Time Configuration Wizard and then Check Point reboots automatically.
Step 1.3: Assign the IP addresses to internal and external interfacesStep 1.3: Assign the IP addresses to internal and external interfaces
After Check Point reboots, access the Check Point Management IP again at https://192.168.1.1 (or the IP addressed you assigned to it) and enter the new credentials of the administrative user if you changed them when you used the First Time Configurations Wizard.
The Check Point Management GUI appears.
Click Network Interfaces, select eth1 and then click Edit. The Edit eth1 page appears.
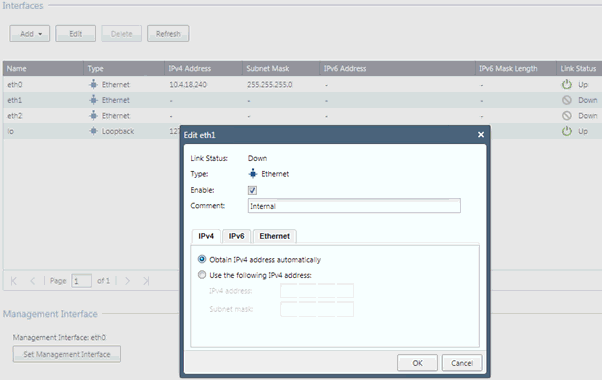
In the Edit eth1 page, do the following to set up the internal corporate network communication (for example, RADIUS authentication and application access):
Comments Internal, IP address and Subnet Mask for Internal / Corporate network communication i.e. RADIUS authentication and applications / resource access.
Check the Enable box to enable the eth1 interface.
Select Obtain IPv4 address automatically to obtain the IP address from a corporate DHCP server.
- or -
Select Use the following IPv4 address to enter a static IP address and subnetmask.
Click OK to return to the Network Interfaces page.
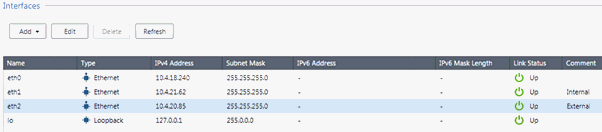
Click Refresh to see the obtained IP.
In the Network Interfaces page, select eth2 and then click Edit. The Edit eth2 page appears.
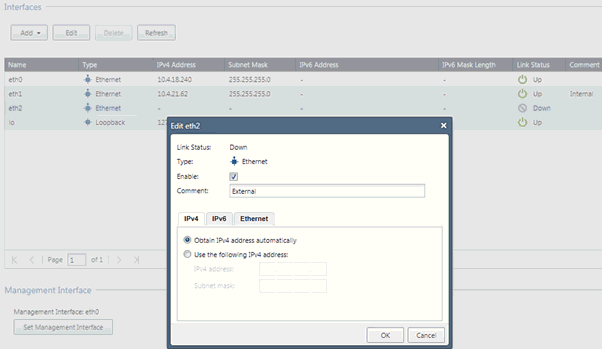
In the Edit eth2 page, do the following to set up remote users VPN access through the Internet:
Check Enable to enable the eth2 interface and select Obtain IPv4 address automatically to obtain the IP address from the ISP.
- or -
Select Use the following IPv4 address to enter a static IP address and subnetmask (Public IP).
Click OK to return to the Interfaces page.
Click Refresh to see the obtained IP.
Step 1.4: Download the SmartConsoleStep 1.4: Download the SmartConsole
To configure the RADIUS application integrated with your Identity as a Service account, you need to download the Smart Console.
To download the SmartConsole
Login to Check Point Management GUI.
In the menu, expand Maintenance and select Download SmartConsole. The Download SmartConsole page appears.
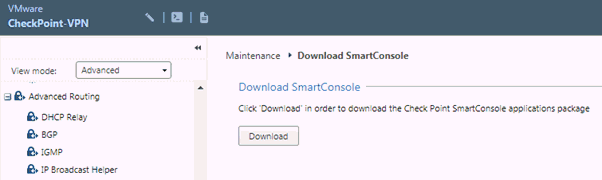
Click Download.
Save the Setup file and install it on the client computer.
Step 2: Configure Check Point Security Gateway to use Identity as a Service
When using an Identity as a Service RADIUS application to authenticate Check Point users, you must configure the VPN to recognize the Check Point as a client. You must also specify a shared secret for the RADIUS application used to authenticate the client request.
The Identity as a Service RADIUS application must be configured with the Check Point Security Gateway. This section describes how to add an Identity as a Service RADIUS application within your Check Point Security Gateway settings.
Step 2.1: Configure a connection between an Identity as a Service RADIUS application on Check Point Security GatewayStep 2.1: Configure a connection between an Identity as a Service RADIUS application on Check Point Security Gateway
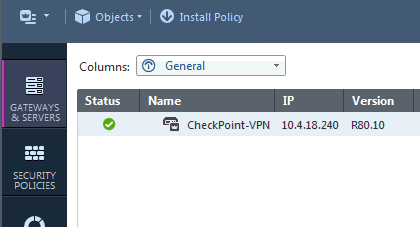
Start the Check Point SmartDashboard R80.10 on a workstation or client computer that is already installed.
In the Login window, enter the information shown in the following table and then click Login.
| Username | admin |
| Password | admin or the password when you configured the Check Point Gateway as part of the First Time Configuration Wizard. |
| Server name or IP Address | Check Point Security Gateway Management IP 192.168.1.1 or the IP address that you set. |
Step 2.2: Add the Identity as a Service RADIUS server hostStep 2.2: Add the Identity as a Service RADIUS server host
On the Check Point SmartConsole main page, right-click Network Objects.
Click Host.
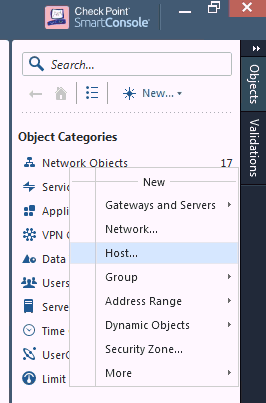
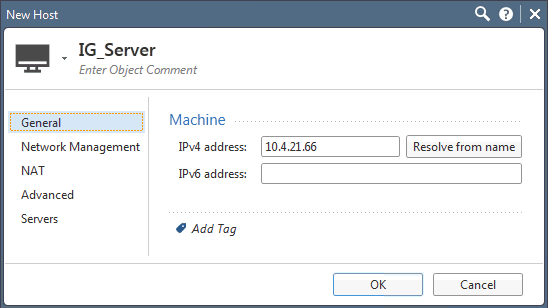
The New Host page appears.
Type an IdentityGuard Server name of your choice and the IPv4 address of the server.
Click OK.
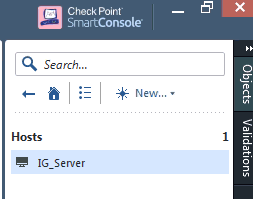
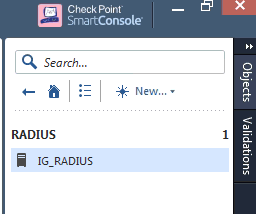
The Identity as a Service RADIUS host has been created. You can find it at Network Objects > Hosts.
Step 2.3: Create a RADIUS server objectStep 2.3: Create a RADIUS server object
To define the RADIUS host, you need to create RADIUS Server objects to define the host, service, version, and protocol to be used. Once you create the RADIUS server object, it can be used to specify a RADIUS object for authentication schemes used for user authentication.
On the Check Point Smart Dashboard window, right-click Servers > More > RADIUS.
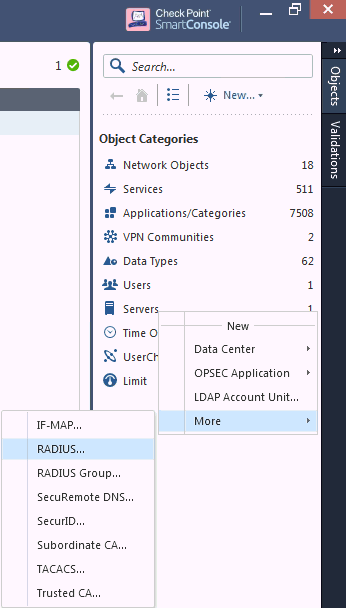
The New RADIUS page appears.
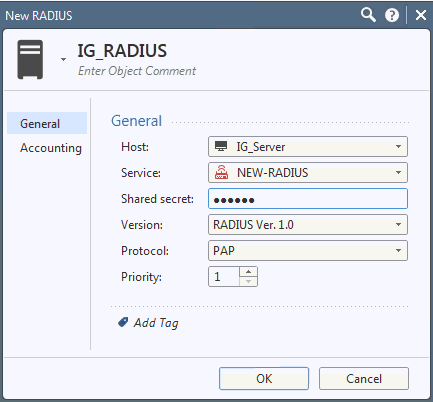
Type a RADIUS object name of your choice.
In the New RADIUS page, do the following:
In the Name field, enter the name of the RADIUS server object, for example, Identity as a Service.
From the Host drop-down list, select the RADIUS server host you configured in the section Adding the Identity as a Service RADIUS server host.
From the Service drop-down list, select the NEW-RADIUS associated with port 1812.
In the Shared Secret field, enter the shared secret value of your Identity as a Service gateway.
From the Version drop-down list, select RADIUS ver 1.0 (or the version of your choice).
From the Protocol drop-down list, select PAP/MS-CHAP v2.
Click OK.
The RADIUS object is created and appears in the RADIUS list.
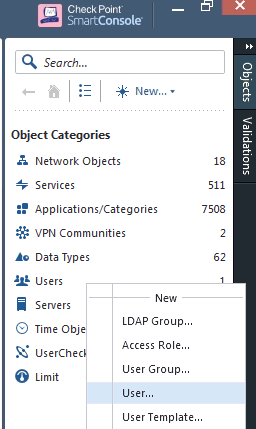
Step 2.4: Create usersStep 2.4: Create users
You must create users in Check Point Security Gateway to authenticate to Identity as a Service. This is required to log in to the Mobile Access portal or VPN client and access their applications.
Create a user
On the Check Point SmartConsole main window, right click on Users
Click User.
The New User windows appears. Select Default from the Choose template drop-down list.
Click OK.
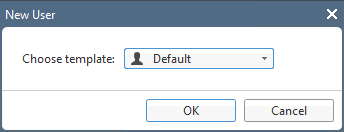
The New User page appears.
Click General.
Enter the following user information:
user name for example: user1
the mobile number
email address.
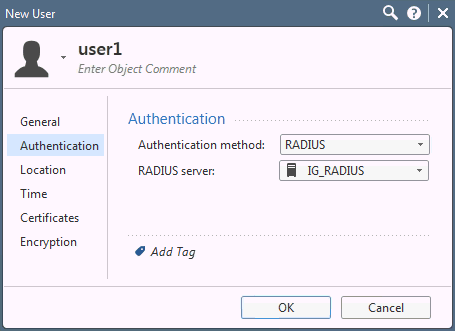
Click Authentication, and then do the following:
Select RADIUS from the Authentication method drop-down menu.
From the RADIUS Server drop-down list, select the RADIUS object you created in the section Step 3: Create a RADIUS server object.
Click OK.
Step 2.5: Create a user groupStep 2.5: Create a user group
A user group is a group of users with either related responsibilities or who perform related tasks. You can specify a user group in policy rules in the same way you do for individual users.
Note: Creating a group is necessary if you want to allow some of your users to do certain things but not others. A firewall does not allow you to define rules for individual users, but you can define rules for groups.
Create a user group
On the Check Point Smart Dashboard main window, right-click Users.
Click User Group.
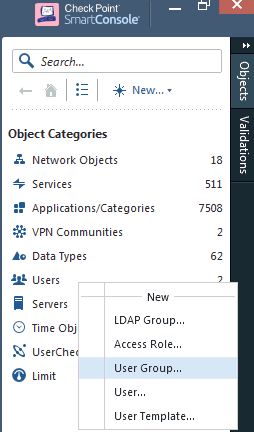
The New User Group page appears.
In the New User Group page, do the following:
In the Name field, enter a name for the user group, for example, Identity as a Service_Users.
Click the + sign, in the list of Available Members.
Select the members that you want to add to the group
Click + next to the user. The user is added to the user group.
Click X to close the user list window.
Click OK.
You have now created a user group and added to the group.
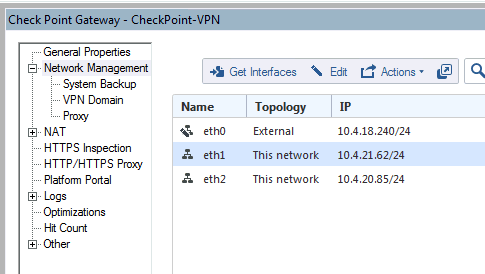
Step 2.6: Set the topologyStep 2.6: Set the topology
Setting the topology helps you define which interface leads to which network. This setting is done manually with the network or group object so that it represents the network or subnet behind each port. This procedure describes how to set the topology for both internal and external networks.
Set the topology for the internal network
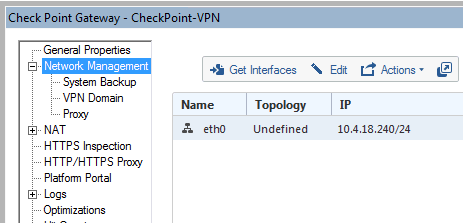
Go to the Check Point Gateway Properties page, double-click CheckPoint Gateway. The Check Point Gateway Properties page appears.

In the left-pane, click Network Management.
In the right-pane, click Get Interfaces.
Note: If you see Topology and Anti Spoofing warning dialog boxes, click Yes.
The Get Topology Results page appears.
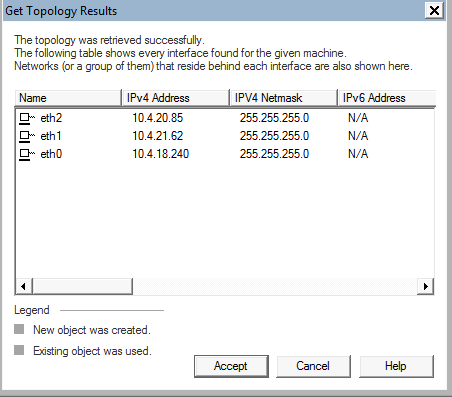
Click Accept.
The interfaces appear with default topology settings.
Optional: Modify the interface settings if they do not match the settings of each machine configured on your PC.
Optional: Define the topologies for each machine if they have not been defined.
Select eth1.
Click Edit. The Interface Properties page appears.
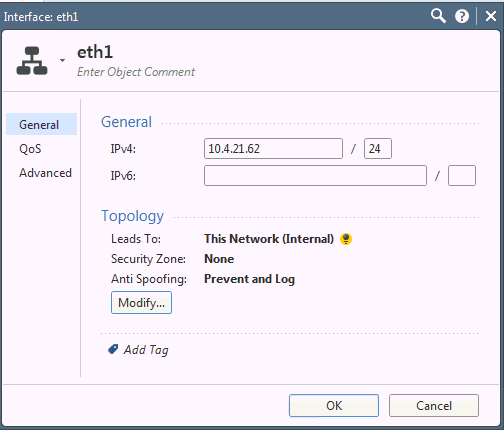
Click Modify.
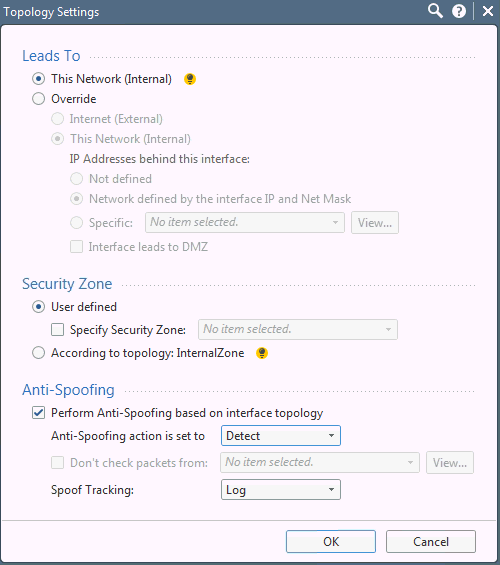
In the Interface Topology Settings page, do the following:
Select This Network (Internal) to lead to the local network.
Select Perform Anti-Spoofing based on interface topology.
Select Detect from the Anti-Spoofing action is set to drop-down list.
Click OK.
Click OK again to close the eth1 topology page.
Set the topology for the external network
In the Network Management right-pane, in the list of topologies, select the external network you added previously, for example, eth2.
Click Edit.
Click Modify.
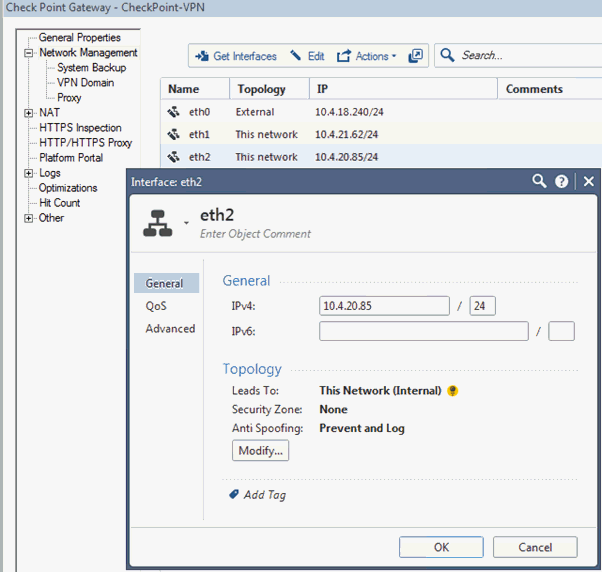
The Interface eth2 Topology Settings page appears.
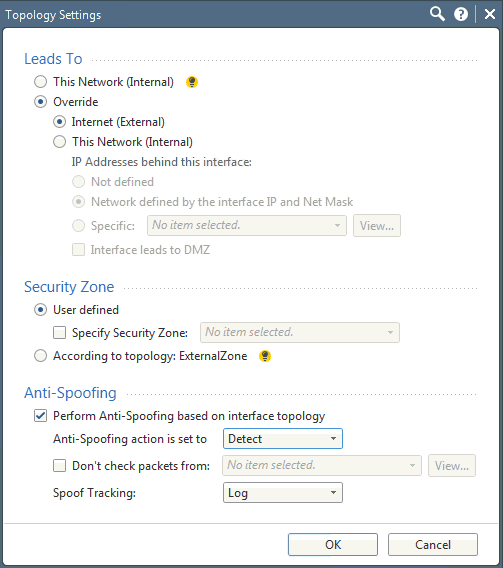
In the Interface Topology Settings page, do the following:
Select Internet (External) to lead to the Internet.
Select Perform Anti-Spoofing based on interface topology.
Select Detect from the Anti-Spoofing action is set to drop-down list.
Click OK.
Click OK again to close the interface properties.
Note: If the Management interface eth0 is set to external, set the interface to eth1 before making changes.
Step 3: Configure Check Point Mobile Remote Access
Check Point Mobile Remote Access allows users to connect to corporate applications over the Internet with a PC. The solution provides enterprise-grade remote access through IPsec and SSL VPN, allowing you simple, safe, and secure connectivity to your corporate email and corporate applications.
Complete the following steps to configure Check Point Security Gateway:
Step 3.1: Configure mobile accessStep 3.1: Configure mobile access
Configure Mobile Access
On the Check Point Smart Dashboard main window, double click on the Check Point Gateway.
The Check Point Gateway properties page appears.
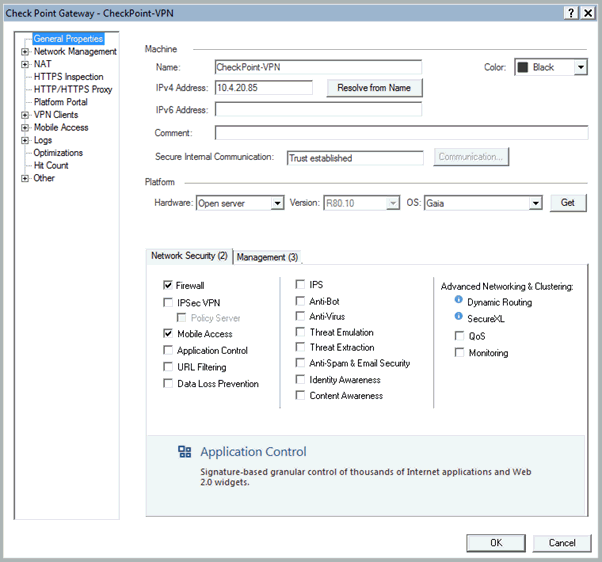
Select General Properties.
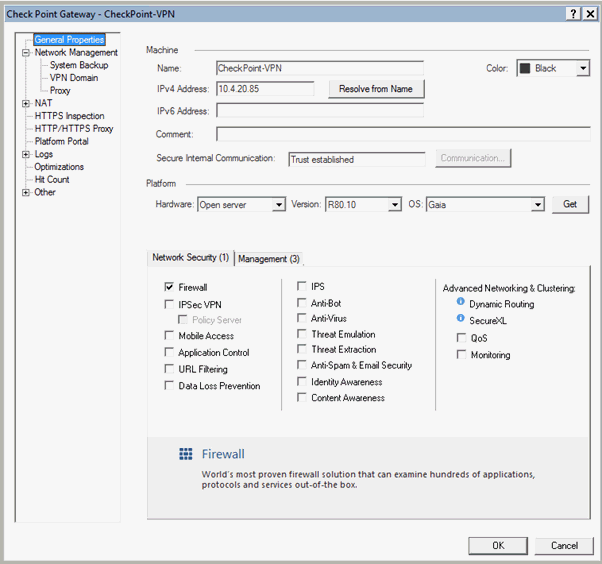
In the IPv4 Address field, enter the IPv4 address of the external interface for remote access.
In the left-pane, select Mobile Access from Network Security (1).
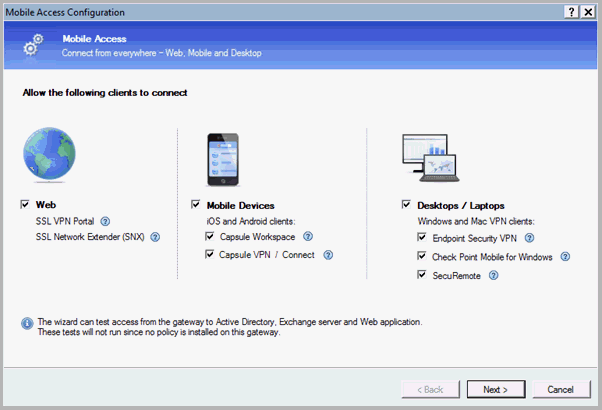
On the Mobile Access page, click Next. The Web Portal page appears.
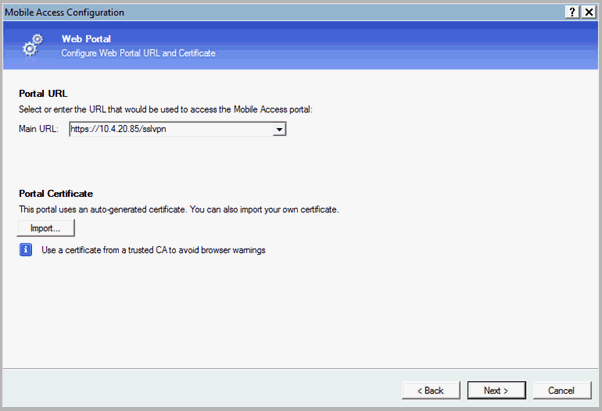
In the Web Portal page, select the Mobile Access portal URL from the Main URL drop-down list, and then click Next. The Applications page appears.
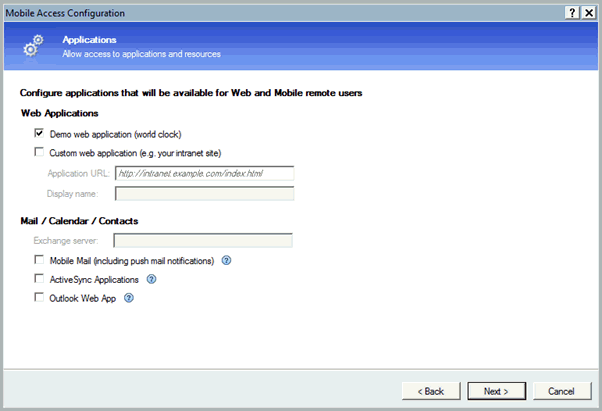
In the Applications page, deselect Mobile Mail.
Click Next. The Active Directory Integration page appears.

Select the I don’t want to use active directory now check box.
Click Next. The Application Test page appears.
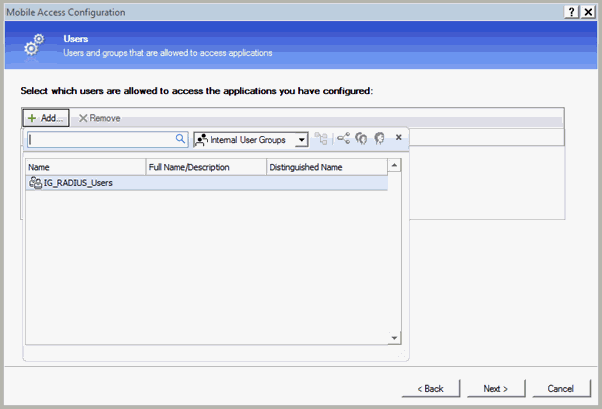
In the Users page, click Add. Select the Identity as a Service user group you previously created.
Click Next.
Click Finish.
Click OK on the Check Point Gateway -- Checkpoint-VPN page.
Step 3.2: Configure the portal settingsStep 3.2: Configure the portal settings
You need to configure the mobile portal so that the remote user is able to access it through an external IP address.
Configure the portal settings
Go to Check Point Gateway Properties page, in the left-pane, click Mobile Access > Portal Settings. The Portal Settings page appears.
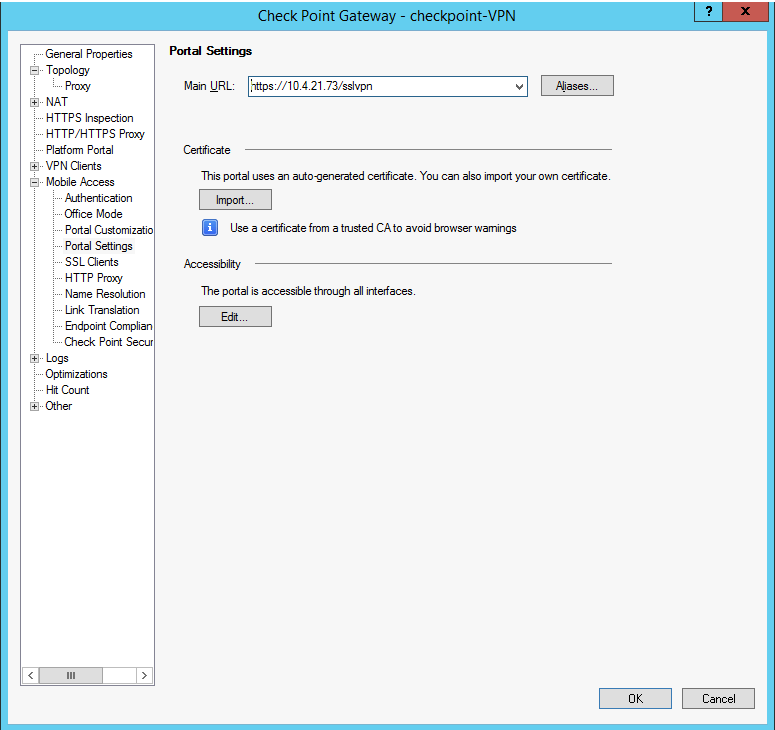
In the Main URL field, enter https://<external_ip>/sslvpn.
Click OK.
Step 3.3: Configure RADIUS authentication for mobile accessStep 3.3: Configure RADIUS authentication for mobile access
For a user to connect to the corporate applications over the Internet using the web, a mobile device, or a desktop computer, the user needs to authenticate first in order to have access.
Configure RADIUS authentication for mobile access
Go to Check Point Gateway Properties page and in the left-pane, click Mobile Access > Authentication. The Authentication for Mobile Access page appears.
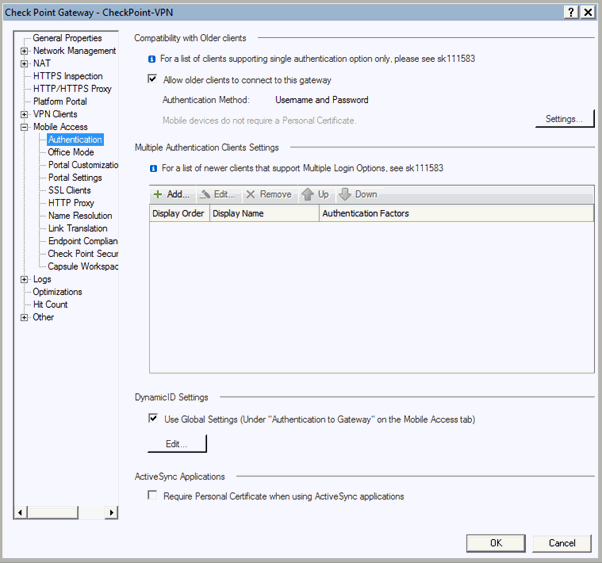
In the right pane, click Settings.
Under Authentication Method, select RADIUS, and then specify the RADIUS server you created earlier.
Click OK.
Click OK again at the CheckPoint Gateway Properties page.
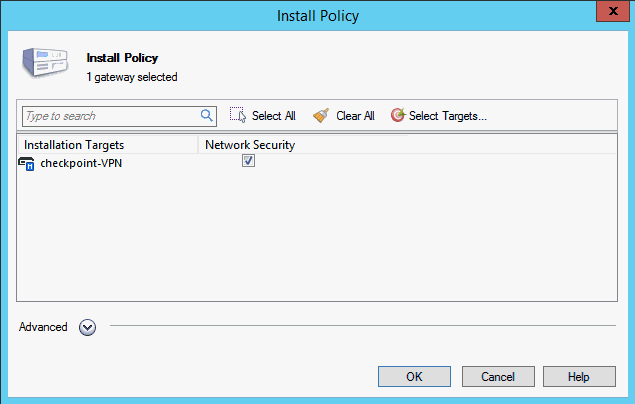
Click Install Policy to apply the configuration changes.
The Unpublished changes dialogue box appears.
Click Publish & Install. The Install Policy page appears.
Click Install.
Step 3.4: Create the mobile access policyStep 3.4: Create the mobile access policy
The Mobile Access policy applies to the Mobile Access portal. Users can access applications remotely as defined by policy rules.
Create the mobile access policy
In the Check Point SmartDashboard main page, click Mobile Access.
In the left pane, click Policy. The Policy page appears.
In the Policy page, click the  icon.
icon.
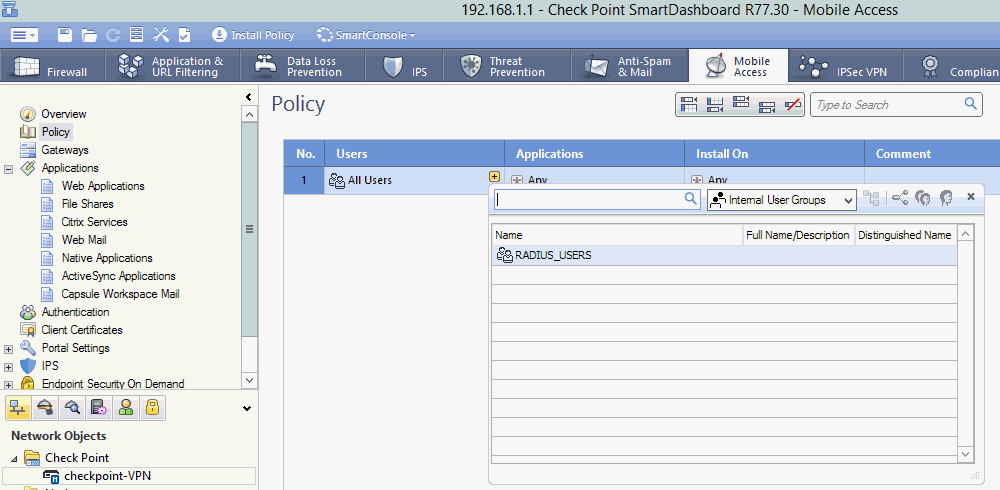
Under the Users section, click the + icon.
Add the RADIUS Users Group that you created in the section Creating a user group.
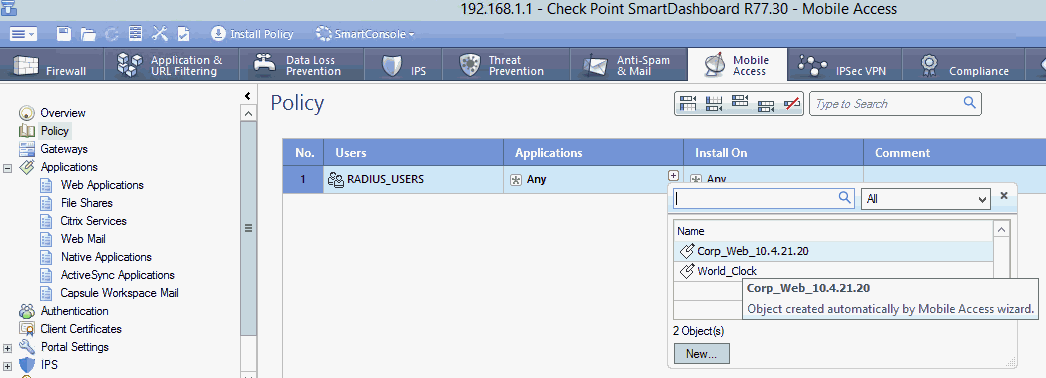
In the Applications column, click + icon, and then select the application that is selected by default, for example, Corp_Web_104.21.20.
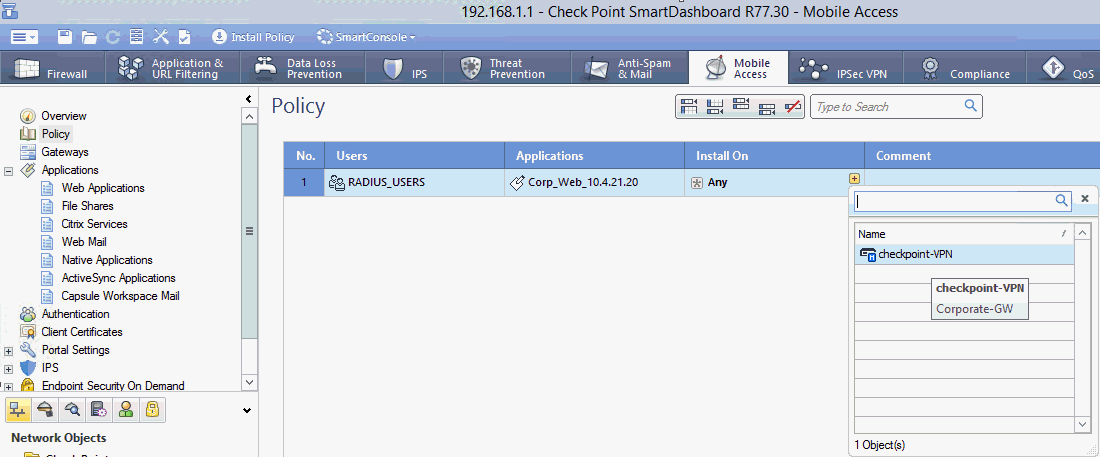
In the Install On column, click + icon, and then select the Check Point Security Gateway, checkpoint-VPN.
Step 3.5: Configure the remote access VPNStep 3.5: Configure the remote access VPN (IPsec)
Configure the Remote Access VPN
Go to the Check Point Gateway Properties page and in the left-pane, select General Properties.
Under Network Security, select IPsec VPN.
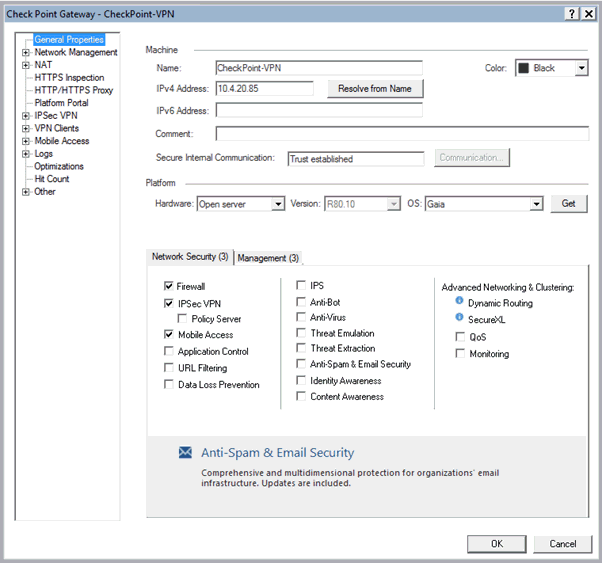
In the left-pane expand VPN Clients and select Authentication. The Authentication for VPN Clients page appears.

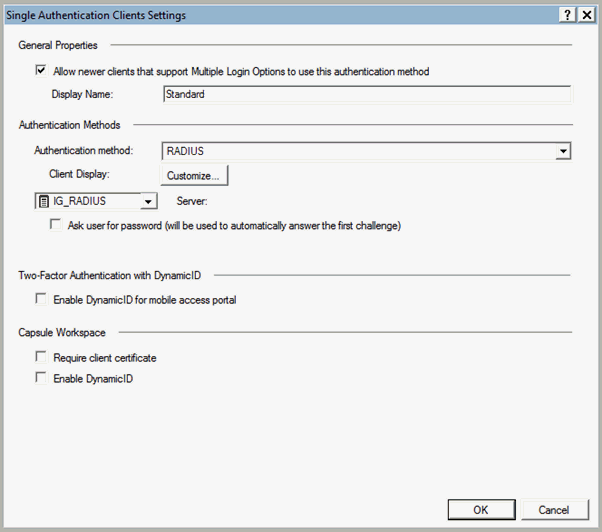
In the right-pane, click Settings. The Single Authentication Client Settings page appears.
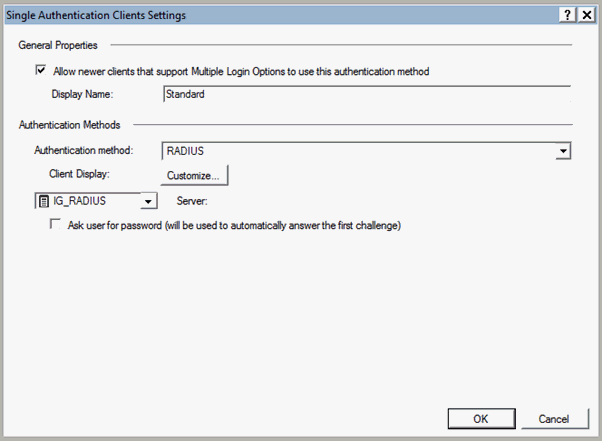
Select the RADIUS radio button.
Select the RADIUS Server object that you created in the in Step 3: Create the RADIUS server object.
Click OK.
Click OK again on the Check Point Gateway properties page.
Check Point Security Gateway should have at least one firewall blade installed that serves as an entry point to the corporate network. The firewall rule is a policy definition of what is allowed and what is blocked by the firewall. Rules use objects. For example, networks objects can be used in the source and destination of rules.
Configure firewall policies
Click Security Policies.
Under Access Control, select Policy.
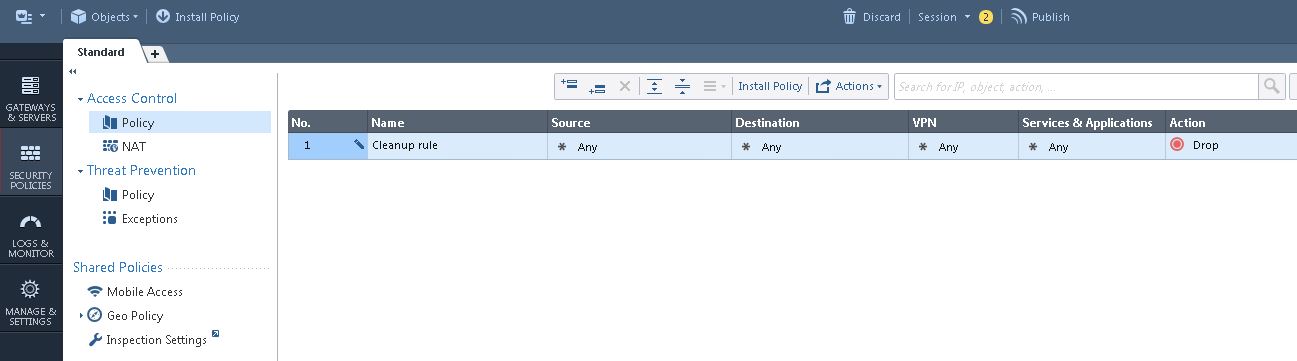
In the Action column, right-click and select Accept from the Edit Properties drop-down list.
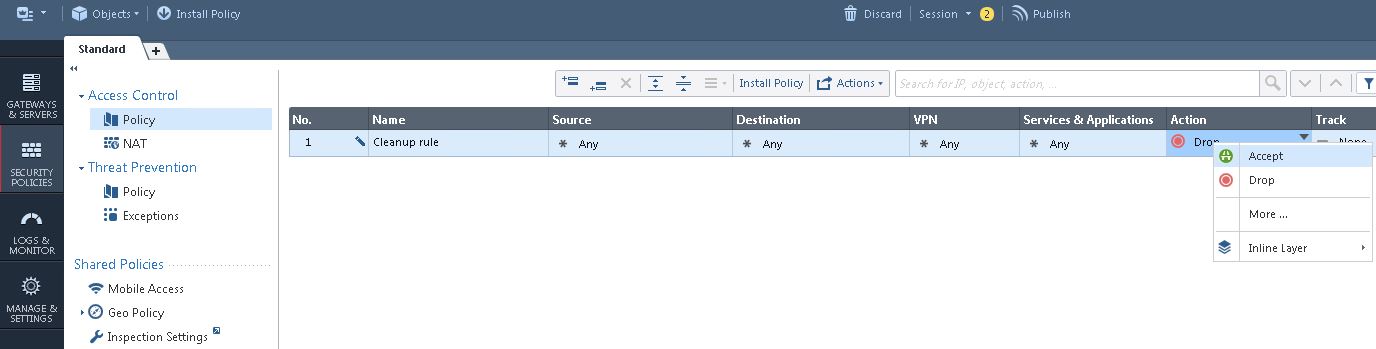
Note: A sample firewall rule to allow any traffic for this integration is available by default. Refer to the Check Point Security Gateway documentation to define the various types of policies to allow specific applications, services, port numbers, and user authenticators.
Click Install Policy to apply the configuration changes. The Unpublished changes dialog box appears.
Click Publish and Install. The Install Policy page.
Click Install.
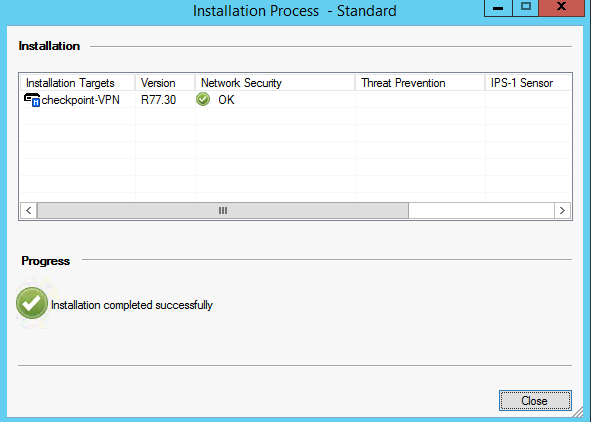
Step 3.7: Install the policyStep 3.7: Install the policy
The policy installation process does the following:
Performs a heuristic verification on rules to ensure that they are consistent and that no rule is redundant.
Confirms that each of the Security Gateways on which the rule is enforced (known as Install On object) enforces at least one of the rules.
Converts the Security Policy into an Inspection Script and compiles this script into an Inspection Code.
Distributes Inspection Codes to the selected installation targets.
Install a policy
In the Check Point SmartDashboard main page, click Install Policy on the top icon bar.

The Install Policy page appears.
In the Install Policy page, in the Network Security column, select the option for your device (for example, Checkpoint-VPN), and then click OK.
When the installation has completed successfully, click Close.
Step 4: Add Check Point Security Gateway to Identity as a Service
Step 4.1: Add Check Point Security Gateway to Identity as a ServiceStep 4.1: Add Check Point Security Gateway to Identity as a Service
Note: Entrust recommends that when multiple RADIUS applications are configured that each RADIUS application is given a unique shared secret.
Integrate a RADIUS client
Click ![]() > Security > Applications. The Applications page appears.
> Security > Applications. The Applications page appears.
Click Add. The Select an Application Template page appears.
Do one of the following:
Select RADIUS and VPN Integrations from the search drop-down list and scroll to find the application you want to add to IDaaS.
- or -
In the Search bar, enter a search option to filter for the application you want to add to IDaaS.
Click Check Point. The Add Check Point page appears.
Optional: Edit the Application Name.
Optional. Enter a Description for your application.
Optional. Add a custom application logo as follows:
Click ![]() next to Application Logo. The Upload Logo dialog box appears.
next to Application Logo. The Upload Logo dialog box appears.
Click ![]() to select an image file to upload.
to select an image file to upload.
Browse to select your file and click Open. The Upload Logo dialog box displays your selected image.
If required, resize your image.
Click OK.
Click Next. The Setup page appears.
Click Add to next to Hosts to add the host name of the VPN server. The RADIUS agent receives the request on this host. The RADIUS Agent on the Gateway determines the RADIUS application the request is for based on the host name and port.
Enter the host name in the Host dialog box and then click OK. Repeat this step to add more host names.
In the Port field, enter the port on which the RADIUS agent accepts messages.
Tip: Do not enter 8443 as the port number for this application. Port 8443 is used by the Entrust Identity Enterprise agent in your Gateway.
Attention: The RADIUS agent uses the host name that sent a request and the port number that it received the request from to determine which RADIUS application made the request. Because of that:
–Two RADIUS applications with the same port value cannot share any host names.
–Two RADIUS applications that have one or more matching host names must have different port values.
In the Shared Secret field, enter the shared secret that is used by your VPN server. This is the RADIUS secret shared between your VPN server and the RADIUS server. The shared secret value must match a shared secret in your RADIUS client.
From the Select RADIUS Agent drop-down list, select the name of the Gateway containing the RADIUS agent to which this application will be assigned.
Optional: From the Select RADIUS Attribute for IP Address drop-down list, select the RADIUS attribute that corresponds to your IP location.
In the Challenge Response Queue Max Time field, set the number of seconds that the RADIUS agent waits for a response to first-factor authentication. The default value is 180 seconds.
In the Challenge Response Queue Max Size field, set the maximum number of second-factor challenge requests allowed in the queue of your RADIUS application. The default value is 1000 requests. The maximum value is 10,000.
In the Request Cache Timeout field, set the number of seconds to cache requests. The default value is 10 seconds.
From the Character Set drop-down list, select the character set used to decode and encode string values (including the user ID and password values) in RADIUS messages. The options are UTF-8 and ISO-8859-1.
Optional: Select Log RADIUS messages to enable RADIUS message logging. When enabled, messages for the RADIUS agent are logged to the same log file as the gateway logs.
Optional: Enable the Authentication Settings.Optional: Enable the Authentication Settings.
Select Enable Push Authentication Fallback if you want to authentication to fallback to another authenticator in the event of a failure. If required, set the Push Authentication Fallback Timeout to the number of minutes before the push authentication times out.
Select When authenticating the user will be asked to select their second-factor authenticator. When selected, after the user responds to the first-factor challenge, they are prompted to select their second-factor authenticator. The list of available second-factor authenticators is set by the resource rule.
The following is a list of supported strings matched to the authentication types:
Grid: grid
Knowledge-based Authentication: kba
One-time password: email, sms, voice
Smart Credential Push: scpush
Temporary Access Code: tac
Token: token
Token push: push
Select Indicate if requests must include the message-authenticator attribute for incoming messages to include the message-authenticator attribute for incoming messages.
Select Indicate if requests must include the message-authenticator attribute for outgoing messages to include the message-authenticator attribute for outgoing messages.
Select Remove domain from user ID for incoming requests to remove the domain value from the user ID during authentication when the user ID provided by the RADIUS client is in the format domain\username and the user ID in IDaaS is in the format username.
Select Indicate if Active Directory password authentication requests are handled by the same Gateway Instance that initiated the request to require that Active Directory password authentication and change requests that are initiated as part of the RADIUS authentication are handled by any Gateway Instance in the same Gateway cluster that initiated it. If disabled, the request is handled by any Gateway Instance.
Select Enable one-step multi-factor authentication. When enabled, the user enters their user ID and then their password and token response in the password field. If you select this option, second factor authenticators available in the resource rule are limited to token and temporary access code.
Enter the One-step multi-factor authentication security token length. This is the length of the token or temporary access code response if you enable one-step multi-factor authentication.
Optional. Add Response Attributes.Optional. Add Response Attributes. Response attributes are returned to the RADIUS application after successful authentication. Use this setting to configure RADIUS attributes to return information such as the user's group information to the VPN server.
When adding response attributes, you optionally add group filters. For example:
Example:
Users in IDaaS may belong to one of the following groups CANADA, US, UK, FRANCE.
The VPN server wants the FilterID attribute returned from the IDaaS RADIUS agent to be the value NA or EUROPE, depending on whether the user is in NA (Canada, US) or Europe (UK, France).
To do this, use a RADIUS attribute filter for the FilterID attribute with a Groups value with the following filters:
- match CANADA, replace NA
- match US, replace NA
- match UK, replace EUROPE
- match FRANCE, replace EUROPE
Set the Response Attributes as follows:
Click ![]() Add. The Add a Response Attribute dialog box appears.
Add. The Add a Response Attribute dialog box appears.
Select the RADIUS Attribute ID from the drop-down list. The option you select depends on your VPN vendor.
Select the Value Type from the drop-down list.
To return a static value specific in the RADIUS attribute definition, select Static and enter a Value in the field and then click Add.
To return the user’s group membership, select Group and then optionally do the following:
- Click Add to add filters.
- Enter the Match and the Replace attribute filters.
- Click Add to add more attribute filters.
- If you add multiple filters, you can drag and drop them in order of preference.
- Select Stop after matching filter if you only want one the filter to return one value. Using the example above, if you want NA to have preference over Europe, make sure to list Canada and US in the list of filters.
- For Multiple Values Per Attribute, enter the Value Separator and then click Add.
Note: If a user belongs to more than one group, you can either add a separate attribute to your RADIUS response for each group or you can combine all of the groups into a single attribute. For example, if the user belongs to G1,G2,G3 then you would
- return a RADIUS response with three attributes
OR
- return a RADIUS response with one attribute and a value like “G1,G2,G3” where the , is defined in the Value Separator setting or a value like “G1 G2 G3” where the Value Separator is defined as a space.
Attention: The default group separator is a space. If you have group names that are separated by a space, use another separator, such as a comma.
Repeat these steps to add more response attributes.
Optional: Configure the EAP Settings to set up the application to use the EAP RADIUS authentication protocol.
Select EAP Enabled to allow the RADIUS application to accept EAP messages.
When enabled, authentication messages with EAP content are treated as EAP requests. The application can accept only EAP authentication requests.
When disabled, incoming authentication requests are processed by the RADIUS application as a standard RADIUS authentication request (even if the request includes EAP content). In this case, the application can accept only standard RADIUS authentication requests.
Select the EAP Protocol from the drop-down list. The options are PEAPv0 with MS-CHAPv2 and PEAPv1 with GTC.
This setting defines the type of EAP authentication protocol that is performed on EAP requests received by the RADIUS application. Consult the configuration requirements of your VPN server to determine which EAP protocol to select.
Select Return MPPE Keys to include the MPPE (Microsoft Point-to-Point Encryption) recv and mppe send keys in the Access-Accept message returned during a successful EAP authentication. The setting is enabled by default.
Select Use PEAPv1 label when calculating MPPE Keys to use the PEAPv1 label when calculating the mmpe recv and mppe send keys.
Leave the Minimum TLS Version, Maximum TLS Version and Allow Weak Ciphers at the default settings unless you have an older VPN and need to configure these settings to allow older versions of TLS or weaker ciphers to interoperate with older VPN servers that do not support the latest versions.
Configure the Deprecated Settings if your RADIUS application is connected to a Gateway version older than 3.0. These values are only required for backwards compatibility.
Select Token OTP Only, Password with second-factor, or No first-factor as the Authentication Type. This setting defines the level of authentication required to access a RADIUS application that relies on a gateway RADIUS agent configured before release 3.1.
Note: MSCHAPv2 authentication is not supported when No first-factor authentication is configured for the RADIUS application.
Click Submit.
Step 4.2: Add a resource ruleStep 4.2: Add a resource rule
Step 5: Test the Check Point integration
Test the integration to ensure that it has been configured properly.
Step 5.1: Test the authentication using a Web browser (Mobile Access SSL)Step 5.1: Test the authentication using a Web browser (Mobile Access SSL)
Test the authentication using a Web Browser
Open a web browser in the client computer and enter the following URL:
https:// <IP Check Point FW External Address>/sslvpn i.e. https://10.4.21.73/sslvpn
If you are connecting for the first time, the SSL VPN gateway imposes the installation of the Check Point SSL Extender Active X component. This is a virtual interface that encapsulates all the communication inside an SSL tunnel.
In the log in window, in the User name and Password fields, enter the user name that you have defined in Check Point and Identity as a Service in the section Creating a user.
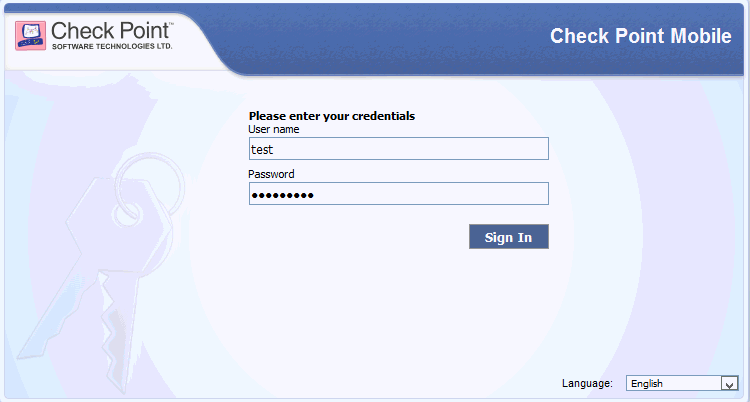
Click Sign In. You are prompted to enter a token response.
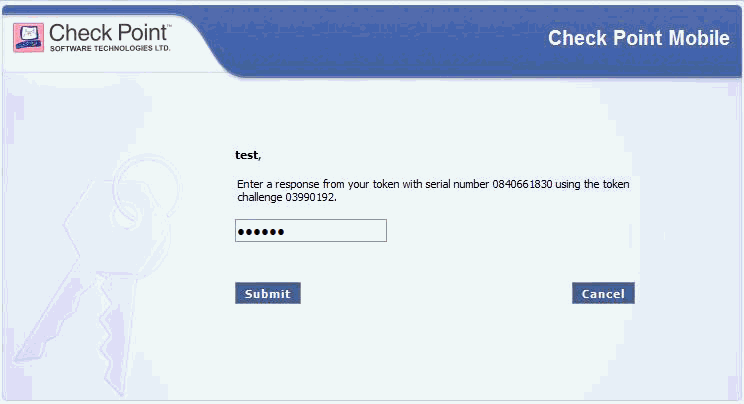
Enter the Entrust CR Token response to the challenge.
Click Submit.
The user has authenticated successfully and the Check Point Mobile window appears.
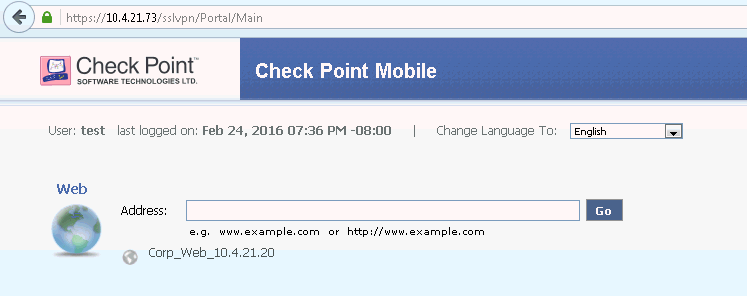
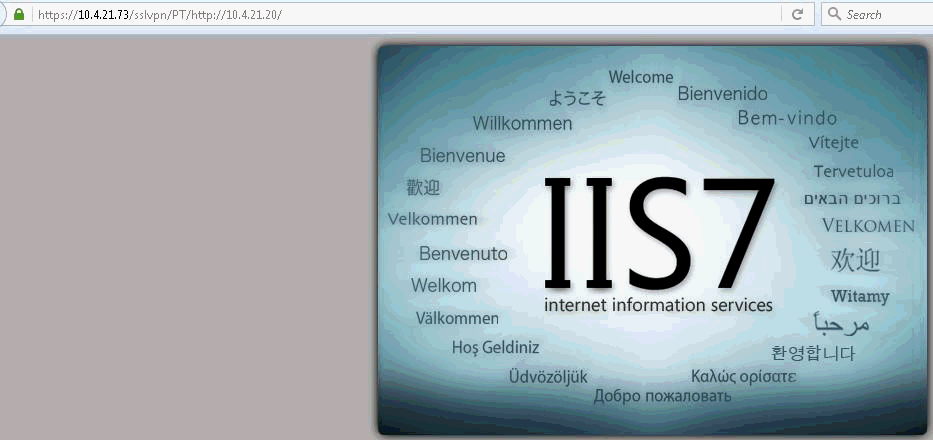
Open the Corp Web application and verify the web access of Internet network.
Step 5.2: Test using Check Point endpoint security client (IPsec)Step 5.2: Test using Check Point endpoint security client (IPsec)
Test using Check Point Endpoint security client
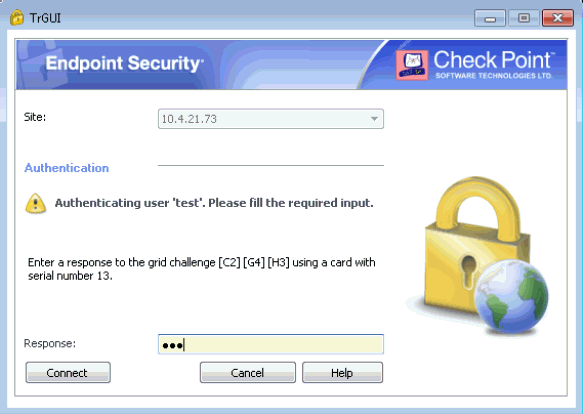
Open the Check Point Endpoint Security application.
In the log in window, do the following:
In the Site field, enter the IP address of the Check Point Security Gateway (External Interface IP).
In the Username field, enter the name that you defined in Check Point/ Identity as a Service.
In the Password field, enter the password of RADIUS application.

Click Connect.
On successful first-factor authentication, Identity as a Service challenges you to enter the response.
Enter a response to the grid authentication challenge.
Click Connect.
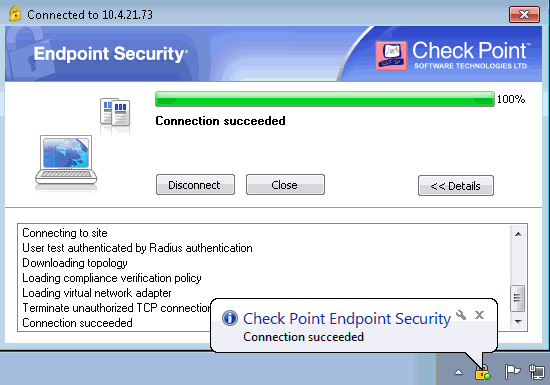
After successful authentication, you should see a Check Point connection succeeded message.
Step 5.3: Test using Entrust Identity push authenticationStep 5.3: Test using Entrust Identity push authentication
Test using the Entrust Identity app for push authentication
Log in with the correct first-factor username/password on your RADIUS client.
Open the Entrust Identity app on a mobile device.
Unlock (log in) using the identity you want to use to respond to the request.
Tap Actions.
Review the transaction summary details.
Tap Confirm.