Manage and create grid card authenticators
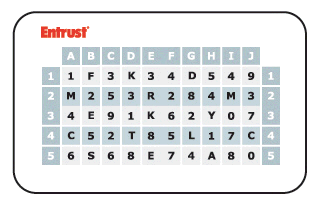
Grid authentication uses cards with a grid as the authentication lookup tool. When asked to authenticate with a grid, the challenge presents you with coordinates, for example, B3, H1. You reference the challenge coordinates on your grid card and respond by typing the corresponding values. For example, using the sample grid card shown below, the correct response to the challenge, B3, H1 is E 5.
A grid card is similar to the one shown in this example. Each grid card includes a unique serial ID. You can have multiple grid cards assigned to you.
Typically, your organization creates grids, manufactures them (for example, prints them), distributes the grid cards, and then assigns the grid card serial numbers so that you can use them for authentication. You can also create your own grid card.
Choose one of these procedures, as required.
Self-assign grid cardsSelf-assign grid cards
You can self-assign grid cards that an administrator has assigned to you. To do this, you must ensure that you have the serial number of the grid card available.
Self-assign grid cards
Click ![]() > My Profile. The My Profile page appears.
> My Profile. The My Profile page appears.
Click the Authenticators tab. The Authenticators page appears.
Click ![]() . A drop-down list of authenticators appears.
. A drop-down list of authenticators appears.
Select Grid Card (Assign). The Assign Grid Card dialog box appears.
Enter the grid card serial number in the Assign Grid Card field.
Click Assign. You are presented with a grid card challenge.
Respond to the grid challenge using your grid card.
Click Assign.
The grid card is now assigned to you. It is in a Pending state until you use it successfully to authenticate to IDaaS.
Manage grid cardsManage grid cards
You can perform a number of actions with grid cards. These include:
Enable or disable a grid card
Cancel a grid card
View grid card details
Export an eGrid to a PDF file
Email an eGrid
Delete a grid card
Managing grid cards
Click ![]() > My Profile. The My Profile page appears.
> My Profile. The My Profile page appears.
Click the Authenticators tab. The Authenticators page appears showing a list of authenticators.
Note: You can have multiple grid cards assigned to you.
Click  next to the desired grid card. A drop-down menu appears with the following options:
Enable—Select ![]() to enable the grid card and then click Confirm on the dialog box. This action puts the grid card in an Active state.
to enable the grid card and then click Confirm on the dialog box. This action puts the grid card in an Active state.
Disable—Select ![]() to disable the grid card and then click Confirm on the dialog box. This action puts the grid card in an Inactive state.
to disable the grid card and then click Confirm on the dialog box. This action puts the grid card in an Inactive state.
Click ![]() Cancel to cancel the Grid Card. Click Confirm on the prompt. A cancelled grid card still counts toward a user's total number of grid cards.
Cancel to cancel the Grid Card. Click Confirm on the prompt. A cancelled grid card still counts toward a user's total number of grid cards.
Click ![]() Export eGrid to print the grid card in PDF format.
Export eGrid to print the grid card in PDF format.
Click ![]() Email to email the grid card to the user. The Email Grid Card dialog box appears.
Email to email the grid card to the user. The Email Grid Card dialog box appears.
If you have multiple email attributes, select the email address that receives the eGrid.
Click Confirm on the prompt.
If your administrator has enabled encryption, you first receive an email with the encryption password and then the email, with the eGrid. There may be a delay between the password email and the one with the eGrid.
View —Select to view the grid card details, including the expiry date and status.
Delete—Select ![]() to delete the grid card and then click Confirm on the dialog box.
to delete the grid card and then click Confirm on the dialog box.
Create grid cardsCreate grid cards
You can create grid cards to use for authentication.
Create grid cards
Click ![]() > My Profile. The My Profile page appears.
> My Profile. The My Profile page appears.
Click the Authenticators tab. The Authenticators page appears.
Click ![]() . A drop-down list of authenticators appears.
. A drop-down list of authenticators appears.
Select Grid Card (Create). The new grid card appears in your Authenticators list.
Note: You can have a maximum of five grid cards.