Integrate ForgeRock OIDC with Identity as a Service
You can configure ForgeRock to use Identity as a Service for multi-factor authentication.
Tip: When performing this integration, you copy and paste content from one application to the other. Open ForgeRock in one browser window and Identity as a Service in another to make copying and pasting easier.
To integrate ForgeRock OIDC with Identity as a Service, complete the following steps:
Step 1: Obtain the Redirect URL from ForgeRock Access ManagementStep 1: Obtain the Redirect URL from ForgeRock Access Management
Log in to ForgeRock Access Manager.
Click Top Level Realm. The Realm Overview page appears.
In the navigation pane, click Authentication > Trees. The Trees page appears.
Click Create Tree.
Enter a Tree Name and click Create. A blank tree appears that you can customize.
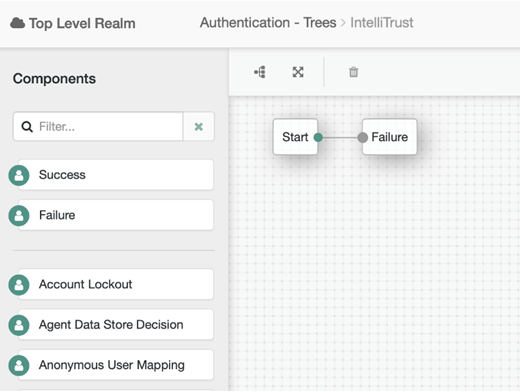
Under Components, click and drag the following nodes to the tree:
Success
OpenID Connect
Provision Dynamic Account
Note: Depending on where you store your users, you might use Provision IDM Account instead of Provision Dynamic Account.
Remove
the Failure node by selecting it and then
clicking  .
.
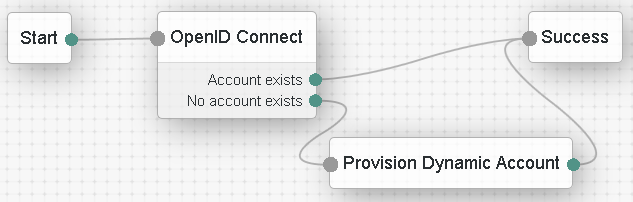
Wire the nodes as shown in this diagram. To wire them, click the red dot and drag to connect it to the connecting dot. The red dots change to green when they are connected.
Click the OpenID Connect node to open the OpenID Connect dialog box.
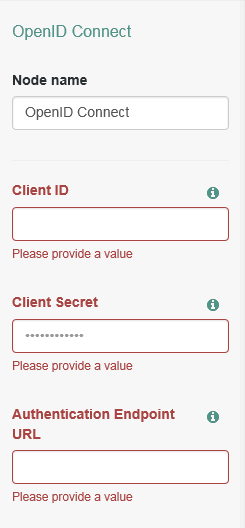
Scroll down to Redirect URL and copy the value. You need to paste this URL into Identity as a Service.
Leave OpenID Connect dialog box open as you will need to copy values from Identity as a Service into this dialog box.
Step 2: Add ForgeRock OIDC to Identity as a ServiceStep 2: Add ForgeRock OIDC to Identity as a Service
Log in to Identity as a Service.
Click ![]() > Security > Applications. The Applications
List page appears.
> Security > Applications. The Applications
List page appears.
Click Add. The Select an Application Template page appears.
Do one of the following:
Select OpenID Connect and OAuth Cloud Integrations from the search drop-down list and scroll to find the application you want to add to IDaaS.
- or -
In the Search bar, enter a search option to filter for the application you want to add to IDaaS.
Click ForgeRock OIDC. The Add ForgeRock OIDC page appears.
In the Search bar, enter a search option to filter for the application you want to add to IDaaS.
Modify the Application Name and Application Description, if required.
Optional. Add a custom application logo, as follows:
Optional. Add a custom application logo, as follows:
Click ![]() next to Application Logo. The Upload Logo dialog box appears.
next to Application Logo. The Upload Logo dialog box appears.
Click ![]() to select an image file to upload.
to select an image file to upload.
Browse to select your file and click Open. The Upload Logo dialog box reappears showing your selected image.
If required, resize your image.
Click OK.
Select the Authentication Flow that appears to users during login.
Click Next. The Settings page appears.
In the General Settings, do the following:
Click  to copy the Client ID is generated
when you create the application on Identity as a Service. You cannot
modify the Client ID. You can then paste the Client
ID value into the required field of your client ForgeRock OIDC
application account settings.
to copy the Client ID is generated
when you create the application on Identity as a Service. You cannot
modify the Client ID. You can then paste the Client
ID value into the required field of your client ForgeRock OIDC
application account settings.
Click to copy the Client Secret value. You can then
paste the Client Secret value
into the required field of your client ForgeRock OIDC application
account settings.
Note: You can define your own Client Secret value. However, Entrust recommends that you use the strong secret value provided.
Select the OIDC Signing Certificate used to connect to ForgeRock.
Optional: Enter the Initiate Login URI to allow users to access the application from Identity as a Service.
The Login URI is the location from which authentication to the ForgeRock OIDC application through Identity as a Service can be initiated.
Click Add to add a Login Redirect URI.
The URI is the location a user is redirected to after being provided or denied access to the ForgeRock OIDC. The value can be a URL, and you can add more than one value.
Note: The login redirect URI hostname is added as a valid CORS origin for OIDC processing.
Deselect Enable Go Back Button if you do not want users to be able to go back to the ForgeRock login page to log in.
In the Authentication Settings, do the following:
Select Require Content to require that users respond to a consent prompt for each request.
Optional. Enter a Consent Message to include a message to users when consent is requested.
Set Max Authentication Age (seconds) to the maximum amount of time that can elapse before a user must re-authenticate to log in. This feature is disabled if the field is left blank.
Under Grant Types, select Authorization Code. The Grant Type tells Identity as a Service what flow to use for returning authorization responses.
From the Authorization Code PKCE Code Challenge Method drop-down list, select S256 as the method used with PKCE during authentication.
Select Include Authentication Time to include the authentication time for ID tokens.
From the ID Token Signing Algorithm drop-down list, select RS256 as the signing algorithm used to sign with ID Token during authentication.
From the User Info Signing Algorithm, select none.
The authorization request uses Supported Scopes to establish a connection between Identity as a Service and the ForgeRock OIDC application. Supported Scopes are selected by default. If you disable Your unique identifier, the ForgeRock OIDC application strictly uses an access token to access a resource server API on behalf of a user.
Note: Click the arrow next to each scope to see the list of Implied Claims included in the scope. The list of Implied Claims is defined by OpenID Connect and cannot be modified. Every Implied Claim included in the scopes you select under Supported Scopes should have an associated Identity as a Service user attribute so that the attribute is returned as part of the OIDC tokens sent back to the client. For example, if you select Address as a Supported Scope, then you must define an Identity as a Service user attribute for each Implied Claim associated with Address. See Create and manage user attributes.
If required, add additional Supported Claims to map OIDC claims to Identity as a Service user attributes.
The supported claims define the claims that are requested by the client during an authorization request. A claim is an Identity as a Service user attribute, for example, first name. The user attribute must be included if that claim is requested by the client during an authorization request. The required claims depend on the OIDC application that you are configuring on Identity as a Service.
You can group claims, for example, the default claim, name, includes the user attribute First Name, a text-based value of a space and the user attribute value of Last Name so that the claim returned to the client is First Name <space> Last Name, for example Alice Gray.
To add a claim:
Ensure that you have already created the required User Attributes in Identity as a Service (see Create and manage user attributes).
Click  . The Add
Claim dialog box appears.
. The Add
Claim dialog box appears.
In the Claim Name field, do one of the following:
- Select
the Claim Name from the drop-down
list.
- Type a Claim Name to create a new custom claim.
In the Enter the Claim value expected by the Service Provider field, enter the following, as required:
User Attribute Value—An Identity as a Service user attribute (see Create and manage user attributes)
Text Based Value—A text based value. For example, to add a space between two claims or add text information.
Related Value—Include user group or authenticator attributes. See Configure OIDC claim to include user authenticators or groups.
Example: some text <first Name> <Last Name> [Groups]
Select Always Return with User Info to always return the user information with the claim.
Select Always Return with ID Token to always return the ID Token with the claim.
Click Add.
Note: If
required, click  next to the claim and make the required changes. Click to delete a claim.
Click Submit.
Step 3: Add a resource ruleStep 3: Add a resource rule
Step 4: Optional. Add a resource serverStep 4: Optional. Add a resource server
Manage OAuth authorization with a resource server.
Add an API/URL resource server
Click ![]() > Security > Authorization. The Authorization page appears.
> Security > Authorization. The Authorization page appears.
Select API/URL to add a protected resource. The APIs/URLs list page appears.
Click ![]() . The Add API/URL page appears.
. The Add API/URL page appears.
Under Basic Definition, do the following:
Select Enabled to make this API/URL resource active in Identity as a Service. JWT access tokens will not be issued unless the authorization is active.
Enter a Name for the resource.
Enter a Description for the resource.
Add a Value for the resource. The value should be an absolute URI value. The value corresponds to the API (aka audience value) that the resource server is protecting.
Note: The API/URL names and values must be unique across all resource server.
Select the Supported OIDC/OAuth Applications from the drop-down list. These are the applications that have permission to access the resource server. If you want all OIDC and OAuth applications to access the resource server, leave this field blank.
Under Token Definition, do the following:
Select Require Consent to prompt users for consent when an OAuth token is requested.
Select Include Application Name to include the application name in OAuth access tokens.
Select Include Client ID to include the client ID in OAuth access tokens.
Select Include OIDC Scopes and Claims to include the claims derived from OIDC scopes and claim requests in OAuth access tokens.
Select Include Authentication Claims to include authentication claims in OAuth access tokens.
Select Include Transaction Claims to include the transaction details in OAuth access tokens (for applications using the JWT IDaaS grant type).
From the Access Token Signing Algorithm drop-down list, select the signing algorithm that is used to sign the access tokens during authentication.
Set the Access Token Timeout to the time that the access token is valid before it expires.
Select Refresh Token to allow refresh token requests for OAuth token access. If you select this option, complete the following:
- Set the Refresh Token Timeout to the time that the refresh token associated with the access token is valid.
- Set the Refresh Token Limit to the maximum amount of a time a refresh token process is valid.
Under Scope Configuration, add the scopes (the permissions) the OIDC and OAuth application can request on behalf of the user for the configured API/URL (for example, view:calendar, edit:calendar). To add scopes:
Select Allow All Scopes to be requested to allow client applications to use the specific scope all_scopes to request all scopes the user has access to for this API/URL. This is a short-hand mechanism to request all scopes instead of listing out all scopes in the request.
Select Role-Based Access Control (RBAC) to enable access to scopes based on their Access Management Role associations. If disabled, the user has access to all scopes associated with the API/URL regardless of their Access Management Role. When enabled, the user only has access to the scopes permitted by the Access Management Role associations. To create RBAC, see Configure Role-Based Access Control (RBAC).
Click Add. The Add Scope dialog box appears.
Add a Name for the scope.
Add a Value for the scope, for example, edit:calendar.
Click Add.
Note: Scope names and values must be unique across scopes defined across all APIs/URLs.
Click Save.
Step 5: Add Identity as a Service to ForgeRock OIDCStep 5: Add Identity as a Service to ForgeRock OIDC
In ForgeRock, open the OIDC Connect dialog box.
In the OIDC Connect dialog box enter the Client ID and Client Secret as follows:
In Identity as a Service, click ![]() > Resources > Applications. The Applications List page appears.
> Resources > Applications. The Applications List page appears.
Click ForgeRock OIDC. The Edit ForgeRock OIDC page appears.
Click Next to go to the ForgeRock OIDC General Settings in Identity as a Service. Keep this page open.
Go to ForgeRock and in the ForgeRock OIDC Connect dialog box, paste the following from Identity as a Service:
In the Client ID field, paste the Identity as a Service client ID.
In the Client Secret field, paste the Identity as a Service client secret.
Return to the Edit ForgeRock OIDC page in Identity as a Service and click Cancel to close the page. You are returned to the Applications List page.
In the Identity as a Service Applications List page, under ForgeRock OIDC application, click OIDC Configuration. The OIDC Configuration page appears.
Leave the OIDC Configuration page open as you need to copy information from this page to ForgeRock OIDC Connect dialog box.
Paste the following from the Identity as a Service OIDC Configuration into the ForgeRock OpenID Connect dialog box:
In the Authentication Endpoint URL, enter the Authorization Endpoint from Identity as a Service.
In the Access Token Endpoint field, enter the Token Endpoint from Identity as a Service.
In the User Profile Service URL, enter the Userinfo Endpoint from Identity as a Service.
Leave the Identity as a Service OIDC Configuration page open as you will need to return to it later in this procedure.
In the ForgeRock OIDC Connect dialog box, do the following:
In the OAuth Scope field, change the scope to match the Identity as a Service configuration, for example, openid, profile, or email. If you want to use more than one, enter each one in the field separated by a space. For example: openid profile email
Enter a name for the Social Provider, for example, Identity as a Service.
Update the ForgeRock mappers as follows (delete any existing values and replace them with the new values):
Note: This configuration is valid for an out of the box ForgeRock AM backed by a local embedded directory. Your mappings may require changes depending on your setup.
In the Account Mapper field, enter:
org.forgerock.openam.authentication.modules.common.mapping.JsonAttributeMapper|*|Identity as a Service-
In the Attribute Mapper field, click x to delete the existing entry and then add the following enter the new Attribute Mapper and press Enter.
org.forgerock.openam.authentication.modules.common.mapping.JsonAttributeMapper|uid|Identity as a Service-.
In the Account Mapper Configuration, delete the existing sub key (if one exists) and then click Add.
Add the following key and value.
sub = uid
Click + after entering the key and value.
In the Attribute Mapper Configuration, delete the existing sub key (if one exists) click Add and the following keys and values.
You must click + after entering each key and value pair to add it to the Attribute Mapper configuration.
sub = uid
name = cn
given_name = givenName
family_name = sn
email = mail
Return to the Identity as a Service OIDC Connection page.
Paste the following from the Identity as a Service OIDC Configuration into the ForgeRock OpenID Connect dialog box:
In the Token Issuer field, enter the Issuer from Identity as a Service.
In the OpenID Connect Validation Value field, enter the Openid Configuration from Identity as a Service.
Click OK to close the Identity as a Service OIDC Configuration page.
Click Save to save the Identity as a Service mapping tree in ForgeRock.
Step 6: Test the integrationStep 6: Test the integration
Log out of both Identity as a Service and ForgeRock.
Open your ForgeRock OIDC instance using the new authentication tree, for example:
https://forgerockserver>.com:8443/openam/?service=Identity as a Service (where service=<tree name>)
You are redirected to Identity as a Service for authentication.
Upon successful authentication, you
are logged in to ForgeRock.