Integrate F5 BIG-IP Access Policy Manager (APM)
This technical integration guide describes how to integrate a F5 BIG-IP Access Policy Manager (APM) Appliance and Identity as a Service. The aim of this integration is to provide strong, second-factor authentication for your F5 BIG-IP Access Policy Manager (APM) appliance solution using Identity as a Service.
Before you begin, review the following:
Supported authentication methodsSupported authentication methods
| Authentication method | Notes | Supported protocols |
| Token |
Identity as a Service supports response-only tokens. One-step or two-step authentication. Note: Challenge/response tokens unsupported with MSCHAPv2. |
EAP-GTC or EAP MSCHAPv2 |
|
OTP (One Time Password) by SMS or Token |
Two-step authentication only | EAP-GTC |
Note: The PA-VM supports only CHAP authentication methods with RADIUS.
VPN capabilitiesVPN capabilities
The following F5 BIG-IP features are documented in this technical integration guide:
Access Policy Managers can be used with most standard browsers supporting secure HTTP (also known as HTTPS).
Standard SSL encryption from the client browser to the Access Policy Manager.
The F5 Big-IP Access Policy Manager provides a web-based Configuration utility. The Configuration utility includes tools for managing the Access Policy Manager, configuring secure access, creating and assigning resources, certificate generation and installation, and customization of the remote client user interface.
The Access Policy Manager can perform authentication, authorization, and accounting (AAA), using standard AAA methods, including LDAP directories, Microsoft® Active Directory® and Microsoft Windows® Domain servers, RADIUS servers, and HTTP authentication.
With Access Policy Manager, you can configure a network access VPN connection for remote access. Using network access, you create an access policy and local traffic virtual server so end users can establish a full VPN connection to internal network resources.
PrerequisitesPrerequisites
Complete the following steps before integrating your authentication system with Identity as a Service:
Install and configure your first-factor authentication resource using the documentation provided by the vendor. The first-factor authentication resource can be a RADIUS server or an external authentication resource (a Local DB, LDAP-compliant directory or Windows domain controller through Kerberos).
Install and configure the RADIUS appliance using the documentation provided by the vendor. The device must be able to route traffic before integrating with Identity as a Service.
Install and configure Identity as a Service and an Identity as a Service gateway (containing a RADIUS proxy agent). Take note of the shared secrets, IP addresses, and ports you use. You need this information to configure the RADIUS appliance and first-factor authentication resource.
If you want to configure your RADIUS appliance and first-factor authentication resource to recognize Identity as a Service user groups, you must define the Identity as a Service user groups first.
Integrate F5 BIG-IP
Complete the following to integrate F5 Big-IP with IDaaS.
Step 1: Configure F5 BIG-IP Access Manager
Complete the following steps, to configure the F5 BIG-IP Access Policy Manager to use the Identity as a Service proxy and enable VPN services.
Step 1.1: Set the IP address to connect to the F5 Big-IP controllerStep 1.1: Set the IP address to connect to the F5 Big-IP controller
You can set the IP address for the computer or workstation to connect to the F5 BIG-IP controller using one of the following methods:
Connect to the management interface using the default network
All F5 BIG-IP systems ship with a default network configured on the management interface. You can access the web-based Configuration utility through the management port, and configure the unit directly. You can use this method if you do not want to configure the management interface before you connect to the web-based configuration utility.
Run the Configuration utility remotely
You can run the Configuration utility remotely only from a workstation that is on the same LAN as the unit. To allow remote connections for the Configuration utility, the traffic management software comes with two predefined IP addresses, and a predefined root password.
The default root password is default.
The preferred default IP address is 192.168.1.245.
If this IP address is unsuitable for your network, the traffic management software uses an alternate IP address, 192.168.245.245. However, if you define an IP alias on an administrative workstation in the same IP network as the system, the unit detects the network of the alias and uses the corresponding default IP address.
Once the utility finishes and the system reboots, these default IP addresses are replaced by the information that you entered in the initial configuration you create with the Configuration utility.
You need to set the static IP address to access the F5 BIG-IP management port IP address.
Set the static IP address to access the F5 BIG-IP management port IP address
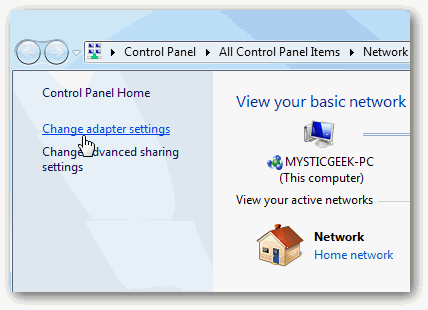
To change the computer’s IP address in Windows, type network and sharing in the Search box in the Start Menu and select Network and Sharing Center.
If you are using Windows 8.x it will be on the Start Screen.
If you are using Windows 7 or 10 it will be on the Start Menu.
In the Network and Sharing Center, click Change adapter settings.
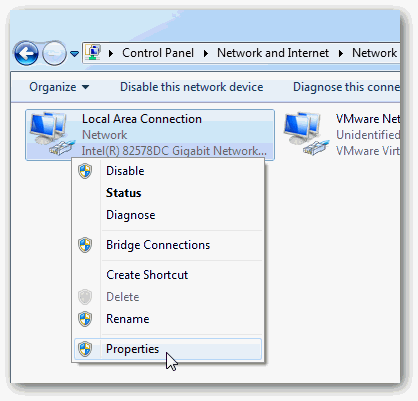
Right-click your Local Area Connection and select Properties to display the Local Area Connection Properties page.
In the Local Area Connection Properties page, highlight Internet Protocol Version 4 (TCP/IPv4) and then click Properties.
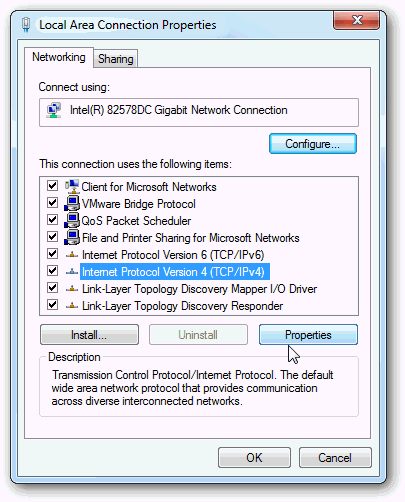
The Internet Protocol Version 4 (TCP/IPv4) Properties page appears.
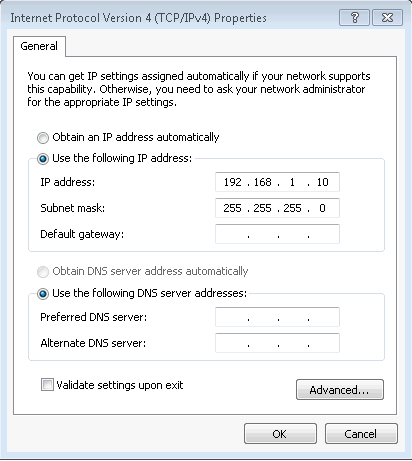
In the Internet Protocol Version 4 (TCP/IPv4) Properties page, do the following:
Select the Use the following IP address radio button.
Enter the correct IP address.
Enter the Subnet mask.
Enter the Default gateway that corresponds with F5 BIG-IP Management port network and subnet.
Click OK to close the Local Area Connections Properties page.
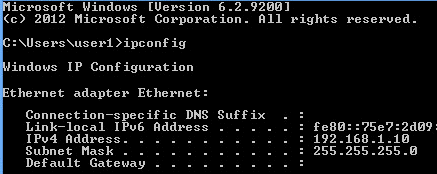
Open a command prompt and type ipconfig to see whether the network adapter settings have been successfully changed.
Step 1.3: Connect the unit to a management workstation or networkStep 1.3: Connect the unit to a management workstation or network
Before you can configure and manage the system, you need to connect the unit to a management workstation or network. There are three ways to attach a management workstation or network to the traffic management system.
Use a Serial consoleUse a Serial console.
Add a network to the management interface.Add a network to the management interface.
Connect using the default network option to change the management and internal/external interface IPs using the CLI
After assigning the static IP to the Client computer or workstation, launch the putty client to SSH to the F5 BIG-IP management IP client. The Putty Configuration page appears.
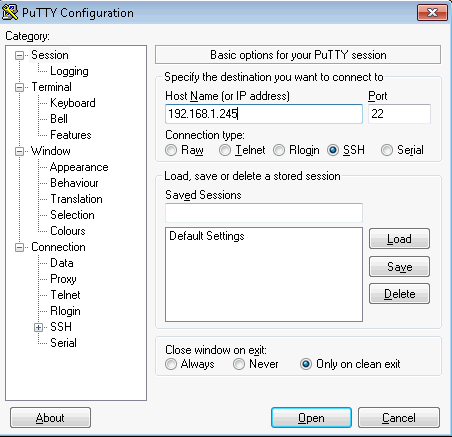
In the Host Name (or IP address) field, enter the F5 BIG-IP management IP address.
Click Open to open the command line interface (CLI).
Login using the following BIG-IP system default credentials:
Login: root
Password: default

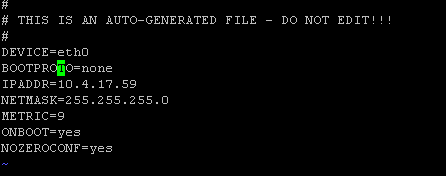
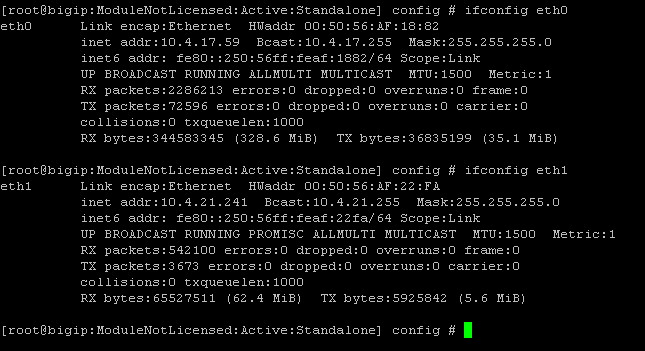
Edit the Network configuration file eth0 (Management IP) using the vi editor.

Add management IP and Netmask details as per your Corporate Network or LAN and then save the file.
Note: To get into the ex-mode, press the [Esc] key and then type a : (the colon). For example, to exit from VI saving changes, press [Esc], (colon) and type: wq (:wq).
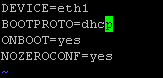
Edit the Network configuration file eth1 (Internal IP) using the vi editor.

Assign the DHCP IP from the Corporate Network or LAN for internal interface eth1.
Note: Ensure that you set BOOTPRPTO to dhcp.
Note: If you are required to set the static IP to internal interface (eth1), add the IP address and Netmask details manually.
At the command prompt, type #ifconfig eth0 (Interface name) to verify the assigned IPs.
Before you begin, be sure to have the F5 BIG-IP base registration key. Using the Setup utility, you can activate the license and provision the F5 BIG-IP system. After you get the management workstation connected to the management interface, you can open the Configuration utility and begin licensing the system. When you start the utility from a Web browser, you use the selected default IP address as the application URL.
To start the Configuration utility in a web browser
From a workstation attached to the network on which you configured the Management Interface, type the following URL syntax where <https://management_IP_address> is the address you configured for device management.
For example: https://192.168.1.245 (which is the default).
If you changed the default, use the IP address that is assigned to the Management port.
The BIG-IP Configuration Utility opens.
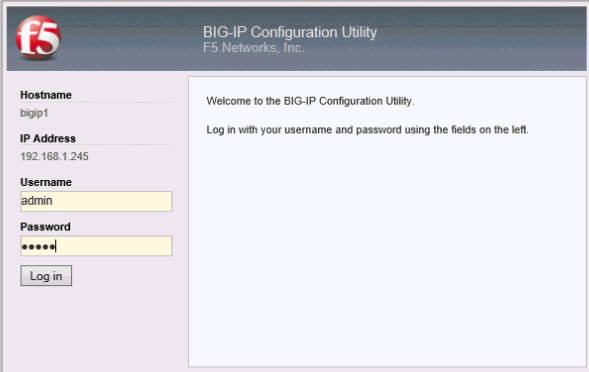
At the login prompt, enter the default user name admin, and password admin, and then click Log in. The Setup Utility page appears.
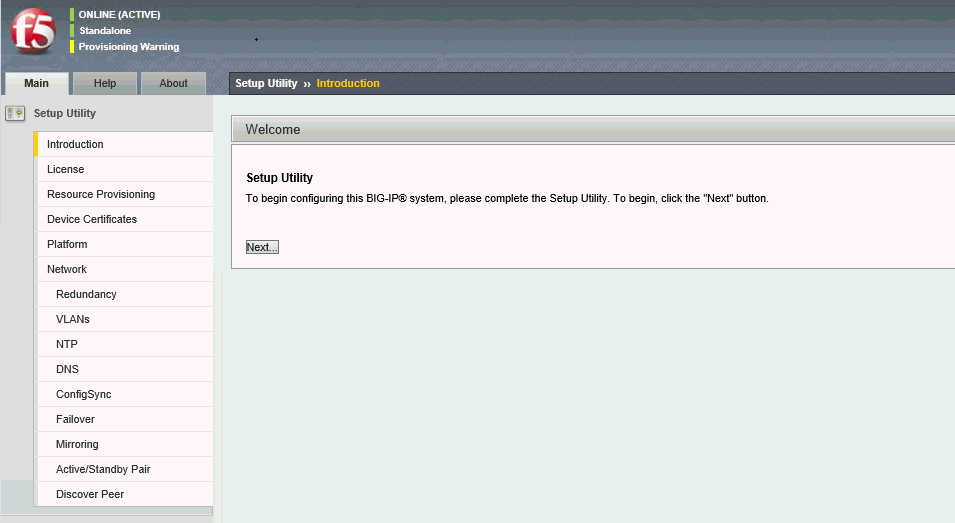
Click Next. The License Activation page appears.
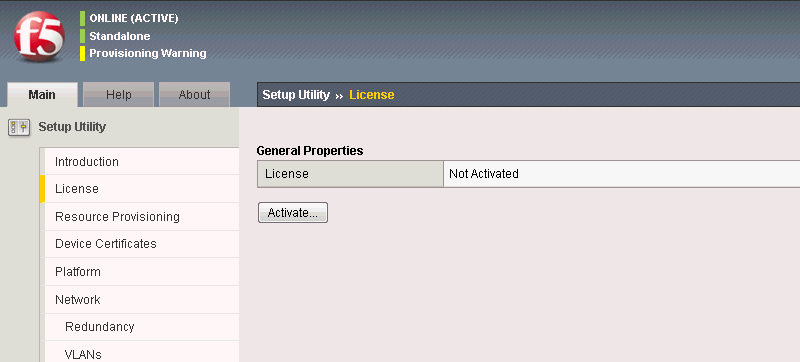
Click Activate. The License General Properties page appears.
In the Base Registration Key field, type or paste the registration key that you received when you purchased the F5 BIG-IP device.
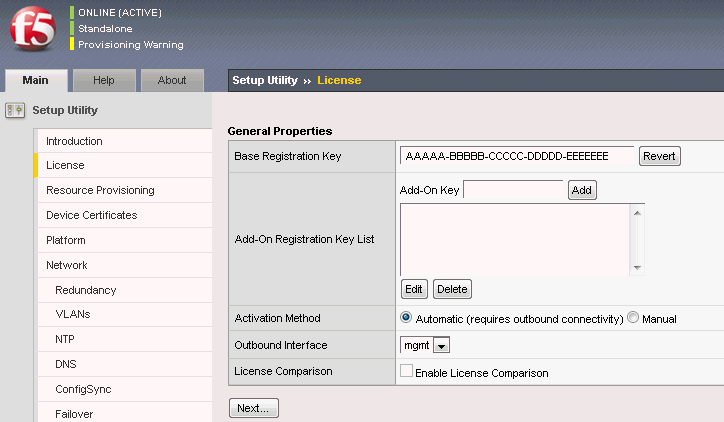
Click Next. The BIG-IP system automatically connects to the F5 License Server and activates the license.
See the following link for more information about activation methods of licensing the BIG-IP system.
https://support.f5.com/kb/en-us/solutions/public/7000/700/sol7752.html
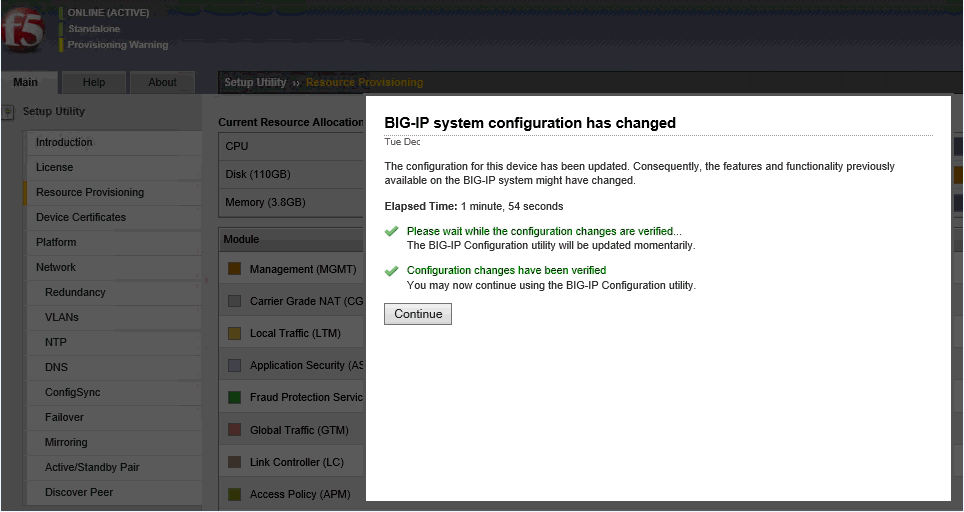
Note: Traffic processing is briefly interrupted while the BIG-IP system reloads the configuration.
After the license is activated and the BIG-IP configuration is reloaded, the Resource Provisioning page appears.
From the Access Policy (APM) drop-down module select Nominal.
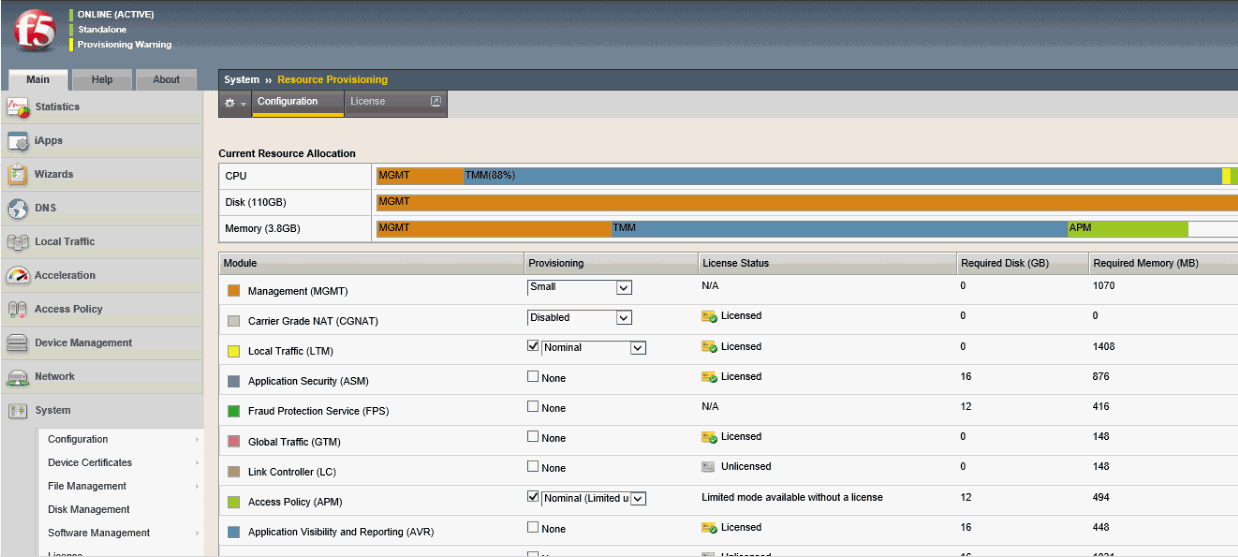
Scroll down the page and click Next. It takes few seconds for the configuration to update. Once done, click Continue.
The Device Certificates page appears.
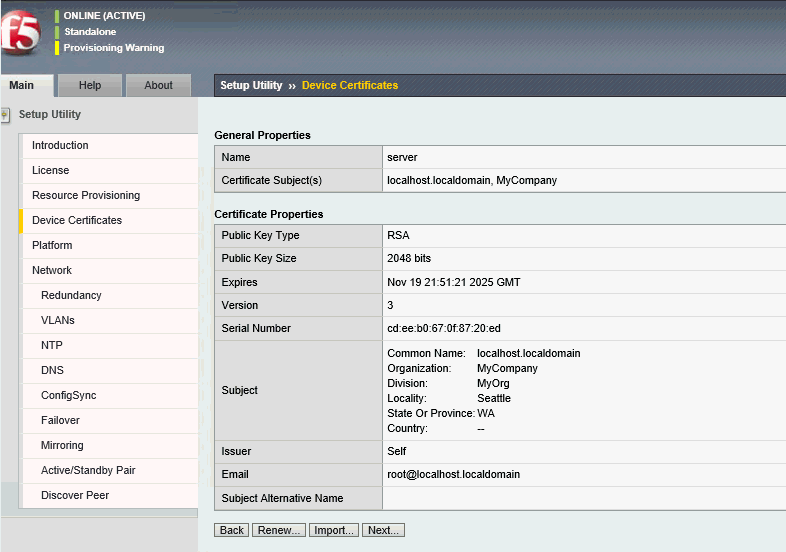
Click Next. The Platform page appears.
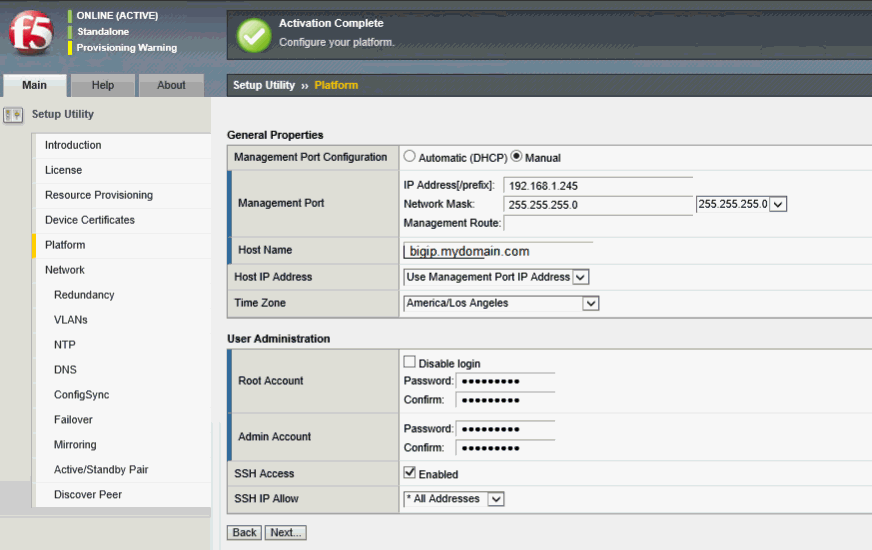
In the Platform page, do the following:
For the Management Port Configuration, click Manual.
Enter the Management Port IP address.
Enter the Network mask.
Enter the Management Route.
Note: Choose DHCP if you are required to obtain the IP from DHCP Server.
In the Host Name field, enter the host name of this F5 BIG-IP system, for example, bigip.mydomain.com.
Enter new root and admin account passwords and confirm the passwords.
Click Next. The F5 BIG-IP system prompts you to log in again.
Log into the F5 BIG-IP system again with the new password.
The F5 BIG-IP system license is now activated, and the F5 BIG-IP APM module is provisioned. The Standard network configuration screen within the Setup utility appears.
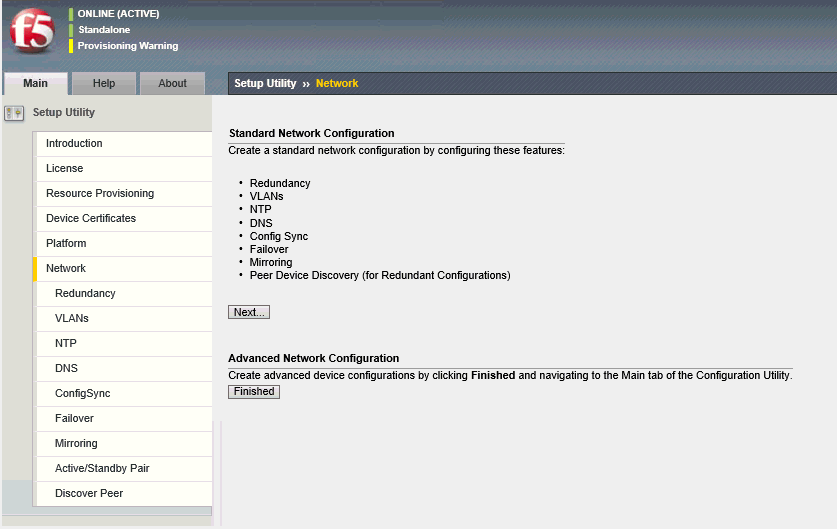
Click Next. The Redundant Device Wizard Options page appears.

Deselect the Display configuration synchronization options checkbox and then click Next. The Internal Network Configuration page appears.
Click Next.
Using the Setup utility, you can configure the internal network by specifying self IP addresses and settings for VLAN internal, which is the default VLAN for the internal network.
To configure the internal and external networks
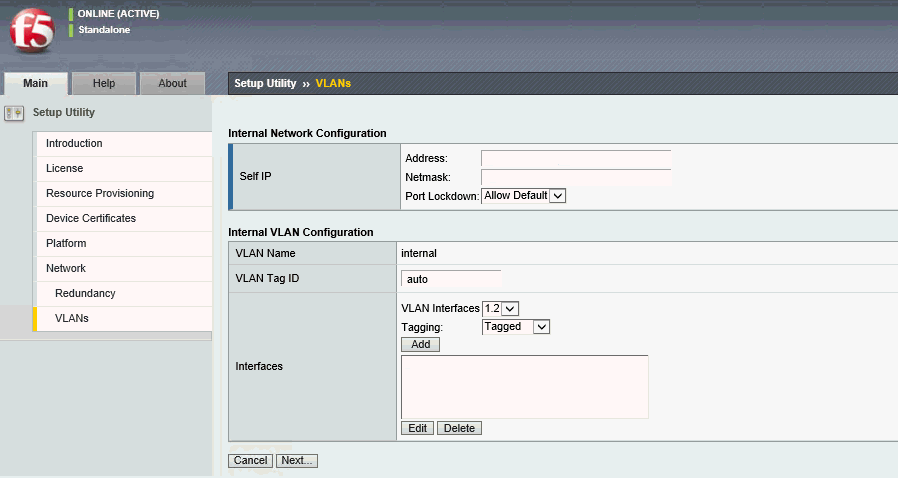
In the Internal Network Configuration page, complete the following:
Specify the Self IP setting for the internal network by doing the following:
In the Address field, type a self IP address.
In the Netmask field, type a network mask for the self IP address.
For the Port Lockdown setting, retain the default value.
For the VLAN Tag ID setting, retain the default value, auto. This is the recommended value.
For the Interfaces settings, do the following:
From the VLAN Interfaces drop-down list, select an interface number.
From the Tagging list, select Tagged or Untagged.
Note: Select Tagged when you want traffic for that interface to be tagged with a VLAN ID.
Click Add.
Click Next. The External Network Configuration page appears.
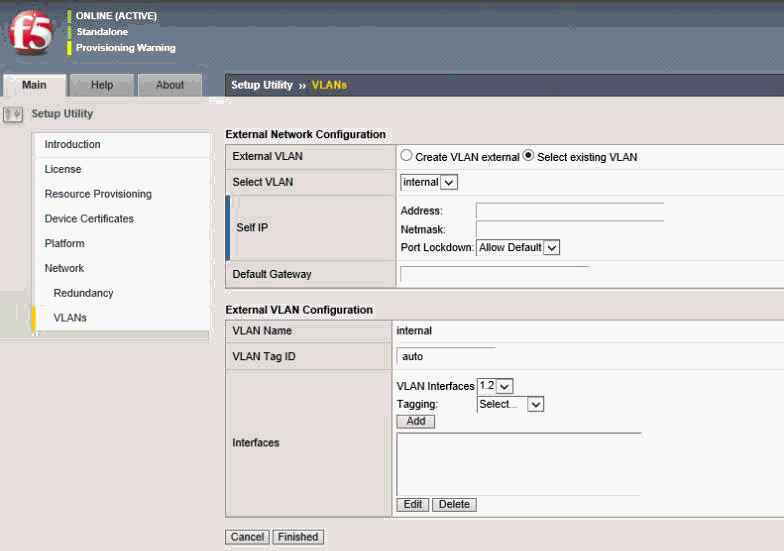
In the External Network Configuration page, complete the following:
Specify the Self IP setting for the external network by doing the following:
In the Address field, type a self IP address.
In the Netmask field, type a network mask for the self IP address.
For the Port Lockdown setting, retain the default value.
In the Default Gateway field, type the IP address that you want to use as the default gateway to VLAN external.
For the VLAN Tag ID setting, retain the default value, auto. This is the recommended value.
For the VLAN Interfaces settings, do the following:
From the Interfaces drop-down list, select an interface number.
From the Tagging list, select Tagged or Untagged.
Note: Select Tagged when you want traffic for that interface to be tagged with a VLAN ID.
Click Add.
Click Finished.
When using an external Microsoft Active Directory (AD) server to authenticate F5 users, you must configure the Active Directory (AD) server to recognize the F5 as a client.
To set up the F5 BIG-IP Appliance, you must add the Active Directory as an AAA (Authentication) Server.
To configure a connection to the Active Directory server on F5 BIG-IP APM Appliance
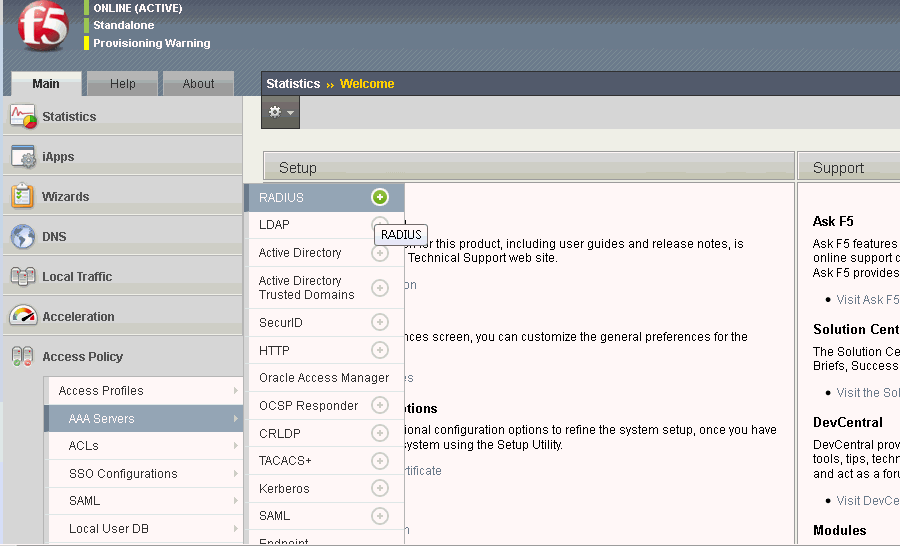
On the Main tab of the F5 navigation pane, expand Access Policy, click AAA Servers and then click the plus sign (+) next to Active Directory.
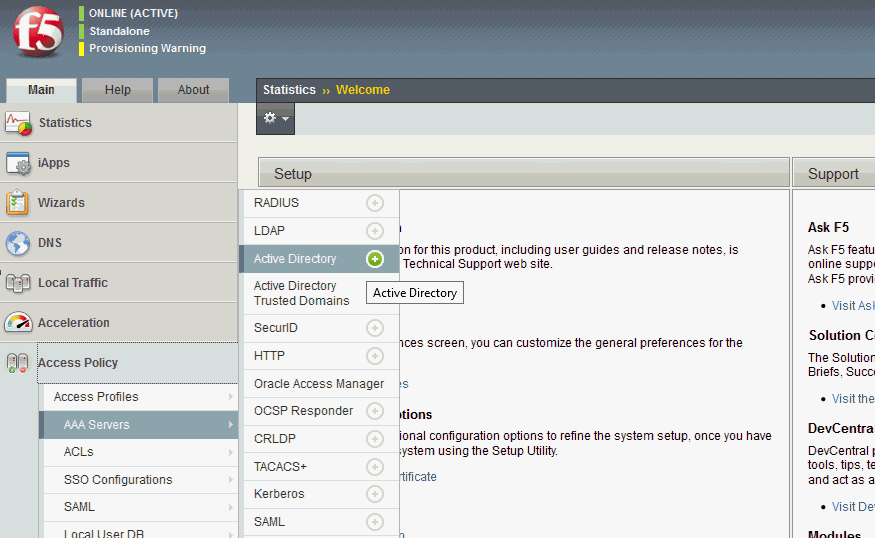
The New Server page appears.
In the New Server page, do the following:
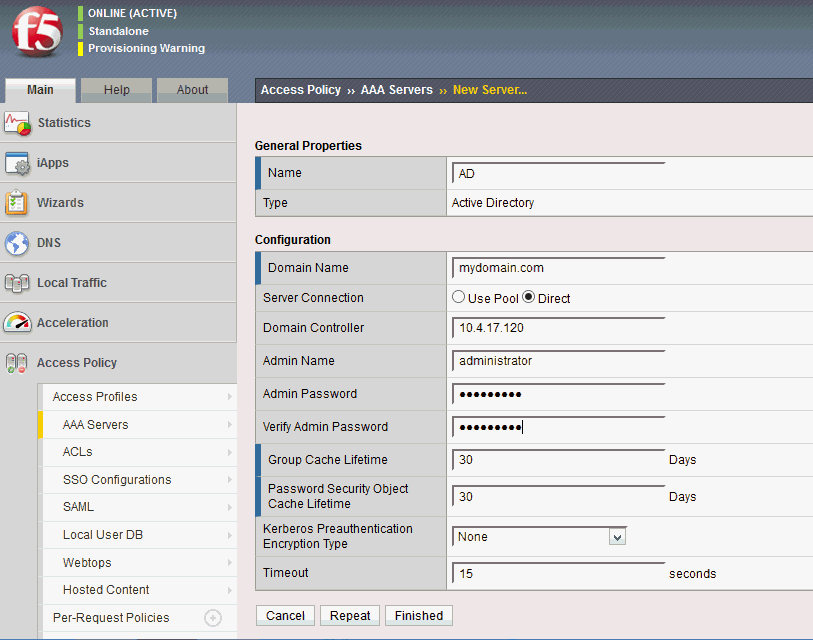
Under General Properties, in the Name field enter the name for the Active Directory (AD) server.
In the Domain Name field type your domain name, for example, mydomain.com.
In the Server Connection field, select Direct.
In the Domain Controller field, enter the IP address of your Active Directory (AD) server.
In the Admin Name field, enter the Active Directory (AD) server administrator user name, for example, administrator.
In the Admin Password and Verify Admin Password fields, enter the Active Directory (AD) server Administrator user password.
Accept all other default settings.
Click Finished.
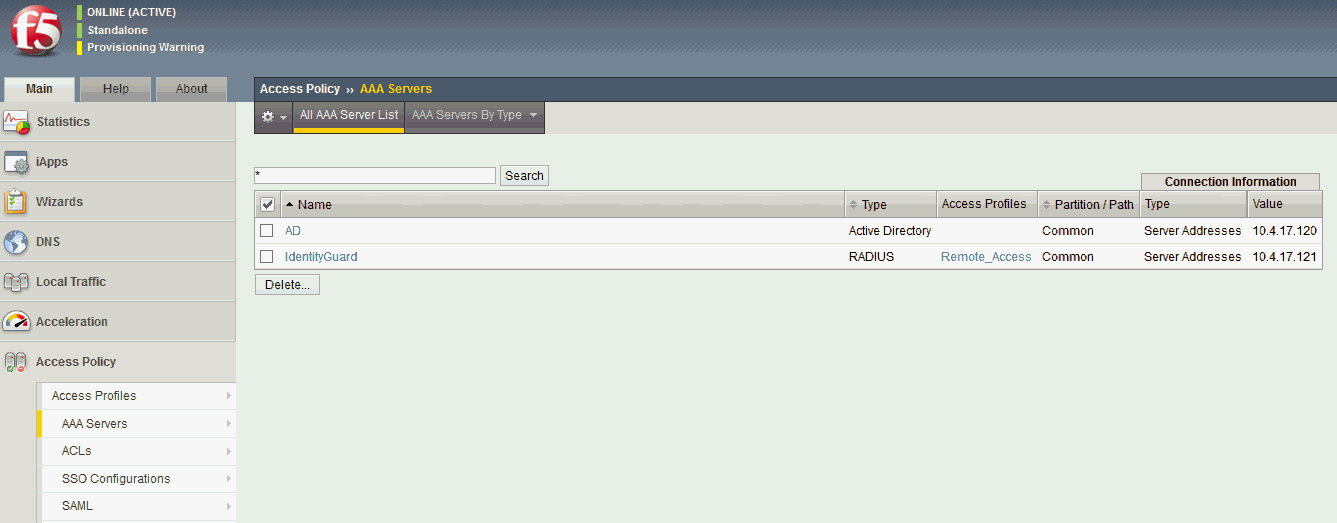
On the Main tab of the F5 navigation pane, expand Access Policy, click AAA Servers to list the AAA Servers.
Obtain the LDAP STRINGS from the Active Directory (AD) Server by doing the following:
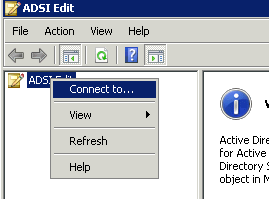
Go to Domain Controller (Active Directory server) and click Start > All Programs > Administrative Tools and select the ADSI Edit application.
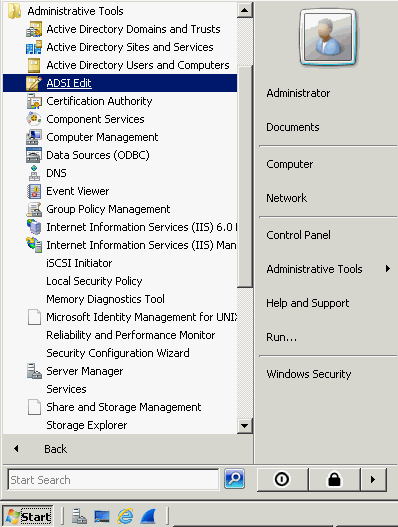
Right- click ADSI Edit and click Connect to...
Click OK. The Connection Settings page appears.
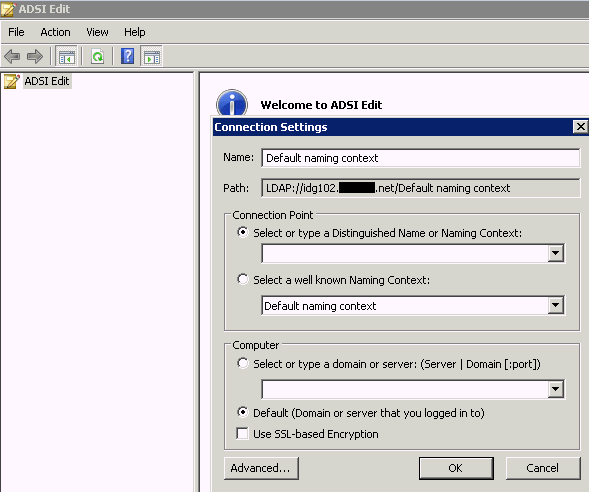
Click OK. ADSI Edit automatically attempts to load the current domain.
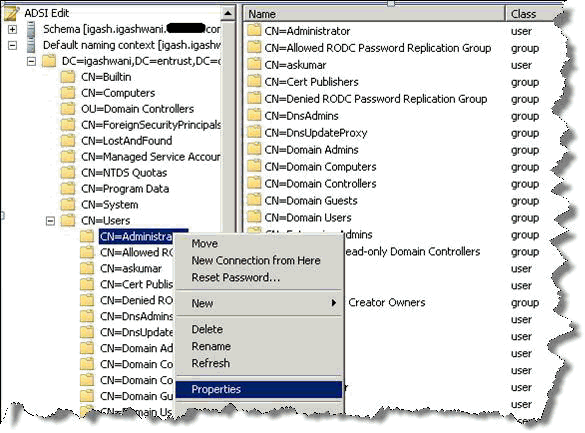
Expand Default naming context > DC > CN=Users, right-click CN=Administrator and select Properties.
The Administrator Properties page appears.
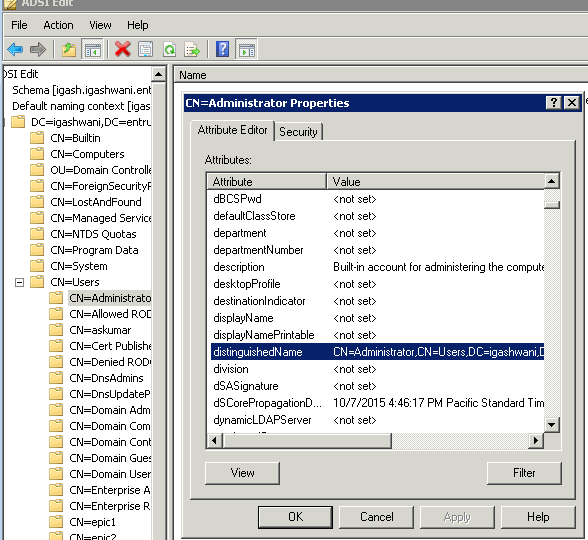
Click the Attribute Editor tab and scroll until you find the field distinguishedName.
Click View. The String Attribute Editor page appears.
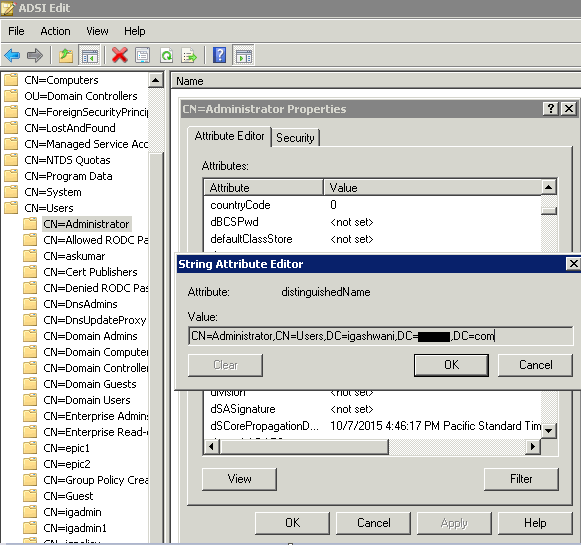
Make a note of the information in the Value field. This is the user string that you will use later.
Click OK.
On the Main tab of the F5 navigation pane, expand System and click Users > Authentication. The Users Authentication page appears.
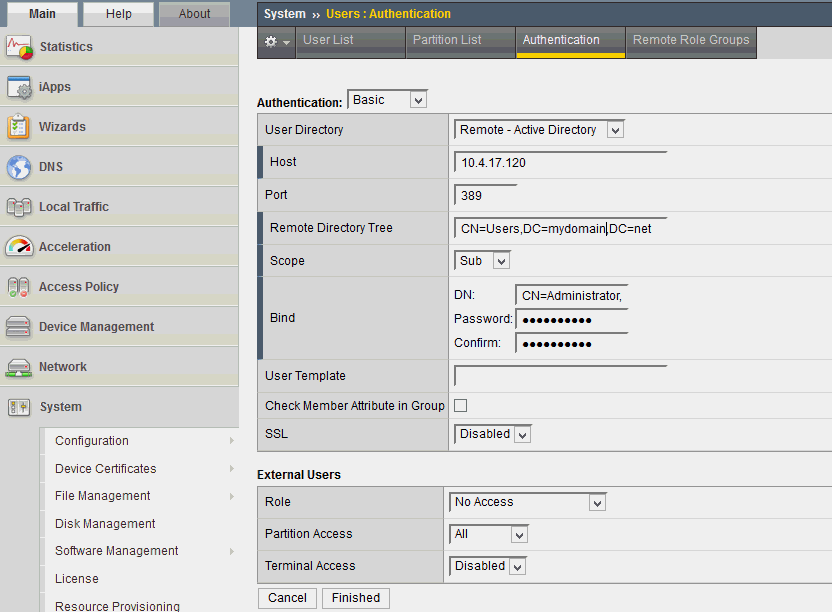
In the Users Authentication page, do the following:
Under Authentication, in the User Directory field, select Remote - Active Directory from the drop-down list.
In the Host field enter your Active Directory Server IP address.
In the Port field enter 389.
In the Remote Directory field, enter the domain string value that you recorded in Step 5 of this procedure.
In the Scope field, select Sub from the drop-down list.
In the Bind field, enter the DN, the DN password and confirm the password.
Accept all other default settings.
Click Finished.
Step 2: Configure Identity as a Service on F5 BIG-IP
After you have configured the F5 BIG-IP Appliance for Identity as a Service, you need to configure Identity as a Service on the F5 BIG-IP Appliance.
Step 2.1: Configure Identity as a Service as an AAA clientStep 2.1: Configure Identity as a Service as an AAA client
When using an external RADIUS server to authenticate F5 users, you must configure the server to recognize the F5 as a client and specify a shared secret for the RADIUS server to use to authenticate the client request. To set up the F5 BIG-IP Appliance, you must add Identity as a Service as an AAA (Authentication) Server.
To configure a connection to Identity as a Service on F5 BIG-IP APM appliance
On the Main tab of the F5 navigation pane, expand Access Policy, click AAA Servers and then click the plus sign (+) next to RADIUS.
The New Server page appears.

In the New Server page, do the following:
Under General Properties, in the Name field enter the name for the RADIUS server.
In the Mode field select Authentication.
In the Server Address field enter the IP address of your RADIUS server.
In the Authentication Service Port field, enter the port for your RADIUS server, for example 1812.
Enter and confirm the shared-secret for your RADIUS server.
Select UTF-8 from the Character Set drop-down menu.
Accept all other default settings.
Click Finished.
Step 2.2: Configure Access Policy Manager for remote accessStep 2.2: Configure Access Policy Manager for remote access
With the APM wizards, you can quickly configure any of the three access types with a simple working configuration. After you configure a connection with the wizard, you can go back and edit the configuration to further customize the access policy.
For this Technical Integration Guide, we have used the Network Access Setup Wizard for Remote Access.
To configure the Access Policy Manager for remote access
To access APM Wizards, in the F5 navigation pane, expand Templates and Wizards, and then click Device Wizards. The Device Wizards page appears.

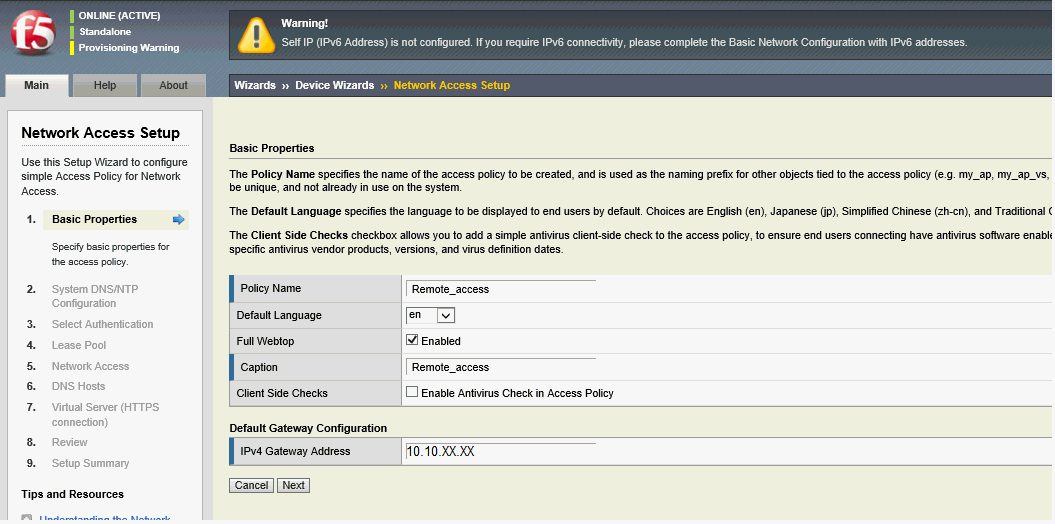
Select the Network Access Setup Wizard for Remote Access option, and then click Next. The Basic Properties page appears.
Note: This wizard configures a working VPN connection. Typically, this allows users outside your network to connect to specified networks and use their applications and network sites as if they are physically on the network.
In the Basic Properties page, do the following:
Enter the Policy Name for the access policy that will be created.
The Policy Name is the name of the access policy that will be created and is used as the naming prefix for other objects configured with the access policy. Later, when you look for items created with the wizard, they are named with this prefix.
Accept the Default Language (English), or change it, if required.
Select the Full Webtop Enabled check box.
Deselect the Enable Antivirus Check in Access Policy check box.
At a later time, you can refine this client-side check to verify a specific antivirus product.
Click Next. The System DNS/NTP Configuration page appears.
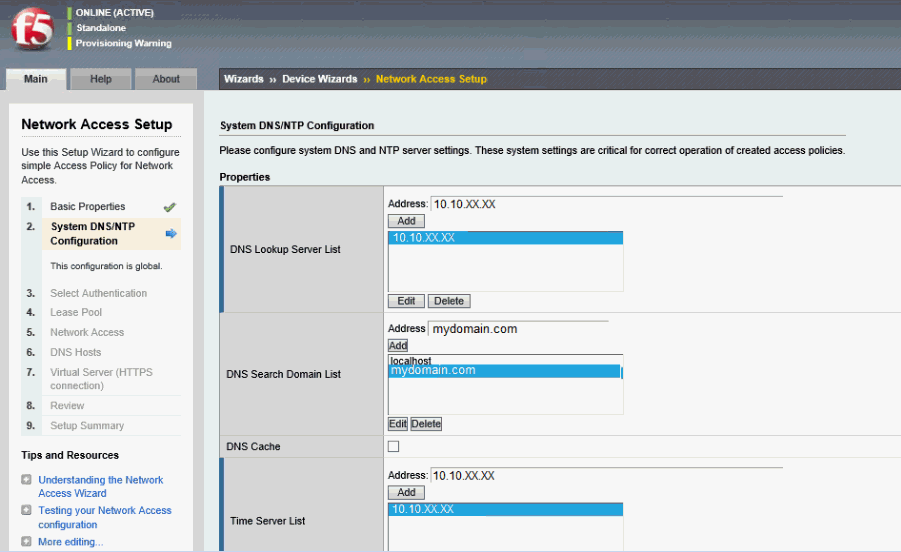
For BIG-IP APM, you must have the DNS and NTP settings configured. To configure these setting, do the following:
For the DNS Lookup Server List, enter the IP address of the DNS server and then click Add.
For the DNS Search Domain List, enter the Name of the DNS server and then click Add.
For the Time Server List, enter the Name of the NTP server and then click Add.
Scroll down the page, click Next. The Select Authentication page appears.
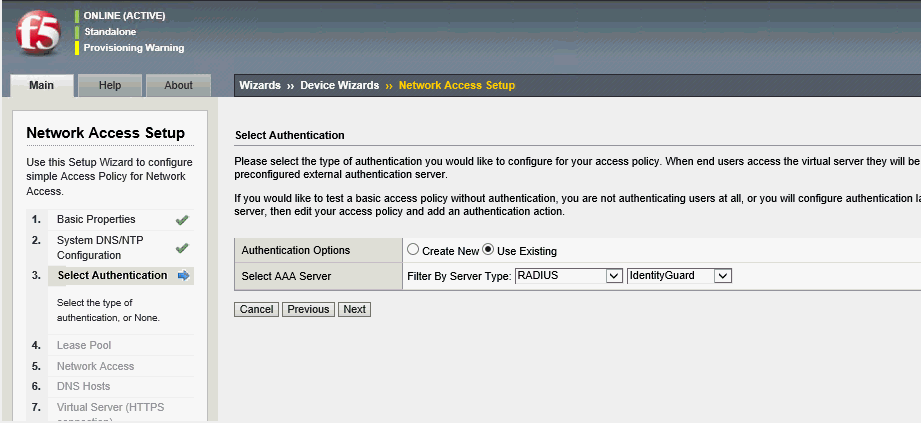
In the Select Authentication page, do the following:
For Authentication Options, select Use Existing.
From the Filter by Server Type drop-down lists, select RADIUS and your AAA RADIUS Server, for example, IdentityGuard or Active Directory.
Click Next. The Configure Lease Pool page appears.
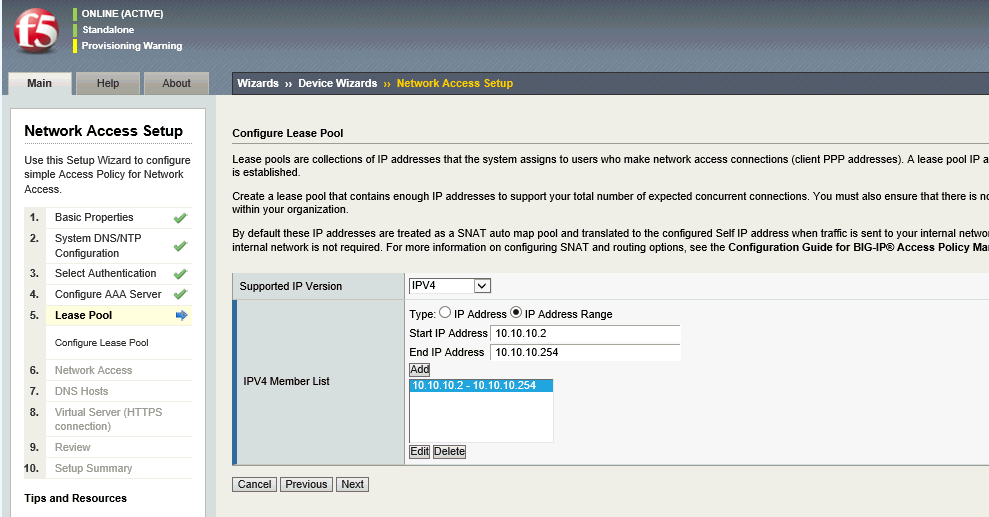
In the Configure Lease Pool page, do the following:
From the Supported IP Version drop-down list, select IPv4.
Specify the Type for the IPV4 Member List (either IP Address or IP Address Range).
Enter the Start IP Address.
Enter the End IP Address.
Click Add one time to specify an IP range.
Note: Click Edit to specify a different IP address.
Click Next. The Configure Network Access page appears for you to specify the network traffic options.
Note: Lease pools are a configuration requirement for network access connections. Each connection is assigned an IP address from the lease pool. You must configure a lease pool with as many IP addresses as required for the number of connected users you expect to host.
Specify the desired Traffic Options. (If you select the option to use split tunneling, then only network traffic that you specify will go through the network access connection.
Click Next. The Configure DNS Hosts for Network Access page appears.
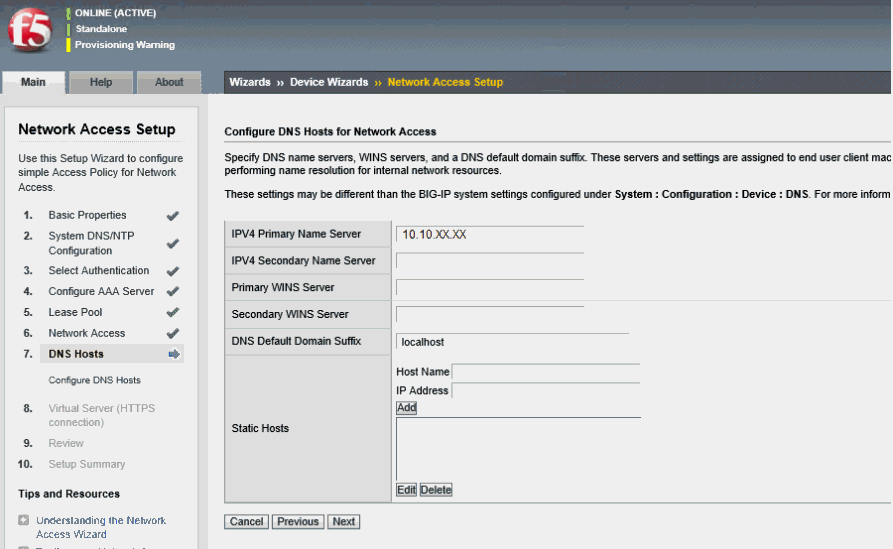
In the Configure DNS Hosts for Network Access, enter an IPV4 Primary Name Server IP address and then click Next. The Virtual Server (HTTPS connection) page appears.
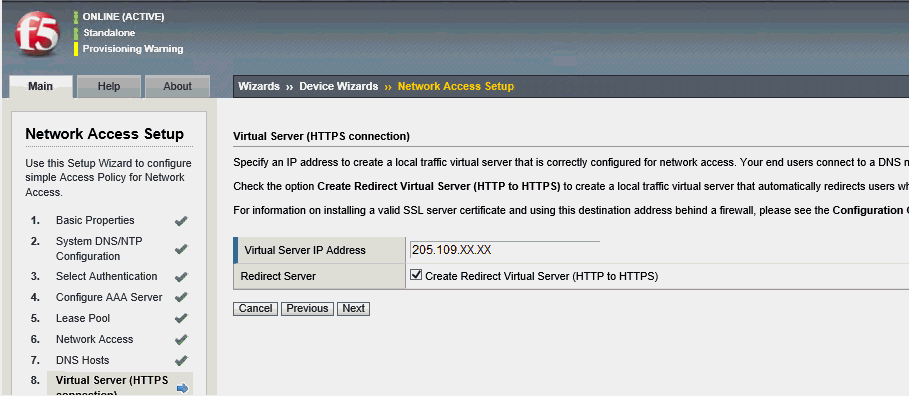
In the Virtual Server IP Address field enter an IP address for a public or Private IP that remote users can access through the Local network, Internet, or a VPN client.
Note: The IP address for this field needs to be on the same subnet as the external self-IP address.
Select the Create Redirect Server check box.
Selecting this option eliminates connection issues that users encounter when they do not type https before the virtual server IP.
Click Next. The Review Configuration page appears.
Review the configuration. If you need to, you can use the Previous and Next buttons to edit the configuration.
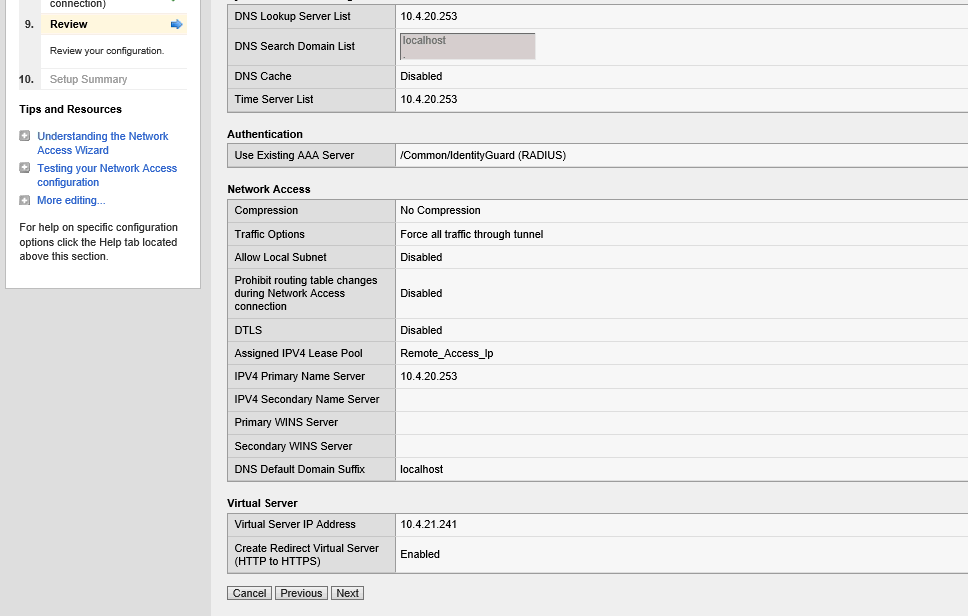
Click Next.
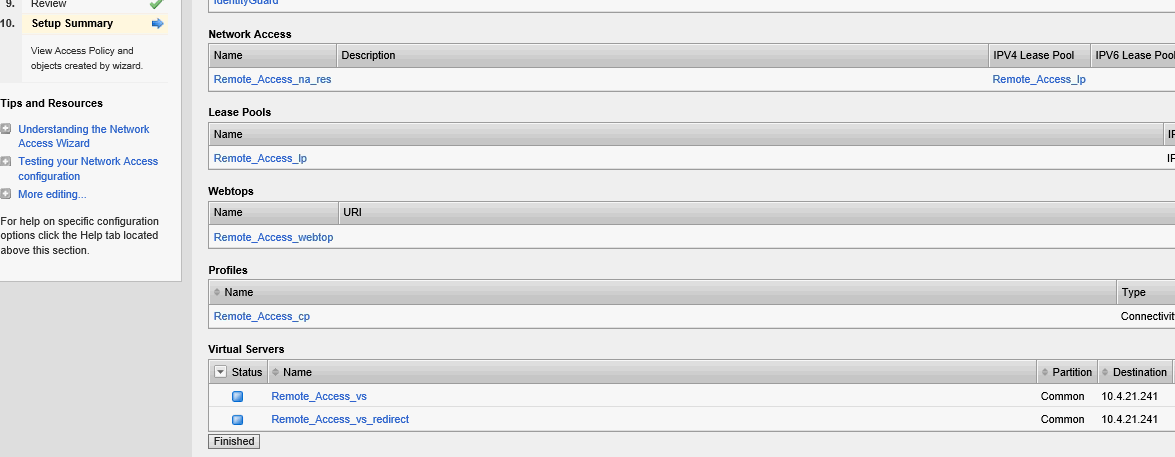
After reviewing and approving your settings, click Finished. The Access Profiles List page appears.
When you have finished customizing your configuration, click Apply Access Policy to apply your access policy.
The system creates and applies network access objects. Current authentication methods have been created and applied to an access policy.
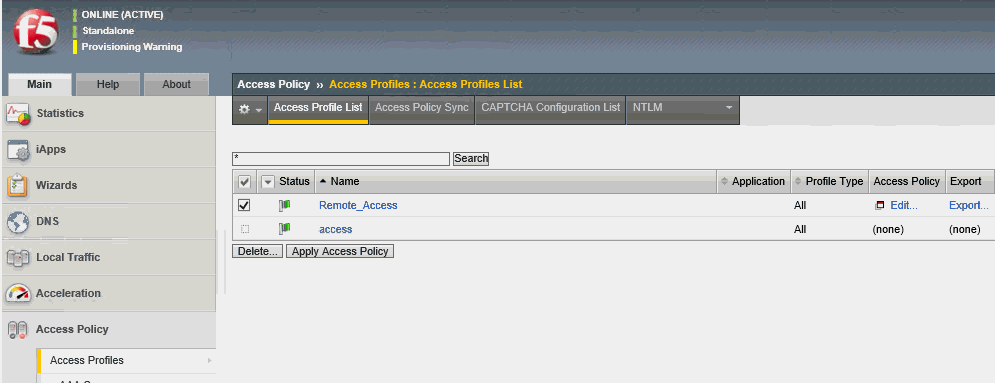
Note: When you have finished, you can still edit any setting associated with the access profile from the Access Profile page. To do so, navigate to Access Policy > Access Profiles > <name of access profile>). You can also edit the virtual server on the Virtual Server page by navigating to Local Traffic > Virtual Servers > <name of virtual server>).
Step 2.3: Configure the logon page for one-step authenticationStep 2.3: Configure the logon page for one-step authentication
You can customize the Logon page to collect the Active Directory password and Identity as a Service token.
You can customize the Logon page to collect the Active Directory password and the Identity as a Service token response.
Typically, when you configure an authentication action, you precede it with a Logon Page action to collect credentials. This example describes how to include more than one authentication in an access policy and present a Logon page only once. In this example, item the first password presented is the Active Directory password and the second password presented is the Identity as a Service token response.
To add a second password on login UI for one-step authentication
Login to F5 BIG-IP.
Click the Main tab and select Access Policy > Access Profiles. The Access Profiles List page appears.

In the Access Policy column, click the Edit link for the access profile you want to configure. The visual policy editor opens the access policy in a separate screen.
Click the Logon Page link. The Logon Page Agent Properties popup page appears.

To customize the Logon Page to prompt for a token code in addition to a password, do the following to add a second password field to the Logon page and supply the appropriate prompts for both password fields.
From the Type list in row 3, select password.
In the Post Variable Name field in row 3, type password1. The name password1 is an example.
From the Session Variable Name field in row 3, type password1.
The name password1 is an example. If you type password1, the name password1 becomes part of the session variable name, session.logon.last.password1. APM stores user input for the field in this session variable.
You now have two fields that accept passwords on this Logon Page.
Set the prompts that display for each password field. This access policy runs authentication AD/LDAP/Local DB first and another type of authentication, such as Entrust IdentityGuard afterward. To do this, complete the following:
In the In Input Field #2, in place of the text Password type AD Password/LDAP Password/Local DB Password or the wording of your choice, based on the first authentication method you already defined.
In Logon Page Input Field #3, type a prompt for the other type of authentication, for example, Identity Guard Token ID.
Click Save. The Properties page closes and the visual policy editor appears.
Step 2.4: Modify F5 Big-IP authentication flowsStep 2.4: Modify F5 Big-IP authentication flows
Using the Visual Policy Editor, you can add or modify settings associated with the access profile. You may want to do this to change or define external or internal authentication flows in the BIG-IP Appliance.
To use the Visual Policy Editor to modify authentication flows
Log into F5 BIG-IP.
Click the Main tab and select Access Policy > Access Profiles > <name of access profile>.
Click Edit. The Visual Properties Editor opens in Web browser.
The following diagrams provide examples of the following:
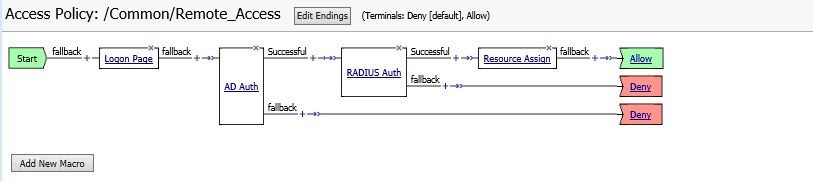
Authentication with only Identity as a Service RADIUS (see Figure 1)
Authentication with Active Directory and Identity as a Service RADIUS proxy (see Figure 2)
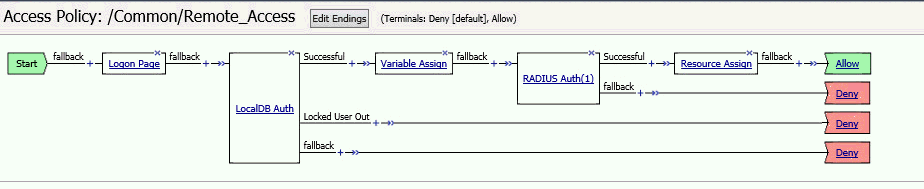
Authentication with Local database and Identity as a Service RADIUS proxy (see Figure 3)
Figure 1

Figure 2
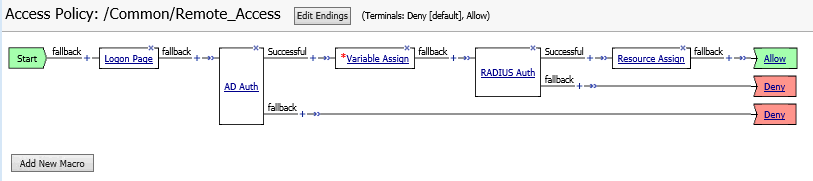
Figure 3
Note: Before you add Identity as a Service authentication to an access policy, you must have at least one AAA Identity as a Service server configured in Access Policy Manager (APM). You might need an AAA server or a local users database configured for another type of authentication, depending on the type or number of authentication actions that you plan to add to this access policy. This access policy uses Active Directory/LDAP authentication in addition to Identity as a Service. In this case, an Active Directory, LDAP AAA server, or local users database is required.
Step 3: Set the F5 BIG-IP Edge (VPN) client IP
Step 3: Set the F5 BIG-IP Edge (VPN) client IPStep 3: Set the F5 BIG-IP Edge (VPN) client IP
Big-IP Edge Client is a native platform-specific application for desktop operating systems that provides network access and endpoint inspection. Big-IP Edge Client allows users to connect to the Big-IP APM system to provide layer 3 network access to protected enterprise network resources.
Download and set the F5 BIG-IP Edge (VPN) client
Login to F5 BIG-IP.
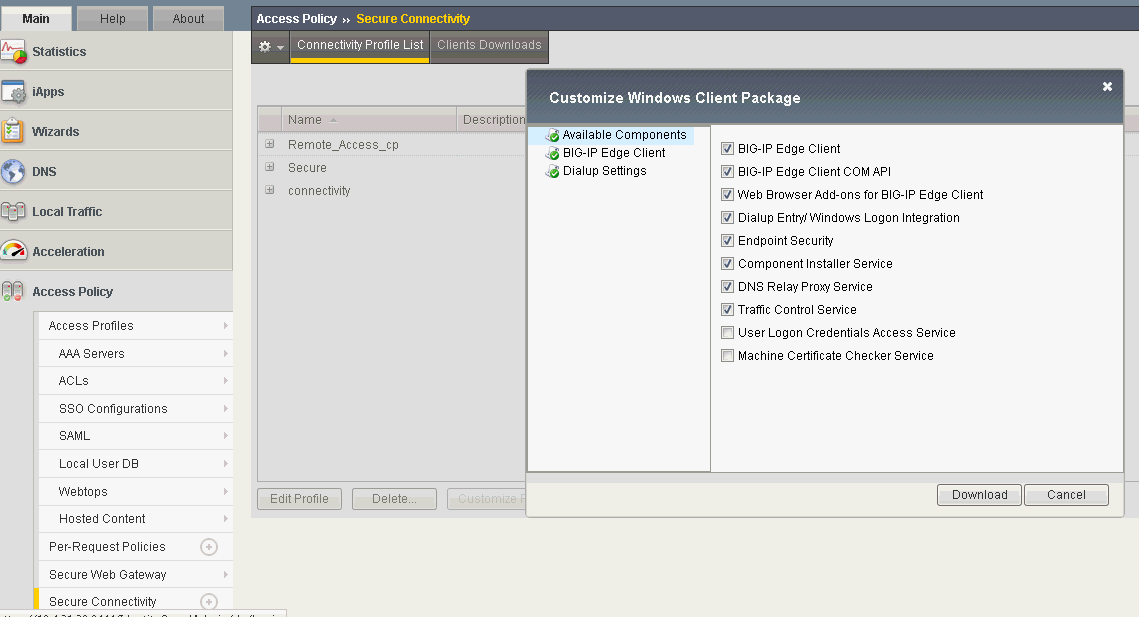
Click the Main tab in the F5 navigation pane and then select Access Policy > Secure Connectivity. The Connectivity Profiles List page appears.

Select the Remote Access Profile.
From the Customize Package drop-down menu, select required the Client Software (Windows or Mac) as per the requirement. (For this example, Windows has been selected.) The Customize Windows Client Package appears.
Customize the Client Software by choosing the options as required and then click Download.
Save the BigIPEdgeClient.exe file and then install it.
Launch F5 Big-IP Edge Client by clicking Start > Programs > F5 BIG-IP Edge Client.
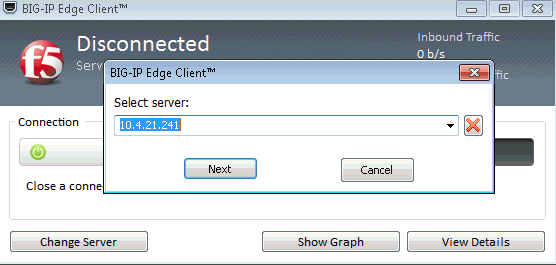
Click Change Server and enter the F5 Big-IP APM Virtual Server IP address.
Click Next to connect to the Big-IP Server and open the Logon window.
Note: See the following link to learn more about Big-IP APM Client Compatibility Matrix, for example, OS, browser and browser compatibility, and supported access and endpoint security features: https://support.f5.com/kb/en-us/products/big-ip_apm/manuals/product/apm-clientcompatmatrix-12-0-0.html
Step 4: Add F5 BIG-IP to Identity as a Service
Step 4.1: Add F5 BIG-IP to Identity as a ServiceStep 4.1: Add F5 BIG-IP to Identity as a Service
Note: Entrust recommends that when multiple RADIUS applications are configured that each RADIUS application is given a unique shared secret.
Integrate a RADIUS client
Click ![]() > Security > Applications. The Applications page appears.
> Security > Applications. The Applications page appears.
Click Add. The Select an Application Template page appears.
Do one of the following:
Select RADIUS and VPN Integrations from the search drop-down list and scroll to find the application you want to add to IDaaS.
- or -
In the Search bar, enter a search option to filter for the application you want to add to IDaaS.
Click F5. The Add F5 page appears.
Optional: Edit the Application Name.
Optional. Enter a Description for your application.
Optional. Add a custom application logo as follows:
Click ![]() next to Application Logo. The Upload Logo dialog box appears.
next to Application Logo. The Upload Logo dialog box appears.
Click ![]() to select an image file to upload.
to select an image file to upload.
Browse to select your file and click Open. The Upload Logo dialog box displays your selected image.
If required, resize your image.
Click OK.
Click Next. The Setup page appears.
Click Add to next to Hosts to add the host name of the VPN server. The RADIUS agent receives the request on this host. The RADIUS Agent on the Gateway determines the RADIUS application the request is for based on the host name and port.
Enter the host name in the Host dialog box and then click OK. Repeat this step to add more host names.
In the Port field, enter the port on which the RADIUS agent accepts messages.
Tip: Do not enter 8443 as the port number for this application. Port 8443 is used by the Entrust Identity Enterprise agent in your Gateway.
Attention: The RADIUS agent uses the host name that sent a request and the port number that it received the request from to determine which RADIUS application made the request. Because of that:
–Two RADIUS applications with the same port value cannot share any host names.
–Two RADIUS applications that have one or more matching host names must have different port values.
In the Shared Secret field, enter the shared secret that is used by your VPN server. This is the RADIUS secret shared between your VPN server and the RADIUS server. The shared secret value must match a shared secret in your RADIUS client.
From the Select RADIUS Agent drop-down list, select the name of the Gateway containing the RADIUS agent to which this application will be assigned.
Optional: From the Select RADIUS Attribute for IP Address drop-down list, select the RADIUS attribute that corresponds to your IP location.
In the Challenge Response Queue Max Time field, set the number of seconds that the RADIUS agent waits for a response to first-factor authentication. The default value is 180 seconds.
In the Challenge Response Queue Max Size field, set the maximum number of second-factor challenge requests allowed in the queue of your RADIUS application. The default value is 1000 requests. The maximum value is 10,000.
In the Request Cache Timeout field, set the number of seconds to cache requests. The default value is 10 seconds.
From the Character Set drop-down list, select the character set used to decode and encode string values (including the user ID and password values) in RADIUS messages. The options are UTF-8 and ISO-8859-1.
Optional: Select Log RADIUS messages to enable RADIUS message logging. When enabled, messages for the RADIUS agent are logged to the same log file as the gateway logs.
Optional: Enable the Authentication Settings.Optional: Enable the Authentication Settings.
Select Enable Push Authentication Fallback if you want to authentication to fallback to another authenticator in the event of a failure. If required, set the Push Authentication Fallback Timeout to the number of minutes before the push authentication times out.
Select When authenticating the user will be asked to select their second-factor authenticator. When selected, after the user responds to the first-factor challenge, they are prompted to select their second-factor authenticator. The list of available second-factor authenticators is set by the resource rule.
The following is a list of supported strings matched to the authentication types:
Grid: grid
Knowledge-based Authentication: kba
One-time password: email, sms, voice
Smart Credential Push: scpush
Temporary Access Code: tac
Token: token
Token push: push
Select Indicate if requests must include the message-authenticator attribute for incoming messages to include the message-authenticator attribute for incoming messages.
Select Indicate if requests must include the message-authenticator attribute for outgoing messages to include the message-authenticator attribute for outgoing messages.
Select Remove domain from user ID for incoming requests to remove the domain value from the user ID during authentication when the user ID provided by the RADIUS client is in the format domain\username and the user ID in IDaaS is in the format username.
Select Indicate if Active Directory password authentication requests are handled by the same Gateway Instance that initiated the request to require that Active Directory password authentication and change requests that are initiated as part of the RADIUS authentication are handled by any Gateway Instance in the same Gateway cluster that initiated it. If disabled, the request is handled by any Gateway Instance.
Select Enable one-step multi-factor authentication. When enabled, the user enters their user ID and then their password and token response in the password field. If you select this option, second factor authenticators available in the resource rule are limited to token and temporary access code.
Enter the One-step multi-factor authentication security token length. This is the length of the token or temporary access code response if you enable one-step multi-factor authentication.
Optional. Add Response Attributes.Optional. Add Response Attributes. Response attributes are returned to the RADIUS application after successful authentication. Use this setting to configure RADIUS attributes to return information such as the user's group information to the VPN server.
When adding response attributes, you optionally add group filters. For example:
Example:
Users in IDaaS may belong to one of the following groups CANADA, US, UK, FRANCE.
The VPN server wants the FilterID attribute returned from the IDaaS RADIUS agent to be the value NA or EUROPE, depending on whether the user is in NA (Canada, US) or Europe (UK, France).
To do this, use a RADIUS attribute filter for the FilterID attribute with a Groups value with the following filters:
- match CANADA, replace NA
- match US, replace NA
- match UK, replace EUROPE
- match FRANCE, replace EUROPE
Set the Response Attributes as follows:
Click ![]() Add. The Add a Response Attribute dialog box appears.
Add. The Add a Response Attribute dialog box appears.
Select the RADIUS Attribute ID from the drop-down list. The option you select depends on your VPN vendor.
Select the Value Type from the drop-down list.
To return a static value specific in the RADIUS attribute definition, select Static and enter a Value in the field and then click Add.
To return the user’s group membership, select Group and then optionally do the following:
- Click Add to add filters.
- Enter the Match and the Replace attribute filters.
- Click Add to add more attribute filters.
- If you add multiple filters, you can drag and drop them in order of preference.
- Select Stop after matching filter if you only want one the filter to return one value. Using the example above, if you want NA to have preference over Europe, make sure to list Canada and US in the list of filters.
- For Multiple Values Per Attribute, enter the Value Separator and then click Add.
Note: If a user belongs to more than one group, you can either add a separate attribute to your RADIUS response for each group or you can combine all of the groups into a single attribute. For example, if the user belongs to G1,G2,G3 then you would
- return a RADIUS response with three attributes
OR
- return a RADIUS response with one attribute and a value like “G1,G2,G3” where the , is defined in the Value Separator setting or a value like “G1 G2 G3” where the Value Separator is defined as a space.
Attention: The default group separator is a space. If you have group names that are separated by a space, use another separator, such as a comma.
Repeat these steps to add more response attributes.
Optional: Configure the EAP Settings to set up the application to use the EAP RADIUS authentication protocol.
Select EAP Enabled to allow the RADIUS application to accept EAP messages.
When enabled, authentication messages with EAP content are treated as EAP requests. The application can accept only EAP authentication requests.
When disabled, incoming authentication requests are processed by the RADIUS application as a standard RADIUS authentication request (even if the request includes EAP content). In this case, the application can accept only standard RADIUS authentication requests.
Select the EAP Protocol from the drop-down list. The options are PEAPv0 with MS-CHAPv2 and PEAPv1 with GTC.
This setting defines the type of EAP authentication protocol that is performed on EAP requests received by the RADIUS application. Consult the configuration requirements of your VPN server to determine which EAP protocol to select.
Select Return MPPE Keys to include the MPPE (Microsoft Point-to-Point Encryption) recv and mppe send keys in the Access-Accept message returned during a successful EAP authentication. The setting is enabled by default.
Select Use PEAPv1 label when calculating MPPE Keys to use the PEAPv1 label when calculating the mmpe recv and mppe send keys.
Leave the Minimum TLS Version, Maximum TLS Version and Allow Weak Ciphers at the default settings unless you have an older VPN and need to configure these settings to allow older versions of TLS or weaker ciphers to interoperate with older VPN servers that do not support the latest versions.
Configure the Deprecated Settings if your RADIUS application is connected to a Gateway version older than 3.0. These values are only required for backwards compatibility.
Select Token OTP Only, Password with second-factor, or No first-factor as the Authentication Type. This setting defines the level of authentication required to access a RADIUS application that relies on a gateway RADIUS agent configured before release 3.1.
Note: MSCHAPv2 authentication is not supported when No first-factor authentication is configured for the RADIUS application.
Click Submit.
Step 4.2: Add a resource ruleStep 4.2: Add a resource rule
Step 5: Test the integration
After you complete the configuration, use a VPN Client or a Web browser to test the integration to ensure that it works correctly.
Step 5.1: Test one-step authenticationStep 5.1: Test one-step authentication
Launch F5 Big-IP Edge Client and click Connect.
Enter the Identity as a Service user name and click Logon.
Enter the response to the second-factor challenge.
Click Logon.
The VPN/Remote access connection is established.
Step 5.2: Test two-step authenticationStep 5.2: Test two-step authentication
Launch F5 BIG-IP Edge Client and click Connect.
Enter the Identity as a Service user name and password and then click Logon.
Enter the response to the second-factor challenge.
Click Logon.
The VPN/Remote access connection is established.
Step 5.3: Test using Entrust push authenticationStep 5.3: Test using Entrust push authentication
Test using the Entrust Identity app for push authentication
Log in with the correct first-factor username/password on your RADIUS client.
Open the Entrust Identity app on a mobile device.
Unlock (log in) using the identity you want to use to respond to the request.
Tap Actions.
Review the transaction summary details.
Tap Confirm.