Configure Microsoft Entra ID to support LDAP
This section describes how to connect Microsoft Entra ID Directory (AD) using LDAP. Before you begin, ensure that you have completed the prerequisites described in Integrate Microsoft Entra ID with Identity as a Service.
Step 1: Prerequisites
Before you begin, ensure that you have the following:
A valid Microsoft Entra ID subscription
A Microsoft Entra ID directory synchronized with an on-premises directory or a cloud-only directory
Microsoft Entra ID Domain Services enabled (see Microsoft Create and configure a Microsoft Enter Domain Services managed domain)
A certificate for secure LDAP to the managed domain (see Configure secure LDAP for a Microsoft Entra Domain Services managed domain).
Step 2: Export the secure LDAP certificate.
You need to export the certificate in both .PFX and .CER formats. The .PFX format is used in Microsoft Entra ID and the .CER format is used in Identity as a Service. Use one of the following procedures:
Export the secure LDAP certificate in .PFX formatExport the secure LDAP certificate in .PFX format
Go to the Start menu on your computer and click Run.
Enter mmc in the Run window and click OK.
Click Yes when prompted to accept changes to your computer. The Microsoft Management Console window appears.
Go to File > Add/Remove Snap-in... The Add or Remove Snap-ins dialog box appears.
Click Certificates under Available Snap-in.
Click Add. A Certificates snap-in dialog box appears.
Select My user account.
Click Finish. The Certificates Snap-in is added to the list of Selected snap-ins.
Select Certificates - Current User and click OK to add the certificates snap-in to MMC.
You are returned to the Console dialog box and Certificates - Current User is added to the Console dialog box.
Under Console Root expand Certificates - Current User > Personal > Certificates. The self-signed certificate you created appears in the list of certificates.
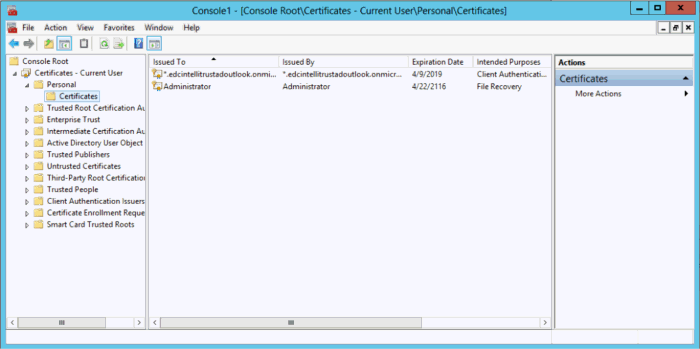
Right-click the self-signed certificate you created and select All Tasks > Export... The Certificate Export Wizard opens.
Note: You must export both the private key and the certificate. You cannot enable secure LDAP for a managed domain using a PFX that does not contain the certificate's private key.
Complete the following steps to complete the Certificate Export Wizard.
Click Next. The Export Private Key page appears.
Select Yes, export the private key and click Next. The Export File Format page appears.
Select Personal Information Exchange - PKCS #12 (.PFX) as the file format for the exported certificate.
Select Include all certificates in the certification path if possible.
Click Next. The Password page appears.
Type a password for your certificate in the Password field.
Retype to confirm the password.
Note: Record this password in a separate location. You will need to enter this password to access the certificate.
Click Next. The File to Export page appears.
Enter the file path, including the file name and location, where you want to export the certificate
–or–
Click browse to navigate to where you want to store the certificate and type the certificate name.
Click Save to return to the File to Export page.
Click Next.
Click Finish. A confirmation messaged appears and you are returned to the Console window.
Click OK.
Export secure LDAP certificate in .CER formatExport secure LDAP certificate in .CER format
In the Console window, reselect the certificate you created in Step 1: Obtain a certificate for secure LDAP to the managed domain.
Right-click the self-signed certificate you created and select All Tasks > Export... The Certificate Export Wizard opens.
Click Next and do the following to export the certificate in .CER format:
Click No, do not export the private key and click Next. The Export File Format page appears
Select DER encoded binary X.509 (.CER) as the format you want to use and click Next.
Browse to where you want to store the certificate, enter a name for the certificate.
Click Save to return to the File Export page.
Click Next.
Click Finish. A confirmation messaged appears and you are returned to the Console window.
Click OK.
Step 3: Enable secure LDAP for managed domain using Microsoft Entra ID.
Open a Web browser and navigate to the Azure portal at https://portal.azure.com. The Microsoft Azure page appears.
Click Manage Microsoft Entra ID. Sign in to Microsoft Entra ID.
In the Search box of the Microsoft Entra ID page, type domain services. A list of search results appears.
Select Microsoft Entra ID Domain Services from the search results. The Microsoft Entra ID Domain Services page appears.
Click the name of your managed domain to display the domain details.
Click Secure LDAP. The Secure LDAP settings appears.
Click Enable under Secure LDAP. An Allow secure LDAP access over the internet option appears.
Select Enable to allow secure LDAP over the internet.
Caution: Enabling secure LDAP access over the Internet makes your domain susceptible to password brute force attacks. Entrust recommends setting up a Network Security Group (NSG) to restrict access to only the desired source IP address range. See Lock down LDAPS access to your managed domain over the internet for assistance.
Browse to select the .PFX file with Secure LDAP certificate.
Type the Password to decrypt the .PXF file.
Click Save. A message appears stating that secure LDAP is being configured for the managed domain. You cannot modify the domain settings until you complete this operation.
Note: The operation takes 10-15 minutes to complete. If the provided secure LDAP certificate does not match the required criteria, secure LDAP for the directory is not enabled. A failure message also appears. If this occurs, retry the operation using a valid certificate.
Update the DNS servers as required. See the Microsoft Entra IS documentation.
Restart the Virtual machines in the network to apply the new DNS settings.
Enable password hash synchronization using the instructions provided in the following Microsoft Azure documentation:
For user accounts synchronized from an on-premises directory